Quantcast
Channel: It Ain't Boring
Viewing all 554 articles
Browse latest View live

PCF Controls – now I have my first PCF control, too

$
0
0


I was curious to see what writing an actual custom PowerApps component using the PowerApps Component Framework (PCF) would look like, but, up until a few days ago, there was always something in the way.  Now that I finally got some hands-on experience, it seems there are a few things which I wanted to share.

Overall, it does not look like this little experiment changed anything in my understanding of where PCF fits, who is going to use it, etc. So this other post is still relevant:

https://www.itaintboring.com/dynamics-crm/beyond-the-powerapps-component-framework/

Either way, what I wanted to try is to create a custom component that would replace a regular input box and add regular expression validation. So, for example, if I had it displayed for a field which is meant to represent a phone number, I would have an error when the phone number did not follow the 10-digits US/Canada format:

image

Here is how that control is configured on the form:

image

If you want to see the source code, you will find it on github:

https://github.com/ashlega/ITAintBoring.PCFControls/tree/master/Controls/ValidatedInputControl

Of course you could probably do the same differently by adding an event handler to a regular out-of-the-box control, and, in this particular case, maybe it would not be that much better or worse, but, again, it was all about trying out the PCF.

And, of course, there were a few takeaways.

1. This all requires some HTML/Javascript experience, or, at least, understanding

Of course it’s, actually, TypeScript, not even Javascript. But, really, it’s just a matter of catching up, and you don’t need to be a TypeScript expert to start writing PCF controls.

Still, there are other things. Part of the problem is that we are, essentially, adding our own HTML controls to the screen, so we have to somehow embed them into the familiar user experience. For example, in case with the regex validations it took me a little while to realize that the event listener I used there at first did not quite fit:

this.inputElement.addEventListener(“input“, this._refreshData);

Because this kind of validations should not happen until the focus moves somewhere else. So, instead, it had to be “blur” event:

this.inputElement.addEventListener(“blur“, this._refreshData);

Actually, I ended up using both just to make error handling a little more user-friendly.


2.  CSS styles – we cannot easily re-use out-of-the-box styles, not yet at least

Model-Driven Power Apps use certain styles to display controls. However, those styles are not automatically inherited by our own PCF controls. It’s possible to add references to your own css files and implement styling that way, but, of course, there is no guarantee out-of-the-box styles won’t change moving forward, in which case all those custom controls would start looking out of place again.

With this one, it turned out that, as I was trying to figure out how to handle the css in the community forums:

https://powerusers.microsoft.com/t5/PowerApps-Component-Framework/Custom-control-styling/m-p/293126#M254

Andrew Ly was hitting some of the same walls, so he submitted an idea you might want to vote for:

https://powerusers.microsoft.com/t5/PowerApps-Ideas/Idea-Harness-should-use-standard-CRM-font/idc-p/293148#M26433

Although, maybe there is more to it than fonts.

3. This one is very granular, but… if you are building a PCF control and if you don’t see your changes reflected, make sure to increase the version number

There is a version # in the control manifest file:

image

If you don’t change it for a new build, there is a 99.9% chance your changes won’t be reflected in the user interface once you import the solution, publish all, and reload the form where you have the control added. It’s possible they’ll show up later, but I did not have that much time to wait.

For that matter, don’t hesitate to ask questions in the community forum:

https://powerusers.microsoft.com/t5/PowerApps-Component-Framework/bd-p/pa_component_framework

It seems that the team behind PCF controls is, actually, monitoring that forum; and they are providing the answers where they can.

4. Build and deployment

Of course there is that ability to see your control outside of PowerApps/Dynamics using a test page. Have a look at the “debugging” here:

https://docs.microsoft.com/en-us/powerapps/developer/component-framework/create-custom-controls-using-pcf

However, if you wanted to publish your control in the PowerApps/Dynamics environment, there are a few additional steps involved:

  • Increasing the version number
  • Packaging everything into a solution file
  • Importing that solution


For this(with the exception of the version # so far), I ended up using a bunch of PowerShell scripts, and you’ll find those script in the “Deployment” subfolder here:

https://github.com/ashlega/ITAintBoring.PCFControls/tree/master/Controls

Those should be used along with the powershell library from the other project:

https://github.com/ashlega/ItAintBoring.Deployment

More on this in the next post, though


How to: package and deploy a PCF control without actually doing much (if anything)

$
0
0


While creating a PCF control I realized at some point that building and packaging it is taking time. More importantly, it’s taking time from the developer – I don’t mind if my laptop spent some time doing all the deployment, but why would I want to also baby sit this powerful machine?

So, basically, I wanted some magic to happen along the way so that what I had on the left side of the diagram below (specifically, all the source code) smoothly flew to the right side (model-driven app)

image

Of course there would be things I’d still have to do, such as creating an app and updating a form. But, as far as deployment goes, I’d like the packaging and deployment to happen seamlessly.

Therefore, PowerShell to the rescue!

Note: you still have to set up your environment first (nodejs, npm, etc)

Here is how you can get it all set up:

  • Get the contents of this git repository: https://github.com/ashlega/ItAintBoring.Deployment
  • Once it’s on your hard drive, update your system path environment variable so that it has a path to the “Setup” subfolder. Down below, the other scripts will need to be able to locate deployment.psm1, loader.ps1, and loadmodules.ps1
  • Then, you can close(or download) my sample PCF regex validation component: https://github.com/ashlega/ITAintBoring.PCFControls
  • Before you do anything else, update connection strings in the settings.ps1 (which you will find in the deployment subfolder)
  • image
  • Because of how that whole set of powershell scripts came about, both source and destination connection strings will need to be updated:
  • image

If you want, you can assign a value to the password variable instead of taking it from the console prompt every time.

Assuming you’ve done everything correctly and the environment had already been set up, you should be able to just run packageandimport.ps1, possibly enter the password, and, from there, you can just take a back sit and relax:

image

What the script will do is:

  • It will build the control
  • It will package that control into a solution
  • It will deploy that solution to Dynamics

In the current version you may want to review settings.ps1 and package.ps1 to see if there are any string constants you need to update (there is a relative path to the control folder, for example. It should work as is for the ValidatedInputControl)

If it’s one tab/window or if it’s multiple tabs/windows – the choice is yours. Although, you have to be in the UCI

$
0
0

I like the unified interface. I did not like it when it was introduced originally, but I don’t mind it at all the way it is now.

One thing I used to not like that much about the navigation in the recent versions of Dynamics is that whenever I clicked a lookup it would just open related record in the same window. That was quite annoying, since I would have to go back and forth in the browser. Personally, I would rather have all those links in separate tabs, since, normally, I have tens of different tabs open anyway:

image

It’s a bit of a mess, of course, but I find it convenient.

So, when we lost the ability to open links in the new tabs/windows, and I don’t even remember right now when exactly it happened, it was quite a disappointment. What I mean is that, while in the classic interface, a lookup link normally opens up in the same window.

It’s a little better with the grids since you can right click there and use “Open in a New Window” option:

image

Neither of that is good enough.

It turned out, though, that there is one interesting difference between the Classic Web Interface and Unified Interface since Unified Interface does support keyboard shortcuts properly:

image

Just use CTRL+CLICK, and that lookup link above will open in a new tab. Use SHIFT+CLICK, and you’ll see a new window.

Small as it is, but it’s been a time saver for the last few months, ever since I’ve realized those shortcuts work in the UCISmile


SharePoint integration for P2 Plan users

$
0
0


Before you read this post, here is the disclaimer: whatever I write below is my own interpretation which you may want to confirm with Microsoft.

Why is there a disclaimer? Well, I’m going to talk licensing below…

So, you know there are two different types of CDS (Dynamics CDS and regular CDS). I am not exactly sure what the technical difference is between those two, but, when you are creating a Dynamics 365 instance, you are getting Dynamics CDS. When you are creating a PowerApps environment, you are getting a regular CDS.

In the Dynamics CDS, you can deploy various Dynamics first-party applications. In the regular CDS, you can’t do that.

However, Sharepoint integration is not considered a first-party application. It’s a functionality included into the Dynamics CDS and not exposed in the regular CDS.

Outlook integration is slightly different, since there is a first-party application now. However, with the Outlook integration coming in Wave 2, it seems PowerApps Plan 2 users are going to be able to use it in the regular CDS as well.

In other words, from the licensing standpoint, it seems nothing should be stopping P2 Plan users from utilizing either of those features. Of course, that would only be possible if either of them were available in the corresponding CDS environment.

But is there anything that’s stopping a P2 user from working in the Dynamics environment? Not really, it seems. Moreover, if you look at some of the diagrams in the licensing guide, you’ll see that P2 license is fine in that sense:

https://www.itaintboring.com/dynamics-crm/wrapping-my-head-around-the-licensing-for-dynamics-powerapps/

Well, of course, normally Dynamics environments are supposed to have all those first-party apps. But they don’t have to, and, even if they do, P2 users don’t have to work with those applications or with the restricted entities introduced through them.

How about Sharepoint, then? The question that came up recently was, literally, how do we get Sharepoint in the regular CDS instance for a P2 user. Well, there seem to be no way, and it’s not even scheduled for Wave 2.

But, then, we can get a Dynamics CDS instance, add P2 user to that instance, and voila – here goes Sharepoint integration:

image

Well… How about server-side email integration? Here it is:

image

And, if you thought that would be enough, we are not done yet. Once that user is given “Outlook App” role:

image

We can add a Dynamics 365 App for Outlook to that user:

image

Just to summarize: there is a P2 plan user who now has access to the Sharepoint integration and who can use Dynamics App for Outlook.

I suspect there might be an extra cost per month since you may need at least one full Dynamics 365 license to get Dynamics CDS instance, but, it seems, the rest of your users can be licensed with P2 if they are not planning to use any of the Dynamics first-party apps, and they will still have access to Sharepoint/Outlook.

Btw, if I were writing this half a year ago, I would have to mention per-instance cost, too. Don’t have to do it this time, though, since Dynamics instance pricing is storage-based now.

A PCF subgrid to check off related items quickly

$
0
0


Sometimes, all we need from a subgrid is to show us the list of checkboxes.

For instance, imagine an inspection entity. A vehicle inspection maybe… Every inspection would have a list of standard inspection items associated with it. If only there were an easy way to check off all those items quickly.

Of course we can use an out-of-the-box editable subgrid, but, surprisingly, it does not support “checkboxes”. For the two-option fields, we will only be able to see yes/no dropdowns in such a subgrid.

That, of course, will make the whole process way more click-consuming than it should be.

So, what if we could do something like this:

pcfcheckboxlist

I probably can’t, really, call it a production-ready control yet since there are a few assumptions made there which are not too flexible:

  • The underlying view selected for the subgrid has to have exactly two columns
  • The first column would be anything, and the second column would be a two-option field
  • This control does not support paging, so the subgrid  should be set up to display enough rows
  • Those “pass”/”fail” are not configurable yet
  • There is no “add” button – the idea is that, in that example with vehicle inspections, all the “subitems” will be added to the parent record through a workflow so there is no need to add/delete anything using this control


And, besides, it might not reflow too well.

Actually, what I just wrote perfectly illustrates a couple of things:

  • PCF has great potential
  • However, PCF is for developers. Even more, if you want to get good results quickly, you may need good front-end developers

That said, the control above is functional, so, if you wanted to see the code and/or if you wanted to try the control, here is how you can do it.

There is a github repository: https://github.com/ashlega/ITAintBoring.PCFControls

You will find this control in the Controls/CheckBoxList subfolder

If you only wanted to download the solution file, you’ll find it here:

https://github.com/ashlega/ITAintBoring.PCFControls/tree/master/Controls/Deployment/Solutions

That solution file includes one more control, too (have a look at my other post: https://www.itaintboring.com/dynamics-crm/pcf-controls-now-i-have-my-first-pcf-control-too/ )

It should be easy to set it up(just remember to use a view with two columns – the first one for the “name” and the second one for the two-options field) :

image

The SOAP endpoint is dying – long live the Organization Service!

$
0
0


This post may have no practical meaning, really. Well, except, maybe, that the next time somebody tells you “Organization Service has been deprecated” you can say confidently that the rumors of its death have been greatly exaggerated.

I used to think that the Organization Service is going away, it’s getting replaced by Web API, and this was all based on the announcements like the one you can find here:

https://docs.microsoft.com/en-us/dynamics365/customer-engagement/developer/use-microsoft-dynamics-365-web-services

“The .NET assemblies for the Organization service currently use a 2011 SOAP endpoint which has been deprecated. The SDK assemblies will eventually be migrated to internally use the Web API instead of the 2011 SOAP endpoint.”

That used to give me shivers, since the Organization Service has proved to be very reliable and capable over the years. How could it possibly be deprecated and disappear without causing some kind of domino effect?

Earlier today, though, I read something that turned this all around:

“The Web API provides a RESTful programming experience but ultimately all data operations go through the underlying organization service.”

The quote above comes directly from this page: https://docs.microsoft.com/en-us/powerapps/developer/common-data-service/webapi/overview

How come WebAPI is using the Organization Service which is going to be deprecated? Is it all going to break down?

The answer was always right there, I just had to read those announcements carefully.

The Organization Service is going to stay. It’s the endpoint which is going to be deprecated… At least that’s what it sounds like if you keep in mind that all the announcements have always been about the SOAP endpoint, and not about the whole service.

I am not sure of whether the diagram below is 100% accurate, but it seems to be close enough to what all those links are talking about:

image

The diagram above shows current state.

And the diagram below shows future state:

image

The backend is not necessarily going anywhere. It’s the client side which is going to be updated – a few pieces will disappear, and, instead, everything will be rerouted through Web API. Which, in turn, will keep working with the Organization Service.

As I wrote at the beginning – there is not a lot of practical value in this knowledge except that, maybe, it adds a bit of peace of mind when you are thinking about what’s going to happen when the SOAP endpoint is finally taken away.

Other that that, the clock is still ticking: https://crmtipoftheday.com/1155/the-clock-is-ticking-on-your-endpoint/

Creating a custom PCF control for a subgrid – a few findings so far

$
0
0

When creating a custom PCF control for a subgrid, how do you display “add new item”, “quick find”, and other commands/actions/navigation items which you would normally see accompanying the subgrids on the forms?

clip_image002

That’s what I was recently asking in the community forums:

https://powerusers.microsoft.com/t5/PowerApps-Component-Framework/PCF-controls-for-specific-subgrid-columns/m-p/304895#M440

Once again, folks from the PCF team have raised to the challenge and provided the answer. It did not come without a few caveats, though.

When defining a dataset in the control manifest file, I can add the following attribute:

<data-set name=”tableGrid” display-name-key=”Table Grid” cds-data-set-options=” displayCommandBar:true;displayViewSelector:false;displayQuickFind:true”>…

This instructs model-driven form to display the command bar, not to display the view selector, and to display the quick find (they may have to be enabled when adding grid to the form in the designer, too).

This did not work at first, though, and I was getting the following error when trying to build the control:

Manifest validation error: instance.manifest.control[0].data-set[0].$ additionalProperty “cds-data-set-options” exists in instance when not allowed

This error, as it turned out, was caused by a setting in the ManifestSchema.json file located in the which the node_modules\pcf-scripts subfolder:

Manifestschema.json (which is in the node_modules\pcf-scripts subfolder) had this:

  “dataSetAttribs”: {
“type”: “object”,
“properties”: {
“name”: { “type”: “string” },
“display-name-key”: { “type”: “string” },
“description-key”: { “type”: “string” }
},
“required”: [“name”, “display-name-key”],
“additionalProperties”: false
},

Using “true” for additionalProperties did the trick – I was able to build the control, and I got the quick find & the command bard displayed on the form.

Well, if you look at the community thread I mentioned above, you’ll see this might not be supported in the future. Although, on the other hand, we can probably figure out how to add those parameters directly to the resulting customizations.xml file even if we can’t add them through the control’s manifest.

So far so good, but there are a few more things there.

The whole purpose of the control above was to basically display the same grid as usual except that I wanted to have a special on/off switch control for the two-options field.

If kind of worked, but, if you compare that screenshot above with the screenshot below, you’ll see how the second column is different now:

clip_image004

This is because my Quick Find view is not using the same set of columns as the original view, so, even though the control is expecting that there will be a Boolean attribute in the second column, and, normally, that’s how it is if the selected view is configured properly, that quick find (even though useful otherwise) starts breaking this perfect picture.

Can’t see any good solutions for this. I might add code to look at the column and only display that switch when it’s a two-options field, but, it seems, I’d have to re-create out-of-the-box rendering then(for all the different attribute types), and I’m not sure I’m really up to it. So, for now, I’ll probably just have to remove quick find.

As for the paging, it seems it has to be custom. As far as I can see, there is no way around it yet.

One other useful feature I did not realize was there is the ability to add default values to the parameters. If not for Guido Preite who provided the solution here: https://powerusers.microsoft.com/t5/PowerApps-Component-Framework/Default-values-for-quot-input-quot-properties/m-p/304561#M436, I might still be looking.

All I had to do is add default-value attribute to the control property:

<property name=”optionsMapping” display-name-key=”Options Mapping” description-key=”Options Mapping” of-type=”SingleLine.Text” usage=”input” required=”true” default-value=”True:True;False:False” />

Now that I have the command bar and I can add a default value… it seems it’s time to work on a few improvements for the CheckBoxList control since I need to:

  • Add a few configuration settings
  • Figure out what to do with the options that are now showing up in the dropdown below – I want the ability to add new items, but I’m not sure Show As and some other options make sense. Besides, there is no “delete”… which probably have something to do with my control not supporting item selections yet:

clip_image005

This is probably to be continued…

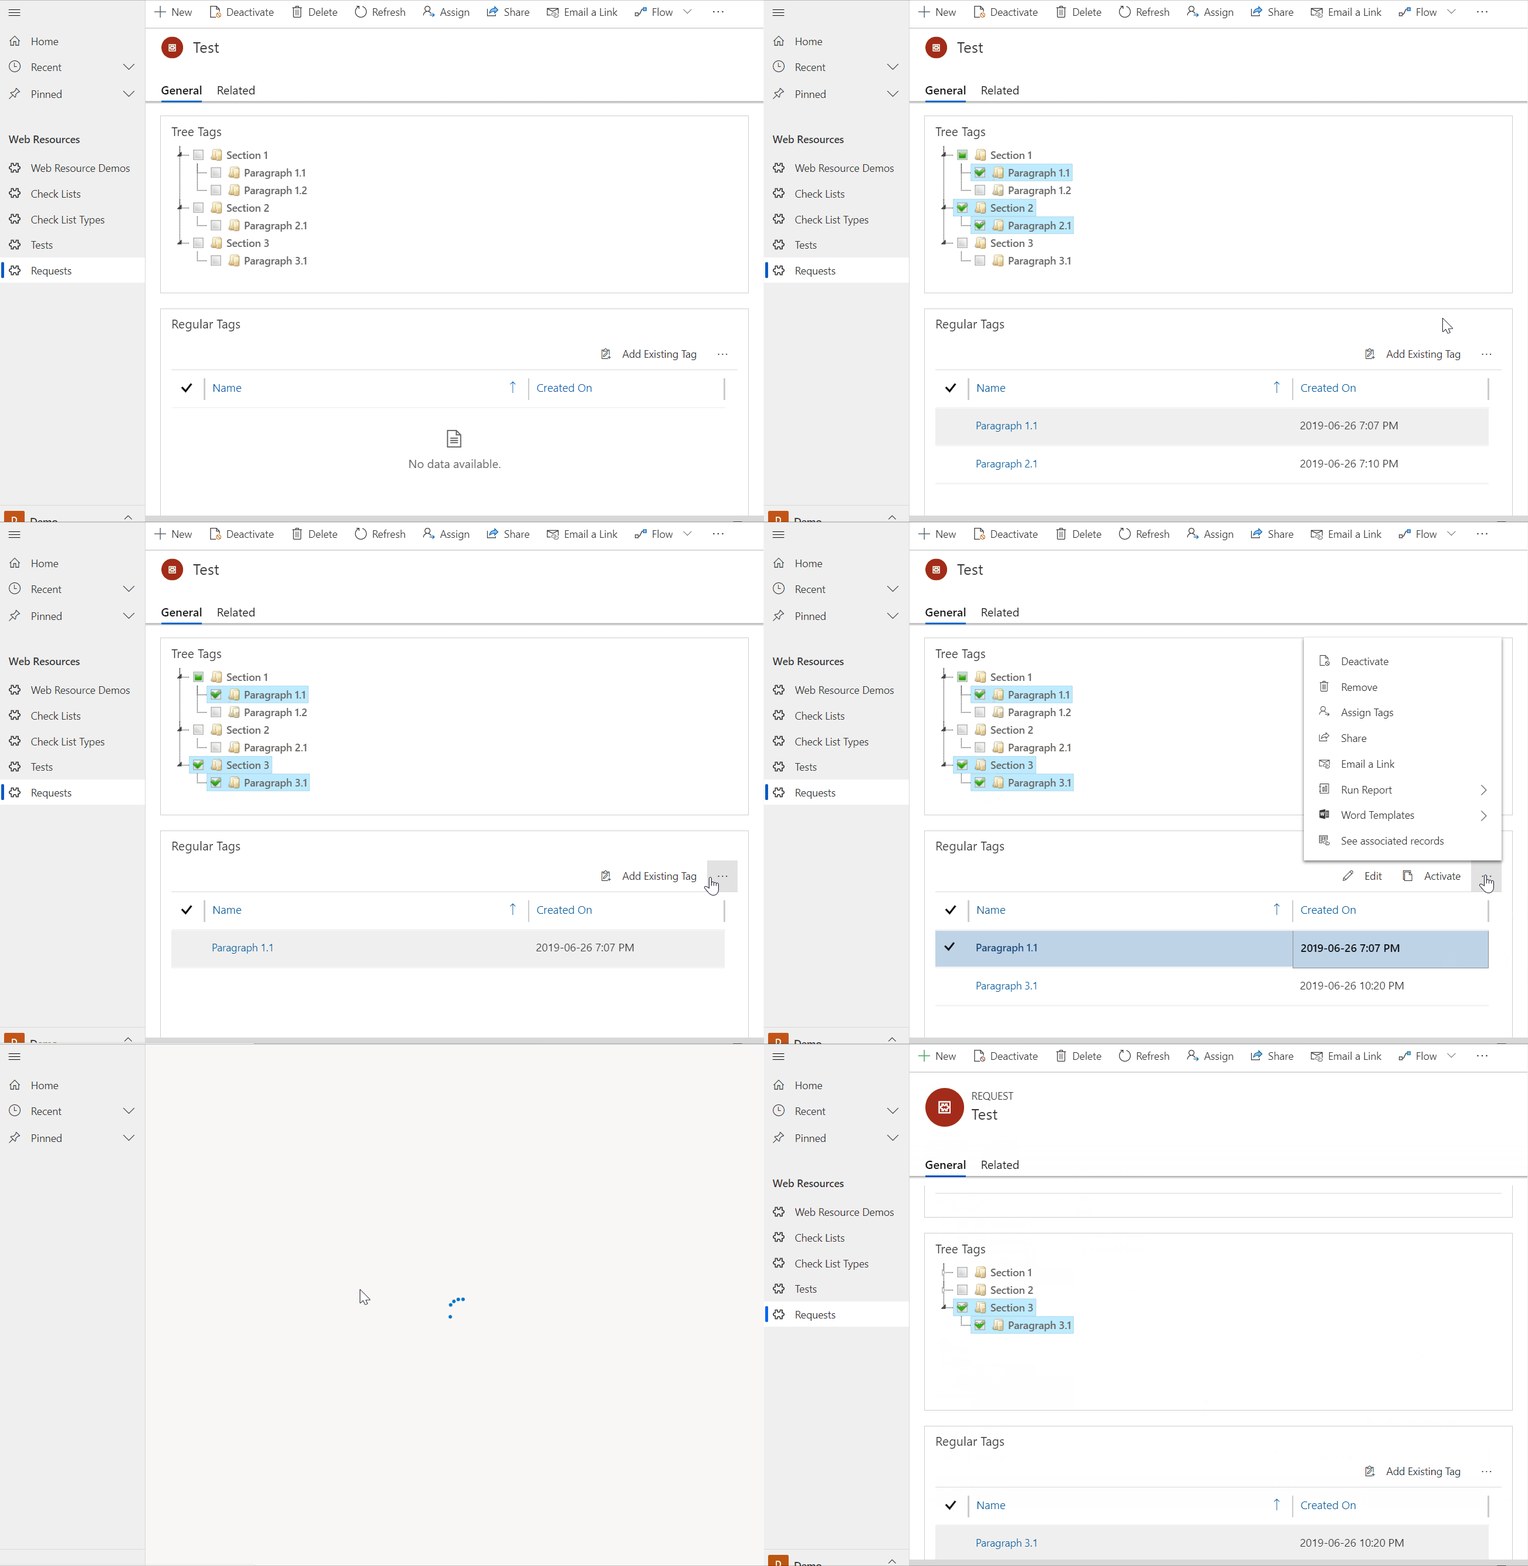
More checkboxes in PCF! As a TreeView this time

$
0
0


Did you ever have to tag records? What if we could organize those tags into a hierarchy, and, then, present them as a tree so the user could check off a few tags to identify the record?

Maybe it would look somewhat similar to this – at the top, there is a tree version, and at the bottom there is a usual subgrid:

And, yes, that’s PCF in action again.

If you wanted to try the control, you can download solution from github:

https://github.com/ashlega/ITAintBoring.PCFControls

There are two more controls there, and, if you need the source codes, they are all there as well.

But how do you set it up?

1. Create an entity for the tags

image

Set up a hierarchy for that entity by creating a self-referencing lookup field(see above) and making that a hierarchy relationship(see below):

image

The hierarchy is not required, but that’s what you can use later when you need to find all records “under” one of the parent tags, for example.

2. Create an N:N relationship between the entity you want to tag and the tags entity

image

3. Add a few tags, organize them into a hierarchy

image

4. Add a subgrid to the form for the entity you’ll be tagging

image

image

5. Set up Tree Relationships control for that subgrid

image

image

I think this can be improved a little more – technically, I might be able to get either the relationship name or the relationship entity name through a webapi call. For now, though, all 6 attributes should be set.

Save, publish, and enjoy the results.

PS. Any known issues you might ask? Right now, when selecting a section in the example above, all the paragraphs will be selected as well, but only the section tag will be linked to the record. And there is a similar issue around “deselecting”. That’s to be fixed soon.

PPS. Update (June 27) – that issue above has been fixed.


When the error message is lost in translations

$
0
0

Every now and then, I see this kind of error message in the UCI:

image

It may seem useful, but, when looking at the log file, all I can say is that, well, something has happened. Since all I can see in the downloaded log file is a bunch of callstack lines similar to the one below:

at Microsoft.Crm.Extensibility.OrganizationSdkServiceInternal.Update(Entity entity, InvocationContext invocationContext, CallerOriginToken callerOriginToken, WebServiceType serviceType, Boolean checkAdminMode, Boolean checkForOptimisticConcurrency, Dictionary`2 optionalParameters)

One trick I learned about those errors in the past is that switching to the classic UI helps. Sometimes. Since the error may look more useful there. Somehow, though, I was not able to reproduce the error above in the classic UI this time around, so… here is another trick if you run into this problem:

  • Open browser dev tools
  • Reproduce the error
  • Switch to the “Network” tab and look for the errors

There is a chance you’ll find a request that errored out, and, if you look at it, you might actually see the error message:

image

That said, I think it’s been getting better lately since there are errors that will show up correctly in the UCI. Still, sometimes the errors seem to be literally lost in translations between the server and the error dialog on the browser side, so the trick above might help you get to the source of the problem faster in such cases.

Public Preview of PowerApps Build Tools

$
0
0


Recently, there was an interesting announcement from the Power Apps Team:

image

https://powerapps.microsoft.com/en-us/blog/automate-your-application-lifecycle-management-alm-with-powerapps-build-tools-preview/

Before I continue, I wanted to quickly summarize the list of Azure DevOps tasks available in this release. Here it goes:

  • PowerApps Tools Installer
  • PowerApps Import Solution
  • PowerApps Export Solution
  • PowerApps Unpack Solution
  • PowerApps Pack Solution
  • PowerApps Set Solution Version
  • PowerApps Deploy Package
  • PowerApps Create Environment
  • PowerApps Delete Environment
  • PowerApps Copy Environment
  • PowerApps Publish Customizations

This looks interesting, yet I can’t help but notice that Wael Hamze had most of those tasks in his Build Tools for a while now:

https://marketplace.visualstudio.com/items?itemName=WaelHamze.xrm-ci-framework-build-tasks

Actually, I’ve seen a lot of different tools and scripts which were all meant to facilitate automation.

How about Scott Durow’s sparkle? (https://github.com/scottdurow/SparkleXrm)

Even I tried a few things along the way (https://www.itaintboring.com/tag/ezchange/, https://www.itaintboring.com/dynamics-crm/a-powershell-script-to-importexport-solutions-and-data/)

So, at the first glance, those tasks released by the PowerApps team might not look that impressive.

But, if that’s what you are thinking, you might be missing the importance of this release.

Recently, PowerApps team has taken a few steps which might all be indicating that the team is getting serious about “healthy ALM”:

  • Solution Lifecycle Management whitepaper was published in January
  • Solution history viewer was added to PowerApps/Dynamics
  • Managed solutions have become “highly recommended” for production (try exporting a solution from the PowerApps admin portal, and you’ll see what I’m talking about)

And there were a few other developments: Flows and Canvas Apps became solution-aware, solution packager was updated to support most recent technologies (Flows, Canvas apps, PCF), etc

The tooling, however, was missing. Of course there always used to be third-party tooling, but I can see how somebody in the PowerApps team decided that it’s time to create solid foundation for the ALM story they are going to build, and there can be no such foundation without suitable internal tooling.

As it is now, that tooling might not, really, be that superior to what the community has already developed in various forms by this time. But the importance of it is that PowerApps team is demonstrating that they are taking this whole ALM thing seriously, and they’ve actually stated pretty much that in the release announcement:

“This initial release is the first step towards a more comprehensive, yet simplified story around ALM for PowerApps. A story we will continue to augment by adding features based on feedback, but equally important – by continuing to invest in more training and documentation with prescriptive guidance. In other words, our goal is to enable our customers and partners to focus more on innovation and building beautiful, innovative apps and less time on either figuring out how to automate or perform daunting manual tasks that are better done automated.”

So… I’m eager to see how it’s going to evolve – it’s definitely been long overdue, and I’m hoping we’ll see more ALM from the PowerApps team soon!

PS. There is a link buried in that announcement that you should definitely read through as well: https://pabuildtools.blob.core.windows.net/docs/PowerApps%20Build%20Tools.htm  Open that page, scroll down almost to the bottom. There will be a “Tutorial”, and, right at the start of the tutorial, you’ll see a link to the hands-on lab. Make sure to download it! There is a lot of interesting stuff there which will give you a pretty good idea of where ALM is going for PowerApps.

Team development for PowerApps

$
0
0


Team development for Dynamics has always been a little vague topic.

To start with, it’s usually recommended to use SolutionPackager – presumably, that helps with the source control since you can unpack solution files, then pack them, then observe how individual components have changed from one commit to another. But what does it really give you? Even Microsoft itself admits that there is this simple limitation:

image

https://docs.microsoft.com/en-us/dynamics365/customer-engagement/developer/use-source-control-solution-files

In that sense you might, of course, use git to merge various versions of the solution component files, but that would not be different from manual editing which, as per the screenshot above, is only partially supported.

The only real merge solution we have (at least as of now) is deploying our changes to the target environment through a solution file or, possibly, re-applying them manually in that environment using a solution designer.

That might be less of a problem if all Dynamics/PowerApps source artefacts were stored in CDS. But, of course, they are not. Plugin source code and Typescript sources for various javascript web resources are supposed to be stored in the source control. And even more – the solution itself would better be stored in the source control just so we don’t lose everything when somebody accidentally deletes the PowerApps environment.

So what do we do? And why do we need to do anything?

Apparently, developers are used to the best development practices, and, so, there is no wonder they want to utilize the same familiar Git workflows with Dynamics/PowerApps.

I am not sure I can really suggest anything magical here, but, it seems, we still need a way to somehow incorporate solutions into the Git workflow which looks like this:

image


https://www.quora.com/What-is-the-difference-between-master-and-develop-branch-in-Git ( although, I guess the original source is not Quora)

Come to think of it, the only idea I really have when looking at this diagram is:

  • Creating a branch in Git would be an equivalent of creating a copy environment in Dynamics/CDS
  • Merging in Git would be an equivalent of bringing a transport solution and/or re-applying configuration changes from the corresponding feature development environment to the higher “branch” environment


That introduces a bunch of manual steps along the way, of course. Besides, creating a new environment in PowerApps is not free – previously, we would have to pay for each new instance. If your subscription is storage-based these days, then, at the very least, you need to ensure you have enough additional storage in your subscription.

And there is yet another caveat – depending on what it is you need to develop on the “feature branch”, you may also need some third-party solutions in the corresponding CDS environment, and those solutions may require additional licenses, too.

At the very least, we need two environments:

  • Production (logically mapped to the master branch in Git)
  • Development (logically mapped to the development branch in Git)


When it comes to feature development, there might be two scenarios:

  • We may be able to create a separate CDS environment for feature development, in which case we should also create a source code branch
  • We may not be able to create a separate CDS environment for feature development, in which case we should not be creating a source code branch


Altogether, the whole workflow might look like this:

image

We might create a few more branches for QA and UAT – in that case QA, for example, would be in place of Master on the diagram above. From QA to UAT to Master it would be the same force push followed by build and deploy.

Of course there is one remaining step here, which is that I need to build out a working example, probably in devops…

PS. On the other hand, if somebody out there reading this post has figured out how to do “merge” of the unpacked solution components in the source control without entering the “unsupported area”, maybe you could share the steps/process. That would be awesome.


Power Apps ALM with Git (theory)

$
0
0

I’ve been definitely struggling to figure out any kind of sane “merge” process for the configuration changes, so I figured I’d just try to approach ALM differently using the old good “master configuration” idea (http://gonzaloruizcrm.blogspot.com/2012/01/setting-up-your-development-environment.html)

Here is what I came up with so far:

image

  • There are two repositories in Git: one for the code, and another one for the unpacked solution. Why two repos? We can use merge in the code repository, but we can’t, really, use merge in the solution repository. Instead, it’ll have to be “push –force” to the master branch in that repo so the files are always updated(not merged) with whatever comes from the Dev instance. Am I overthinking it?
  • Whenever there is a new feature to develop, we should apply configuration changes in the main DEV instance directly. The caveat is that they might be propagated to the QA/UAT/PROD before the feature is 100% ready, so we should try to isolate those changes through new views/forms/applications. Which we can, eventually, delete (And, since we are using managed solutions in the QA/UAT/PROD, “delete” will propagate to those environments through the managed solution)
  • At some point, once we are satisfied with the configuration, we can push (force) it to the solution repo. Then we can use a devops pipeline to create a feature Dev instance from Git. We will also need to create a code branch
  • In that feature Dev instance, we’ll only be developing code (on the feature code branch)
  • Once the code is ready, we will merge it with the master branch, will refresh Feature Dev instance from the main Dev Instance, will register required SDK steps and event handlers in the main DEV instance, and we will update solution repo. At this point the feature might be fully ready, or we may have to repeat the process again (maybe a few times)

We might utilize a few devops pipelines there:

  • One pipeline to create an instance, deploy a solution, and populate sample data in the Feature Dev instance (to use when we are starting to work on the code for the feature)
  • Another pipeline to push (force) unpacked managed/unmanaged DEV instance solution to GIT. This one might be triggered automatically whenever “publishall” event happens. Might try using a plugin to kick off the build
  • Another pipeline to do smoke tests with EasyRepro in the specified environment (might run smoke tests in Feature Dev, but might also run them in the main Dev)
  • And yet another pipeline to deplo managed solution to the specified environment (this one might be a gated release pipeline if I understand those correctly)

CI/CD for PowerPlatform, round #3

$
0
0


In the two of my recent posts, I tried approaching CI/CD problem for Dynamics, but, in the end, I was obviously defeated by the complexity of either of those two approaches. Essentially, they were both artificial since both assumed that we can’t use source control merge.

If you are wondering what those two attempts were about, have a look at these posts:

https://www.itaintboring.com/dynamics-crm/team-development-for-powerapps/

https://www.itaintboring.com/dynamics/power-apps-alm-with-git-theory/

Although, I really think neither of the models are viable, which is unfortunate of course.

This is not over yet – I’m still  kicking here, so there goes round #3.

image

The way I see it, we do need source control merge. Which might not be easy to do considering that we are talking about XML files merge, but I don’t think there is any other way. If we can’t merge (automatically, manually, or semi-automatically), the whole CI/CD model starts breaking apart.

Of course the problem with XML merge (whether it’s manual or whether it’s done through the source control) is that whoever is doing it will need to understand what they are doing. Which really means they need to understand the structure of that XML.

And then, of course, there is that long-standing concept of “manual editing of customizations.xml is not supported”.

By the way, I’m assuming you are familiar with the solution packager:

https://docs.microsoft.com/en-us/dynamics365/customer-engagement/developer/compress-extract-solution-file-solutionpackager

So, to start with, I am going to cheat here.

Manual editing might not be quite supported, but how would anyone know that I’ve edited a file manually if that file has been imported into the Dynamics/PowerPlatform instance?

In other words, imagine that we’ve gone through the automated or manual merge, packaged the solution, and imported that solution into the CDS instance:

image

What do we have as a result?

We have a solution file that can be imported into the CDS instance, and, so, from the PowerPlatform standpoint it’s an absolutely valid file.

How do we know that the merge went well from the functional standpoint? The only way to prove it would be to look at our customizations in the CDS instance and see if the functionality has not changed. Why would it change? Well, we are talking about XML merge, so who knows. Maybe the order of the form tabs has changed, maybe a section has become invisible, maybe we’ve just managed to remove a field from the form somehow…

Therefore, when I wrote that I am going to cheat, here is what I meant:

  • I am going to use XML merge and assume it’s “supported” if solution import works
  • In order to cover that regression question, I am going to test the result of the merge by using a UI testing framework. Since we are talking about PowerPlatform/Dynamics, I’ll be using EasyRepro


Finally, I am going to assume that the statements above are included into my “definition of done” (in SCRUM terms). In other words, as long as the solution import works fine and the result passes our regression tests, we can safely release that solution into the QA.

With that in mind, let’s see if we can build out this process!

The scenario I want to cover is:

There is a request to implement a few changes in the solution. Specifically, we need to create a new entity, and we also need to add a field to an existing entity (and to a specific form). Once the field is added, we need to update existing javascript web resource so that an alert is displayed if “test” is entered into that new field.

To complicate thing, let’s say there are two developers on the team. The first one will be creating a new entity, and the other one will be adding a field and updating a script.

At the moment, unpacked version of our ContactManagement solution is stored in the source control. There are a few environments created for this exercise – for each of those environments there is a corresponding service connection in DevOps:

image

The first developer will be using DevFeature1 environment for Development, and TestFeature1 environment for automated testing.

The second developer will be using DevFeature2 environment for development and TestFeature2 for automated testing.

Master branch will be tested in the TestMaster environment. Once the changes are ready for QA, they will be deployed in the QA environment.

Of course, all the above will be happening in Azure DevOps, so there will be a Git repository, too.

To make developers life easier, there will be 3 pipelines in DevOps:

  • Export and Unpack – this one will export solution from the instance, unpack it, and store it in the source control
  • Build and Test – this one will package solution back into a zip file, import it into the test environment as a managed solution, and run EasyRepro tests. It will run automatically whenever a commit happens on the branch
  • Prepare Dev – similar to “Build and Test” except that it will import unmanaged solution to the dev environment and won’t run the test


Whenever a task within either of those pipelines tasks need a CDS connection, it will be using branch name to identify the connection. For example, the task below will use DevFeature1 connection whenever the pipeline is running on the Feature1 branch:

image

There is something to keep in mind. Since we will need unmanaged solution in the development environment, and since there is no task that can reset environment to a clean state yet, each developer will need to manually reset corresponding dev environment. That will likely involve 3 steps:

  • Delete the environment
  • Create a new one and update / create a connection in devops
  • Use “Prepare Dev” pipeline on the correct branch to prepare the environment


So, let’s say both developers have created new dev / test environments, all the connections are ready, and the extracted/unpacked solution is in the source control. Everyone is ready to go, but Developer #1(who will be adding a new form) goes first. Actually, let’s call him John. Just so the other one is called Debbie.

Assuming the repository has already been cloned to the local, let’s pull the master and let’s create a new branch:

  • $ git pull origin master
  • $ git checkout -b Feature1

At this point John has full copy of the master repository in the Feature1 branch. However, this solution includes EasyRepro tests. EasyRepro, in turn, requires a connection string for the CDS instance. Since every branch will have it’s own test environment, John needs to update connection string for Feature1 branch. So he opens test.runsettings file and updates connection parameters:

image

Now it’s time to push all these change back to the remote repository so John could use a pipeline to prepare his own dev instance.

  • $ git add .
  • $ git commit –m “Feature1 branch init”
  • $ git push origin Feature1

There is, now, a new branch in the repo:

image

Remember that, so far, John has not imported ContactManagement solution to the dev environment, so he only has a few default sample solutions in that instance:

image

So, John goes to the list of pipelines and triggers “Prepare Dev” on the Feature1 branch:

image

As the job starts running, it’s checking out local version of Feature1 branch on the build agent. Which is important since that’s exactly the branch John wants to work on:

image

It takes a little while, since the pipeline has to repackage ContactManagement solution from the source control and import it into the DevFeature1 instance. In a few minutes, the pipeline completes:

image

All the tasks completed successfully, so John opens DevFeature1 instance in the browser to verify if ContactManagement solution has been deployed, and, yes, it’s there:

image

And it’s unmanaged, which is exactly what we needed.

But what about Debbie? Just as John started working on his sprint task, Debbie needs to do exactly the same, but she’ll be doing it on the Feature2 branch.

  • $ git checkout master
  • $ git pull origin master
  • $ git checkout –b Feature2
  • Prepare dev and test instances for Feature2
  • Update test.runsettings with the TestFeature2 connection settings
  • $ git add .
  • $ git commit –m “Feature2 branch init”
  • $ git push origin Feature2


At this point the sources are ready, but she does not have ContactManagement solution in the DevFeature2 instance yet:

image

She starts the same pipeline, but on the Feature2 branch this time:

image

  • A couple of minutes later, she has ContactManagement solution deployed into her Dev instance:image


Just to recap, what has happened so far?

John and Debbie both have completed the following 3 steps:

image

They can now start making changes in their dev instances, which will be a topic of the next blog post.

Contents:


CI/CD for PowerPlatform: Making changes and merging

$
0
0


Now that John and Debbie have there own dev/test instances, and they also have their own development branches in Git (Feature1 for John, Feature2 for Debbie), it’s time for them to start making changes.

John was supposed to add a new entity, so let’s just assume he knows how to do that in the solution designer. Here is how the solution looked like when Feature1 branch was created:

image

And below is how the solution looks like in DevFeature1 instance once John has finished adding that entity:

image

John has added that entity to the “Contact Management” application, too, so we can see it on the screenshot below:

image

Technically, John might have stopped here and just all those changes to the master branch. However, what if John is not the only one who was working on the new Features all this time? Maybe the master branch has already been updated. Besides, Debbie will be in this situation just a few pages later since she will have to apply her changes on top of what John has done so far.

Therefore, it’s time to tackle that merge issues, and, as I mentioned before, here is how I’m going to approach it:

  • I am going to use XML merge and assume it’s “supported” if solution import works
  • In order to cover that regression question, I am going to test the result of the merge by using a UI testing framework. Since we are talking about PowerPlatform/Dynamics, I’ll be using EasyRepro


In other words, what John needs to do at this point is:

  • He needs to add a UI test to cover the feature he just implemented. When it’s time for Debbie to add her changes, she will be able to test merge results against John’s test to ensure she does not break anything
  • John also need to test his changes against all the tests that have been created so far


To do that, John will need to ensure that he is on the Feature1 branch first:

image

If not, the following git command will do it:

$ git checkout Feature1

There is a test project in the repository which John needs to open now:

image

Not to make it overly complicated, John will add a test to verify that a new record of “New Entity” type can be created in the application.

The easiest way to do it would be to create a copy of the existing “Create Tag” test – that can be done in the Visual Studio through the usual copy-paste. And, then, there would be a few changes in the code (to update C# class name and to change the entity name that the code will be using):

image

Once the test is ready, John should run all ContactManagement tests against his dev instance right from the Visual Studio. For that, he will need to use different instance url, so he could use a local test.runsettings file instead of the one used by default. He can do that in the Visual Studio under Test->Test Settings menu:

image

Turns out there is no problem – both the existing and the new test pass, so John’s changes are good from the regression perspective, and they should also help to ensure that, whoever is making changes next, will be able to confirm the feature John just implemented is still working as expected:

image

Now that there is a test John needs export solution from DevFeature1 and unpack it on the Feature1 branch.

  • To export and unpack the solution, John can use “Export and Unpack” pipeline:

image

Once the job completes, John can have a quick look at the repository to double check if the changes have been added there:

image

ita_newentity is there on Feature1 branch. And it’s not there on the master, which is how it should be at this point:

image

So now John needs to do a few things:

    • Bring over remote Feature1 changes into his local Feature1
    • Merge Master changes into Feature1
    • Commit changes on the Feature1 branch and re-test
    • Commit changes to Master and re-test on the
      Master


  • $ git add .
  • $ git commit –m “New Entity Test”
  • $ git pull origin Feature1


Once John issues the last command, solution changes will be brought over to the local Feature1:

image

Time to merge with the master then.

  • $ git checkout master
  • $ git pull origin master
  • $ git checkout Feature1
  • $ git merge master


In other words, checkout the master and bring over remote changes to the local. Checkout Feature1 and merge in the master.

John can, now, push Feature1 to the remote:

$ git push origin Feature1

Finally, John can go to the DevOps and run “Build and Test” pipeline on the Feature1 branch to see how automated regression test works out on the merged managed solution:

image

Once the job completes, John should definitely check if the tests passed. They are this time:

image

image

And, just to give himself a bit of extra piece of mind, he can also go to the TestFeature1 instance to see that the managed solution has been installed, and, also, that NewEntity is there:

image

image

What’s left? Ah, yes… John still needs to push his changes to the master branch.

So:

  • $ git checkout master
  • $ git pull origin master
  • $ git merge Feature1
  • $ git push origin master


John’s “New Entity” is on the master branch now, yet Build and Test pipeline has kicked in automatically since there were changes committed to the master branch:

image

That pipeline is now installing managed solution (from the master branch) to the TestMaster environment.

That takes a little while, but, after a few minutes, John can confirm (just like he did previously with TestFeature1) that New Entity is in the TestMaster now:

image

And the tests have passed:

image

Actually, as a result of this last “Build and Test” run, since it ran on the master branch, two solution files were created and published as artifacts:

image

They can now be used for the QA/UAT/Prod.

John can now move on to his next assignment, but I wanted to summarize what has happened so far:

image

As a takeaway so far(before we get to what Debbie has to do now) I need to emphasize a few things:

  • John certainly had to be familiar with Git. It would be difficult for him to go through the steps above without knowing what git can do, how it can do it, what the branches are, etc
  • He also was familiar with EasyRepro, and that’s why he could actually create that additional test for the feature he was working on


Still, as a result of all the above, John was actually able to essentially bring his changes to the TestMaster instance using git merge, DevOps pipelines, and automated testing. Which means his CI/CD process is much more mature than what I, personally, used to have on most of my projects.

Let’s see how it works out for Debbie (she is on Feature2 branch, and she still needs to add new field to the Tag entity, and, also, to make a change in the related web resource)

Contents:


Using Admin powershell cmdlets with PowerPlatform

$
0
0

There is a bunch of useful admin cmdlets we can use with the PowerPlatform, but, as it turned out, they can be a little tricky.

As part of the CI/CD adventure, I wanted to start using those admin scripts to create/destroy environments on the fly, so here is what you may want to keep in mind.

Do make sure to keep the libraries up to date by installing updated modules

Install-Module -Name Microsoft.PowerApps.Administration.PowerShell -force
Install-Module -Name Microsoft.PowerApps.PowerShell -AllowClobber –force

EnvironmentName parameter means GUID, not the actual display name

For example, in order to remove an environment you might need to run a command like this:

Remove-AdminPowerAppEnvironment -EnvironmentName 69c2da9a-736b-4f09-9b5c-3163842f539b

You may not be able to change environment display name if there is a CDS database created for the environment

image

I believe this is because the additional “ID” you see in the name of such environments identifies environment url:

image

image

Sometimes it helps to see how your environment looks like from the PowerShell standpoint

You can run these two commands to get those details:

$env = Get-AdminPowerAppEnvironment “*prod”

$env

image

Finally, if you are receiving an error, adding –Verbose switch to the command may help

image


MFA, PowerApps, XrmTooling and XrmToolbox

$
0
0


If you are working in the online environment where authentication requirements have started to shift towards the MFA, you might be noticing that tools like XrmToolBox (or even the SDK itself) are not always that MFA-friendly.

To begin with, MFA is always interactive – the whole purpose of multi-factor authentication is to ensure that you are who you are, not just somebody who managed to steal your username and password. Hence, there are additional verifications involved – be that an SMS message, an authenticator app on the phone, or, if you are that unlucky, a custom RSA token validation.

There are different ways to bypass the MFA.

If your organization is willing to relax security restrictions,  you might get legacy authentication enabled, so you would be able to get away authenticating the old way – by providing a login/password within the connection string. Having had some experience with this, I think this solution is not quite viable. Security groups within the organizations will be cracking down on this approach, and, sooner or later, you may need something else.

Besides, MFA is not, always, Azure-based. In the hybrid environments where authentication is done through the on-premise ADFS, there could be other solutions deployed. To be fair, having to figure out how to connect XrmToolBox to the online org in this kind of environment is exactly why I ended up writing this blog post.

But the final explanation/solution is applicable to the other scenarios, too.

To be more specific, here is the scenario that did confuse XrmToolBox to the point of no-return:

image

It was all working well when I was connecting to CDS in the browser, but, as far as XrmToolBox was concerned, somehow it just did not want to work with this pattern.

The remaining part of this post may include some inaccuracies – I am not a big specialist in OAuth etc, so some of this might be my interpretation. Anyway, how do we make everything work in the scenario above?

This is where we need to look at the concept of OAuth applications. Basically, the idea is that we can register an application in the Azure AD, and we can give permissions to that App to use Dynamics API-s:

https://docs.microsoft.com/en-us/powerapps/developer/common-data-service/walkthrough-register-app-azure-active-directory

This would be great, but, if we wanted to bypass all the 2FA above, we would have to, somehow, stop using our user account for authentication.

Which is why we might register a secret for our new Azure App. However, application secrets are not supported in the XrmTooling connection strings:

https://docs.microsoft.com/en-us/dynamics365/customer-engagement/developer/xrm-tooling/use-connection-strings-xrm-tooling-connect

So, what was the point of registering an app you may ask?

There is another option where we can use a certificate instead, and you may want to have a look at the following page at some point:

https://docs.microsoft.com/en-us/powerapps/developer/common-data-service/authenticate-oauth

If you look at the samples there, here is how it all goes:

image

It’s a special AuthType (“Certificate”), and the whole set up process involves a few steps:

  • Registering an application in Azure AD
  • Uploading a certificate (I used one of those I had in the certificate store on my windows laptop. It does not even have to be your personal certificate)
  • Creating an application user in CDS
  • Creating a connection string for XrmToolBox


To register an app, you can follow one of the links above. Once the app is registered, you can upload the certificate – what you’ll see is a thumbprint which you will need to use in the connection string. Your XrmTooling client, when connecting, will try to find that certificate on the local machine by the thumbprint, so it’s not as if you would able to use the thumbprint (as a password) without the certificate.

While trying to make this work, I’ve uploaded a few certificates to my app, so here is how it looks like:

image

What’s that with the application user in CDS? I think I heard about it before, I just never realized what’s the purpose of this. However:

  • Application users are linked to the Azure applications
  • They do not require a license


How do you create one? In the CDS instance, go to Settings->Security->Users and make sure to choose “Application Users” view:

image

Surprisingly, you will actually be able to add a user from that view and the system won’t be suggesting that you need to do it through the Office admin center instead. Adding such a user is a pretty straightforward process, you just need to make sure you are using the right form (Application User):

image

For the email and user name, use whatever you want. For the application ID, make sure to use the actual application ID from the Azure AD.

Don’t forget to assign permissions to that user (in my case, I had to figured I’d have that user as System Admin)

Once you have reached this point, the rest is simple.

Go to the XrmToolBox and start creating a new connection. Make sure to choose “Connection String” option:

image

Set up the connection string like this (use your certificate thumbprint and your application’s appid):

image

Click next, give that connection some name, and voila… You should be able to connect without the MFA under that special application user account now.

Filtered N:N lookup

$
0
0

If you ever tried using out of the box N:N relationships, you may have noticed that, out of the box, we cannot filter the lookups when adding existing items to the relationship subgrids.

In other words, imagine you have 3 entities:

  • Main entity
  • Complaint entity
  • Finding entity

Main entity is the parent entity for the other two. However, every complaint may also be linked to multiple findings and vice versa… Although, that linkage should only be done within the main entity – if there are two main records, it should only be possible to link complaints and findings related to the same main record.

Which is not how it works out of the box. I have two main records below, the first one has 2 complaints and two findings, and the second one has one complaint and one finding:

image

image

image

There is an N:N between Findings and Complaints, so what if I wanted to link Complaint #1 on the first main record to both of the findings for the first main record?

That’s easy – open the complaint, open related findings, click “add existing” and…

image

Wait a second, why are there 3 findings?

Let’s try it the other way around – let’s open Finding #1 (first), and try adding complaints:

image

Only two records this time and both are related to the correct main record?

The trick is that there is a custom script to filter complaints. In essence, that script has been around for a while:

https://www.magnetismsolutions.com/blog/paulnieuwelaar/2018/05/17/filter-n-n-add-existing-lookup-dynamics-365-v9-supported-code

It just did not seem to work “as is” in the UCI, so there is an updated version here:

https://github.com/ashlega/ItAintBoring.FilteredNtoN/blob/master/FilteredNtoN.js

All the registration steps are, mostly, the same. There are a couple of adjustments, though:

You can use the same script for all N:N relationships, but, every time you introduce a new relationship, you need to update the function below to define the filters:

image

For every N:N relationship you want to start filtering, you will need to add one or two conditions there since you may be adding, in my example above, findings to complaints or complaints to findings. Hence, it’s the same relationship, but it can be one or the other primary entity, and, depending on which primary entity it is, there will be different filters.

When configuring command in the ribbon workbench (have a look at that original post above), there is one additional parameter to fill in – that’s the list of relationships for which you want entity lookup to be filtered:

image

In the example above, it’s just one relationship. But it could be a comma-separated list of relationships if I wanted complaint entity to be filtered for different N:N-s.

That’s about it… There is, also, a demo solution with those 3 entities(+the script) which you can import to try it all out:

https://github.com/ashlega/ItAintBoring.FilteredNtoN/blob/master/DemoFilteredSelector_1_0_0_0.zip

CI/CD for PowerPlatform: Developing Feature2

$
0
0


Almost a month has passed since the previous post on the DevOps topic, so, the imaginary “Debbie” developer has left the project, and, it seems, I have to finish development of that second feature myself… Oh, well. Let’s do it then!

(Tip: if you have no idea what I am talking about above, have a look at the previous post first)

1. Run Prepare Dev to prepare the dev environment

clip_image002

2. Review the environment to make sure unmanaged solution is there

clip_image004

3. Add new field to the Tag entity form

clip_image005

4. Run Export and Unpack pipeline on the Feature2 branch

This is to get those changes above pushed to the Feature2 branch

5. Make sure I am on Feature2 branch in the local repository

git checkout Feature2

Since I got some conflicts, I’ve deleted my out-of-sync Feature2 first:

git checkout master
git branch -D Feature2
git checkout Feature2
git pull origin Feature2

6. Update the script

At the moment of writing, it seems PowerApps Build Tools do not support solution packager map files, so, for the JS files and plugins (which can be built separately and need to be mapped), it’s done a little differently. There is a powershell script that actually copies those files from their original location to where they should be in the unpacked solution.

In case with the script I need to modify, the script itself is in the Code folder:

clip_image006

clip_image007

The way that script gets added to the solution as a webresource is through the other script that runs in the build pipelines:

clip_image009

So, if I had to add another web resource, I would do this:

  • Open solution in PowerApps
  • Add a web resource
  • Run Export and Unpack pipeline on the branch
  • Pull changes to the local repo
  • Figure out where the source of my new web resource would be (could be added to the same Code subfolder above)
  • Update replacefiles.ps1 script to have one more “Copy-Item” line for this new web resource


Since I am not adding a script now, but, instead, I need to update the script that’s there already, I’ll just update existing tagform.js:

clip_image010

7. Commit and push the change to Feature2

git add .
git commit –m “Updated tagform script”
git push origin Feature2

8. Run Prepare Dev build pipeline on Feature2 branch to deploy updated script

This is similar to step #1

Note: the previous two steps could be done differently. I could even go to the solution in PowerApps and update the script there if I did not need/want to maintain the mappings, for example.

9. Now that the script is there, I can attach the event handler

clip_image011

10. Publish and test

clip_image013

11. Run Export and Unpack pipeline on the Feature2 branch to get updated solution files in the repository

12. Pull changes to the local Feature2 branch

git checkout Feature2
git pull origin Feature2

13. Merge changes from Master

git checkout Master
git pull origin Master
git checkout Feature2
git merge –X theirs master
git push origin Feature2

14. Retest everything

First, run Prepare Dev pipeline on the Feature2 branch and review Feature 2 dev manually

At this point, you should actually see New Entity from Feature1 in the Feature 2 dev environment:

clip_image014

Then, run Build and Test pipeline on the Feature2 branch and ensure all existing tests have passed.

15. Finally, merge into Master and push the changes

git checkout master
git merge –X theirs Feature2
git push origin master

16. Build and Test pipeline will be triggered automatically on the master branch – review the results

Ensure automated tests have passed

Go to the TestMaster environment and do whatever manual testing is needed


Contents:

Flow and workflow permissions in CDS

$
0
0


Funny how you hope you know stuff, and, then, you discover something very basic that’s not working the way you’d think it would.

That’s my life, though.

I was having a hard time trying to figure out why a user with Sales Manager permissions can use a link to access a Flow I created. And not only to access it, but, also, to modify it and to save those changes.

No, that flow would not show up under flows:

image

image

However, if that user knew what the link is to the flow, they would be able to open the flow and edit it:

image

A little weird you’d think? Well…

My Sales Manager user account had only “Sales Manager” role assigned to it. So, I tried something else – I went to the environment to have a look at the workflows under that user account, and, to my surprise, I could actually activate and deactivate pretty much any of the classic workflows:

image

Turned out it’s all about how the role is set up:

image

Sales Manager role allows “write” access to the process (which is also “workflows”, and which is also “Flows”) records in the user’s business unit.

In this environment, there is only one business unit, so, even though the workflows and flows are created by system admin and/or deployed through the solutions, a lot of non-admin users might end up having access to those flows just because they have permissions out-of-the-box.

How do you mitigate this?

There seem to be a few options:

  • Tweak your security roles so that BU-write on the workflows is not allowed. For example, here is how SalesPerson role is dealing with this:image
  • Although, maybe your users want to have access to each other’s workflows/flows, in which case you might create a child BU and move all non-admin/non-customizer users into that BU instead. once they are there, they can still share workflows in their BU, but they wan’t be able to update system workflows anymore


Either of that would work for both Flows and Workflows.

PCF Control Manifest file setting that’s easy to ignore

$
0
0


It’s been a little while since I noticed that my treeview checkbox control stopped working, so I was eager to see what’s going on. Finally, got to look into it today, and it turned out there is a settings in the control manifest file that I overlooked before.

Normally, when creating a web resource, we would be using Xrm client-side library. With the PCF controls, it seems the idea is that we should be using context.webAPI instead:

https://docs.microsoft.com/en-us/powerapps/developer/component-framework/reference/webapi

Mind you, not everything is available there that we may need, so, while creating the control, I ended up using a mix of context.webAPI where I could and Xrm where I could not.

It was working fine until it broke, though I am not sure when did it happen exactly. Either way, when looking at it in the chrome dev tools earlier today, I noticed that webAPI was not properly initialized for some reason:

Fast forward, it turned out if we want to use webAPI, we need to enable related feature in the control manifest as per this page:

https://docs.microsoft.com/en-us/powerapps/developer/component-framework/manifest-schema-reference/uses-feature

<feature-usage> <uses-feature name=”WebAPI” required=”true” /> </feature-usage>

And, of course, once I have added WebAPI feature to the manifest and rebuilt the control, it all started to work again. Guess there was an update at some point, but this is what previews are forSmile

What other features are available, though? To see that, go to the page below:

https://docs.microsoft.com/en-us/powerapps/developer/component-framework/manifest-schema-reference/feature-usage

At the moment of writing this post, here is the list of features that can be added to the manifest:

<feature-usage>
    <uses-feature name="Device.captureAudio" required="true" />
    <uses-feature name="Device.captureImage" required="true" />
    <uses-feature name="Device.captureVideo" required="true" />
    <uses-feature name="Device.getBarcodeValue" required="true" />
    <uses-feature name="Device.getCurrentPosition" required="true" />
    <uses-feature name="Device.pickFile" required="true" />
    <uses-feature name="Utility" required="true" />
    <uses-feature name="WebAPI" required="true" />
 </feature-usage>
Viewing all 554 articles
Browse latest View live