Quantcast
Channel: It Ain't Boring
Viewing all 554 articles
Browse latest View live

UI Flow in Power Automate (former Microsoft Flow)

$
0
0


If you have not heard about UI Flows, give them a try! As in right now… that’s just some cool stuff from Microsoft which is now in preview.

Login to your powerapps portal (https://make.powerapps.com), select Flows, and choose UI Flows:

image

The coolest part about it is that, right from the start, you can probably appreciate where it’s all going:

image There are no connectors, there is no API, there is nothing BUT recording and re-running of the user actions.

You want to automatically open an application, fill in some fields, click save button, etc? There you go. You want to open a web site, populate some fields, click “next”, etc? That’s another scenario. Basically, we should be able to automate various usage scenarios – I am not sure if this also means we’ll be able to use this for automated testing, and I am also not sure to what extent this will work with various web applications where controls are created/loaded/updated on the fly… But, if it all works out, this is going to be really interesting.

And I am wondering about the licensing, since, technically, it seems there will be no API calls or connectors involved, so might not be a lot of load on the Microsoft servers when running such flows. Does it mean “not that expensive” licensing? We’ll see, I guess.

Anyway, let’s just try something.

Let say I wanted to create a desktop UI flow:

image

Apparently, need to download a browser extension. Presumably, that’s to actually perform actions on my computer (heh… how about security… anyway, that’s for later):

image

image

Here is a funny hiccup – the installer asked me to close all Edge/Chrome windows. Lost the Flow, had to re-open and re-create again.

Continuing from there and still getting the same error.

Some back and forth, tried installing new Edge (Chromium), still the same… Eventually, I tried updating that same Flow using a different portal:

https://flow.microsoft.com

It finally worked that way, and it also started to work through make.powerapps.com after that.

And I have just recorded a UI Flow which is going to put some text into a notepad window!

image

Here, have a look (it takes a few second to start the test):

desktopuiflow

Might seem like not too much  for now, but keep in mind this was just a simple test. At the moment, I am not even sure of the practical applications and/or limitations yet, but that’s for later.


Bulk-loading inactive records to CDS

$
0
0


When implementing ItAintBoring.Deployment powershell modules, I did not initially add support for the “status” and “status reason” fields. Usually, we don’t need to migrate inactive reference data, but there are always exceptions, and I just hit one the other day. Reality check.

There is an updated version of the powershell script now, and there is an updated version of the corresponding nuget package.

But there is a caveat.

In CDS, we cannot create inactive records. We have to create a records as “active” first, and, then, we can deactivate it.

Just to illustrate what happens when you try, here is a screenshot of the Flow where I am trying to create a record using one of the inactive status reasons:

image

The error goes like this:

7 is not a valid status code for state code LeadState.Open on lead with Id d794b380-0501-ea11-a811-000d3af46cc5.

In other words, CDS is trying to use inactive status reason with the active status, and, of course, those are incompatible.

The workaround here would be to create the record first using one of the active status reasons, and, then, to change the status/status reason.

If we get back to the bulk data load through powershell scripts above, then it would look like this:

  • Export data without status/status reason into one file
  • Export data with status/status reasons into another file
  • Import the first file
  • Import the second file


In other words, in the export script I would use these two queries(notice how there is no status/status reason in the first one, and the second one is querying all attributes):

image

Once I’ve run the export, here is how exported data looks like – you can see the difference:

image

And, then, I just need to import those files in the same order.

Here is what I had before I ran the import:

image

Here is what I have after:

image

It takes a little bit of planning to bulk-load reference data this way, but, in the end, it’s just an extra run for the script, an extra fetch xml for me, and quite a bit of time saving when automating the deployment.

A tricky Flow

$
0
0

I got a tricky Power Automate Flow the other day – it was boldly refusing to meet my expectations in what it was supposed to do. In retrospect, as much as I would want to say that it was all happening since Power Automate was in a bad mood, there seem to be a couple of things we should keep in mind when creating the Flows, and, somewhat specifically, when using Common Data Service(current environment) connector:

image

That connectors supports FetchXml queries in the List Records action, which makes it very convenient in the situations where you need to query data based on some conditions.

Here is what may happen, though.

Let’s imagine some simple scenario for the Flow:

  • The Flow will start on create of the lead record
  • When a lead is created, the Flow would use “List records” action to select a contact with the specific last name
  • Finally, the flow would send an email to that contact


And there will be two environments, so the idea is that we’ll use a managed solution to move this flow from development to production:

image

image

Let’s see if it works? I’ve created a lead, and here is my email notification:

image

But wait, wasn’t it supposed to greet me by name, not just say “Hello”?

Problem is, even though I can use all those attributes in the flow, they have to be added to the FetchXml in order to query them through the List Records action. Since I did not have firstname included in the Fetch, it came up empty.

The fix is simple:

image

And I have my email with the proper name now:

image

Now let’s bring this flow through a managed solution to another environment.

  • Export as managed
  • Import into the prod environment


Before I continue, let’s look at the solution layers for that flow in production:

image

Everything is perfect, but now we need to fix the connections for the flow:

  • image
  • Once the connections have been fixed, apparently we need to save the Flow.
  • What happens to the solution layers when we click “save”, though?


image

That is, actually, unfortunate. Let’s say I need to update the Flow now.

In the development environment, I can add an extra attribute to the Fetch:

image

That solution is, then, exported with a higher version, and I’m about to bring it over to production:

image

I should see that attribute added in production now, right?

image

You can see it’s not there.

I would guess this problem is related to the solution layering – when updating connections in production, I had to save the flow there, and that created a change in the unmanaged layer. Importing updated managed solution made changes to the managed layer, but, since it was an existing solution/flow, those changes went just under the unmanaged layer, so they did not show up on the “surface”.

If I go to the solution layers for my flow in product and remove active customizations:

image

All connections in the Flow will be broken again, but that additional attribute will finally show up:

image

This is when I can fix the connections, and, finally, get the Flow up and running as expected.

Of course another option might be to remove managed solution completely and to re-import updated version. Since I normally have Flows/Workflows in a separate solution, that would probably work just fine, even if I had to request a downtime window.


It’s the balloons time (when the help panes are feeling empty)

$
0
0


I just learned how to create balloons!

helppanes

At first, it actually did not look that interesting at all when I clicked the question mark button:

image


image

Yep, it felt a little empty there. So, I started to wonder, what can I do to make it more interesting?

Turned out there is quite a bit we can do:

https://docs.microsoft.com/en-us/powerapps/maker/common-data-service/create-custom-help-pages

We can add sections, images, bullet lists, videos, some other things… and, of course, those balloons.

The thing about the balloons, though, is that they are linked to the page elements, so, if the elements change (or if you navigate to a different page), the balloons might stop flying. Well, that’s just a note – other than that the balloons still are awesome.

So, what is it we may want to keep in mind about the help panes?

We can add them to the solutions. Although, only while in the classic(?) mode

image


We can work with the help XML using the definition below. Although, I guess that involves extracting solution files, updating them, then packing them back into a solution file (would be a good use for the solution packager)

https://docs.microsoft.com/en-us/powerapps/maker/common-data-service/create-custom-help-pages#custom-help-xml-definition

The help pane will stay open as the user keeps navigating in the app

This may bring the help pane a little bit out of content, so the users would have to remember to either close it or to click “home” button at the top left corner to change context for the help pane.

Help panes are language-specific

I just switched to French, and the help pane is feeling empty again

image

I used Dynamics 365 environment everywhere above, but it’s actually working in the CDS environments, too

image


Well, it seems to be a pretty cool feature. Of course help authoring may take time, and keeping it up to date may take time, too. But it seems to be a nice easy-to-use feature which can help even if we choose to only use it sporadically where it’s really needed.

CDS (current environment) connector is playing hide and seek?

$
0
0

Have you ever seen a connector playing hide and seek? Just look at the recording below:

  • Common Data Service (Current Environment Connector) does not show up when I type “related records” on the first screen
  • But it does show up when I do it on the other screen

currentenvconnector

What’s the difference?

From what I could see so far, the only difference is that, in the first case, my Flow is created outside of the solution. In the second case, I’m creating a Flow within a solution.

But, that magic aside, if you have not seen that connector yet, it’s definitely worth looking at since we are getting additional functionality there:

  • FetchXML
  • Relate/Unrelate records
  • Actions
  • There is a unified on update/create/delete trigger


And, also, this connector can be deployed through your solutions without having to update the connections.

Actually, it’s a bit more complicated. If you deploy the Flow with such a connector through a managed solution, it will start working in the new environment.

BUT. If you choose to look at that flow in the new environment, you’ll notice that the connections are broken, so you won’t be able to change anything in the Flow until you fix the connections.

Here, notice how the Flow ran a few times:

image

But the connections, if you decide to look at them, are broken:

image

The trick with this connector is not to touch those connectionsSmile Just leave them be, deploy that flow through a solution, and, probably, don’t forget to delete the solution when deploying an updated version of the Flow (for more details on this, have a look at the previous post )

Do you want to become an MVP?

$
0
0

I was watching the video Mark Smith just posted, and, as it often happens, got mixed impression.

Of course I do agree that there is always this idea that becoming an MVP should bring in some benefits. When thinking of “becoming an MVP”, you are inevitably starting to think of those benefits at some point. As in “is it worth putting in all those efforts to be awarded”?

In that sense, Mark has done a great job explaining the benefits.

However, I wanted to give you a little different perspective.

First of all, let’s be honest, I am not a great speakerSmile My main contribution to the community has always been this blog and Linkedin. There were a few tools, there were occasional presentations, and there were forum answers at some point. But all those videos and conferences… I’m just not wired that way.

Somehow, I still got awarded twice so far. What did it really give me?

Consider the NDA access. I do appreciate it since, that way, I often hear about upcoming changes and can provide early feedback before the changes become public. However, I can rarely act on that information since I can’t reference it. In other words, if I knew of an upcoming licensing change (it’s only an example, please don’t start pulling your hair), I could only influence license purchase decisions indirectly. On the technical side, it could be more helpful. But, again, how do you explain technical or architecture decisions which are made based on the NDA information?

Do I appreciate NDA access, though? Absolutely. Even if, more often than not, I can’t use it to justify my decisions, it gives me the feeling that I can influence product group direction. How about that? Out of a sudden, I am not just a “client” utilizing the product – I am a bit of a stakeholder who can influence where the product goes.

What about the money? In my “independent consultant” world, I know a lot of people who are making more even though they are not MVP-s. Maybe it’s different for the full-time employees, but I can’t say much about it.

Speaking engagements. Personally, I am not looking for them that actively. On a practical note, though, I think those engagements are tied to the previous point, which was “money”. More speaking engagement and more publicity means better recognition, and, in the end, more opportunities to land better jobs/contracts. On the other hand, that’s travel, that’s spending time away, etc.

How about free software and tools? I have MSDN and Azure credits. I have Camtasia. Etc. That does help. The tricky part there is… what if I don’t get renewed next year? I will lose all that. But, then, to what extent can I rely on those benefits when preparing my sample solutions, tools, posts, presentations, etc? The way I personally deal with this, I am trying to use this kind of benefits, of course, but I am trying not to over rely on them. For example, rather than getting an MVP instance of Dynamics 365, I’m getting one through the Microsoft Action Pack subscription.  Am I using MSDN? Of course. If I lose it, I’ll deal with it when the time comesSmile

So, in general, I think my overall idea of the MVP program has not changed much in the last year:

https://www.itaintboring.com/mvp/who-are-those-mvp-folks/

However, again on a practical note, what if, after doing all your research, you still wanted to be an MVP? My personal recipe is relatively simple:

  • Find your own motivation for making those community contributions. As for me… I always thought that I can learn more through sharing. No, I am not always sharing just because I want to shareSmile I am sharing because, while doing so, I can fine-tune my own skills and knowledge. After all, how do you write about something if you don’t understand it? The same goes for different tools – it’s one thing to have something developed for myself, but it’s another thing to have a tool that somebody else can use. In the same manner, how do you answer a forum question if you don’t know the answer? You’ll just have to figure out that answer first.
  • Once your motivation and efforts are aligned with the MVP program, and assuming you’ve been doing whatever it is you’ve been doing for some time, you will be awarded. Yes, you may have to get in touch with other MVP-s just to become nominated, but, more likely than not, by the time you do it(and assuming you’ve been making quality contributions), you will already be on the radar, so the question of being nominated won’t be a question at all.

Of course, this recipe does not guarantee the award, since there is no formula to calculate the value of your contributions ahead of time. Well, you may just have to start doing more of those, and then, a little more again. And you’ll get there.

Adding real code to the low-code

$
0
0


Just look at this – it’s a screenshot from Logic Apps:

image

To say that I felt bad when I saw this is to say nothing! I was pretty much devastated.

Do you know that Logic Apps have an Inline Script component that a logic app designer can use to run Javascript?

crying-clipart-gif-animation-464814-2904560And we, Power Platform folks, don’t have it in Power Automate!

You are not sure what I’m talking about? Well, I warn you, you may lose your sleep once you open the link below. But here you go:

https://docs.microsoft.com/en-us/azure/logic-apps/logic-apps-add-run-inline-code

HOW COULD THIS BE ADDED TO THE LOW-CODE PLATFORM? Apparently, end of the world is nearing…

Or, possibly, I am just being jealous. Can we have that in Power Automate? Please?

Anyway, fooling aside, I figured this might be a good reason to explore what options we have in PowerPlatform when we need to add real code to such low-code solutions as Power Automate and/or Canvas Apps.

Since, of course, writing formulas for Canvas Apps cannot be considered real coding. It’s just writing (sometimes very complex) formulas.

Off the top of my head, it seems there are a few options:

  • Azure Functions
  • CDS Custom Actions
  • Custom Connectors(?)
  • Calling a logic app which can utilize the inline script mentioned above(?)

Let’s try something out to compare those options. To be more specific, let’s try implementing that regex above?

To start with, we can use Match function in Canvas Apps to achieve most of that, but, for the sake of experiment, let’s imagine we still wanted to call out some code instead, even from the Canvas Apps.

Anyway, Azure Functions were first on my list, and let’s do it all in the same order.

1. Azure Functions

Assuming you have Visual Studio and Azure Subscription, setting up and Azure Function is easy

  • You need to create an Azure Function project in the Visual Studio
  • And you need to deploy it to Azure

image


As for the price, it’s seems to be very affordable for what we are trying to use functions for. Most likely it’ll be free since you’ll probably hit some limits on the Flow side long before you reach 1000000 function executions, but, on the other hand, it all depends on the number of Flows utilizing that function. Still, here are some numbers from the pricing calculator:image


It took me about an hour(not that long considering that the last time I wrote an Azure Function was a year or so ago), but a quick test in PostMan is showing that I can, now, start using that function to extract all emails from the given string (or, if I want, to find all substrings matching some other regex):

image


You will find the sources here:

https://github.com/ashlega/ItAintBoring.PowerPlatformWithCode

But, just quickly, here is the code:

        [FunctionName("RegEx")]
        public static async Task Run([HttpTrigger(AuthorizationLevel.Function, "post", Route = null)]HttpRequestMessage req, TraceWriter log)
        {
            RegExPostData data = await req.Content.ReadAsAsync();

            string result = "";
           
            MatchCollection foundMatches = Regex.Matches(data.value, data.pattern, RegexOptions.IgnoreCase);
            foreach (Match m in foundMatches)
            {
                if (result != "") result += ";";
                result += m.Value;
            }
            return req.CreateResponse(HttpStatusCode.OK, result);
        }


Btw, why am I returning a string, not a json? This is because, later on, I’ll need to pass the response back to a Canvas App, and, when doing it from a Flow, it seems I don’t have “json” option. All I have is this:

image

Hence, string it is.

Now, how do I call this function from a Flow/CanvasApp?

Technically, the simplest solution, at least for now, might be to figure out how to call it from a Flow, since we can call a Flow from the Canvas Apps. Which kind of solves the problem for both, so let’s do it that way first.

Here is the Flow:

image


When creating the Flow for a Canvas App, I had to use PowerApps trigger:

image

And I added parameters for the Flow using that magical “Ask in PowerApps” option:

image

So I just initialized variables (might not have to create variables, really).

Which I used in the HTTP action to call my Azure Function:

image

And the result of that call went back to the Canvas App through the respond to a PowerApp or Flow action:

image

And what about the Canvas App? It’s very straightforward there:

image

In the OnSelect of the button, I am calling my Flow, which is calling an Azure Function, which is using a regex to find matches, and, then, the result goes back to the Flow, then to the Canvas App, then it gets assigned to the FoundMatches variable… Which is displayed in the textbox:

powerapp_to_azurefunc

One immediate observation – calling an Azure Function this way is not the same as just calling code. There is a delay, of course, because of all the communication etc. Other than that, it was not that complicated at all to make an Azure Function work with a Flow, and, through that flow, with a Canvas App.

And, of course, if I wanted that Azure Function to connect to CDS and do something in CDS, it would have to be a bit more complicated Azure Function. But there might be a better option for that scenario, which is creating a Custom Action and using a CDS (current environment) connector to call that custom action.

That’s for the next post, though: Power Automate Strikes Again

Power Automate Strikes Again

$
0
0


I will start this post with exactly the same picture as the previous one to keep us all alert. Remember, Logic Apps have Inline Scripts now – there is no time to relax till we find an appropriate answer to this challenge:

And, even  though I feel much better now keeping in mind that Azure Functions have proved to work quite well with the Flow yesterday (and, subsequently, with the Canvas Apps), there is one minor issue I did not mention since I did not want to undermine what was done.

imageSee, Azure Functions are not solution-aware. They are not PowerPatform aware for that matter, so you might find it complicated to distribute Azure Functions with the solutions, especially if you are an ISV.

Any options? Is it, actually, a big issue?

Hm… to start with, Logic Apps are not solution-aware either. So, technically, PowerAutomate is already winning from the get go, since PowerAutomate Flows and Canvas Apps are solution aware. But, still, it would be nice to have an option of putting everything into a solution, sending it to the client, and living happily ever after.

This is why this post is going be about the Custom Actions!

“Heh…” – would say a seasoned Dynamics warrior… – “ I knew you would mention it”.

And rightly so (and, btw, if you are one, please feel free to take a seat back there for a while till we get to the Flows down below… Then come forward to read through the rest of this post). But, for those coming more from the Canvas App / Power Automate world, let’s start from the beginning.

So, what is an action?

“Actions and functions represent re-usable operations you can perform using the Web API”

https://docs.microsoft.com/en-us/powerapps/developer/common-data-service/webapi/use-web-api-actions

This is all in the context of CDS. There is  Web API, there are actions, and we can reuse those actions through Web API (yes, through the SDK, too).

What is a CUSTOM action?

There are re-usable operations available out of the box, but we can create our own actions in CDS. Not surprisingly, those care called custom actions.

What does it have to do with adding custom code to PowerAutomate?

First, we can write code with custom actions. More details below.

And, second, there is a relatively new Common Data Service (Current Environment) connector which we can use to easily call custom actions from Flows:

image

Put those two together and you have custom code in PowerAutomate. Let’s do just that.


Logic apps should really start feeling the heat now. This connector is only available in Flows and PowerApps!

image

https://docs.microsoft.com/en-us/connectors/commondataserviceforapps/

Not that I have anything against Logic Apps, but we ought to have something unique on the PowerPlatform side, right?


Anyway, it’s time to create a custom action for the same regex example I used in the previous post.

1. Let’s switch to the classic solution designer (custom actions don’t seem to be available in the new designer yet)

image

2. Let’s create a new action (as a process)

For this one, there is no need to bound it to an entity

image

3. This action will have two input and one output parameter

image

4. No need for any workflow steps – we’ll have C# code instead

So, can simply activate the action

image

5. Now on to the C# code

Basically, we need a plugin. That plugin will kick in whenever an action is called (well, once there is a plugin, we’ll need to register it so it all gets connected)

Plugin development can be a rather long story which I tried to cover in my now-2-years-old-now course:

http://itaintboring.com/downloads/training/Plugin%20Development.pdf

Again, you will find complete code on github, but here is the essence of that plugin:

image

It’s almost a reincarnation of the Azure Function discussed in the previous post with some added plumbing to turn this code into a plugin.

6. We need to register the plugin

The process of registration involves using what is called a plugin registration tool:

image

You may need to download it first:

https://docs.microsoft.com/en-us/dynamics365/customerengagement/on-premises/developer/download-tools-nuget

7. We need to link that plugin to the custom action created before

This involves creating a step in the plugin registration tool. Notice the message name – it’s, actually, the name of the custom action:

image

This took a while – about half an hour, but we have it all ready and can go back to the Flow now.

(Apparently, I cheated here since I had all those tools installed already and I knew what I was doingSmile May take somewhat longer if you are doing it the first time, but you know where to find me if you have questions)

8. Creating the Flow (I am hoping seasoned Dynamics developers are back, btw)

The Flow is very similar to what it used to be for the Azure Function example. The only difference is that instead of calling an Azure Function through the HTTP connector, we will need to call an unbound action through a Common Data Service (Current Environment) connector:

image

9. Calling that Flow from the Canvas App

image

10. And here is the end result (which is no different from what we had before with Azure Functions)

powerapp_to_customaction


So, then, compared to the Azure Functions, what is the difference?

  • Custom Actions are CDS-based
  • Azure Functions do not need a CDS
  • Custom action calls will be counted against CDS request limits
  • Azure Function calls will be priced according to Azure Functions pricing
  • Custom actions can be added to the solutions (you will have to add the plugin, the action, and the step)
  • Azure Functions will have to be deployed somehow, but they don’t need CDS
  • Finally, since custom actions will be using plugins for the “code” part, it will be easy to connect to CDS from that plugin
  • Azure Functions, if the need to connect to CDS, will have to create required connections, authenticate, etc


In other words… if you have a CDS instance there, and if you need to simplify devops, custom actions might work better. Except that there is that API request limits part which might make you think twice.

This is not over yet, though. It may take a few days before another post on this topic, but I’m hoping to take a closer look at the custom connectors soon.


Taking a closer look at how Flows and Apps communicate with connectors

$
0
0

I used to think that connectors would be isolated from my local machine in the sense that, since they are in the cloud, my machine would be talking to the Flow/Canvas Apps/Flow Designer/etc, but not to the connector directly. Basically, like this:

image

And I was going to mention it in the context of security in one of the following posts. But it turned out there is an interesting scenario where connectors do behave differently depending on whether we are working with them in the “designer” or whether our flows are responding to various triggers.

Earlier today, I got the following error when trying to choose environment for the CDS connector in the Flow:

image

So I got on the call with Microsoft Support just to find out that everything was working. How come?

Well, I was using a laptop which was connected to a different network. You can probably see where it’s going now.

Back to the machine where it was not working, and, in the network tab of Chrome dev tools I see that the following request is failing:

image

That’s the evidence that there is some communication with the connectors which may be happening from the “client side”. In other words, the communication diagram should look a little different:

image

In practical terms, that means one should always read the manuals rather than assuming too muchSmile For this particular issue, there is a whole section in the documentation related to the IP address configuration:

https://docs.microsoft.com/en-us/power-automate/limits-and-config#ip-address-configuration

And the one which we ran into is mentioned there, too. It seems to be one of a few for which I would not be able to explain the purpose right away (would not even recognize them):

image

But, if you look at where the error happened on the screenshots above, you’ll see how having a connectivity issue between your client machine and that domain could hurt you.

Now, in my case there was a problem with DNS resolution. I fixed it temporarily by adding required ip address to the hosts file:

52.242.36.40 canada-001.azure-apim.net

Which also allowed me to do an interesting test. What if, after fixing the connections, I saved the flow and removed that IP address from the hosts file?

The Flow just ran. Without any issues.

Even though, when I tried editing the flow, I could not load the environments again.

Which kind of makes sense, but also gives a clue about what that azure-apim.net is for. Flows will be running on the cloud servers, so they won’t have a problem connecting to the azure-apim.net from there. However, when editing Flows in the designer, the designer will need to work with those connectors, too. Turns out there is a special server(s), which is hosting “connectors runtime”, and which needs to be accessible form our local machines to let the Flow designer communicate with the connectors.  It’s not CDS-specific, it’s not connector-specific… For instance, just out of curiosity, I tried Outlook connector and got an error on the same URL:

image

This is not all, though. If you open network tab for a canvas application, you’ll actually see that Canvas Apps are communicating to the apim servers even in the “play” mode, so, essentially, there is no way around this. We just need to make sure apim servers are accessible from our network.

Working with HTML tables in Power Automate Flows

$
0
0

While playing with “HTML tables” earlier today, I suddenly realized that there seem to be a bit more depth to it than I expected.

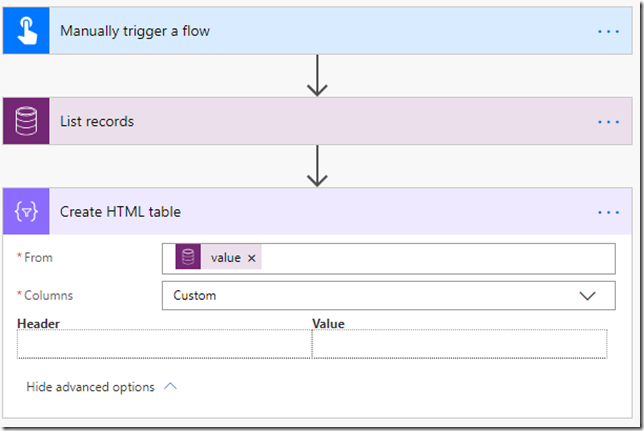
Let’s say you have this Flow:

image

And imagine that you wanted to

  • Add headers with spaces
  • Change overall look and feel of the rendered table

Turns out those things are not that straightforward.


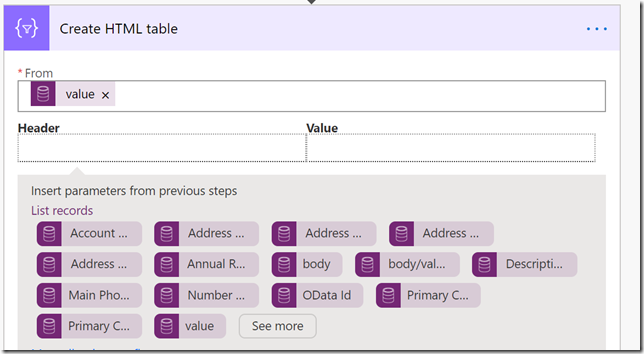
But, to start with, when I first tried using an HTML Table today, I found that I’m having troubles adding dynamic values. Instead of the regular dynamics values screen with the searchbox and two tabs (“dynamics content” / “expression”):

image

I saw this:

image

Have you ever seen it like that? If you have not, and if you see it, don’t panic. It’s not a new feature!

Just try scaling your browser window down. Even if you currently at 100%, scale down to 90. Definitely scale down to 100 if you are at 130. Once you do it, you’ll probably see the usual dynamics content window:

image


Let’s get back to the HTML Table, though.

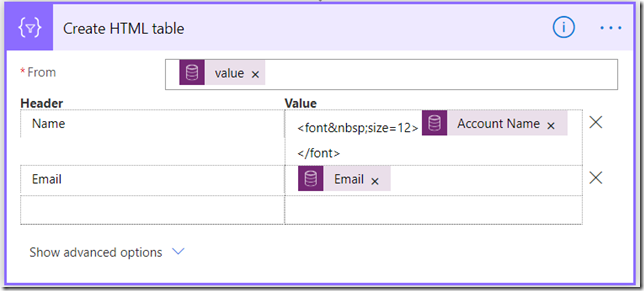
Using dynamic content there is as straightforward as anywhere else in the Flows, but how do we add colors, border, modify text size, etc?

For example, if I add HTML font tag to the value:

image

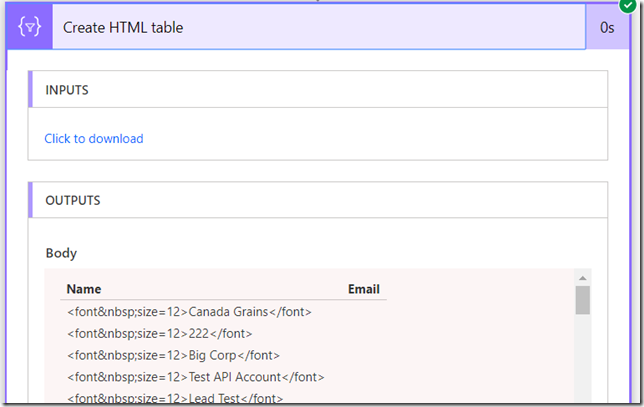
That’s only going to mess up the output since those tags will be added there as “text” rather than as html:

image

So, there is an awesome post which explains the basic concept behind HTML Table formatting options:

https://www.sharepointsiren.com/2019/07/formatting-html-tables-in-flow/

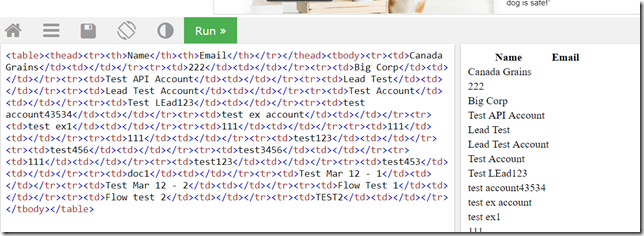
Essentially, we need to get the output and post-process it. I can easily get the output by adding a Compose action:

image

You can take that source and use TryIt to see how it looks like:

https://www.w3schools.com/html/tryit.asp?filename=tryhtml_intro

image

What if, instead of messing with that HTML, we just styled that table using an external stylesheet? To make it look more like this:

image

Of course if you wanted to play with CSS, you might probably make it look even better. How do we add that CSS to the output of the HTML Table action, though?

First, get that CSS file uploaded on some web server which would be available from wherever the table will eventually be viewed. Maybe to Azure somewhere(for instance: https://docs.microsoft.com/en-us/azure/storage/blobs/storage-blob-static-website)

In my case, I am using “styledtable” class name, so I’ll just need to add that class name to the table tag, and I’ll also need to add “link” tag to the output to link my css file to the table. Here is a compose action to do it:

image

And here is that replace function (you’ll definitely need to adjust it for your needs):

replace(body(‘Create_HTML_table’),'<table>’,'<link rel=”stylesheet” href=”https://itaintboring.com/downloads/tablestyle.css”><table class=”styledtable”>’)

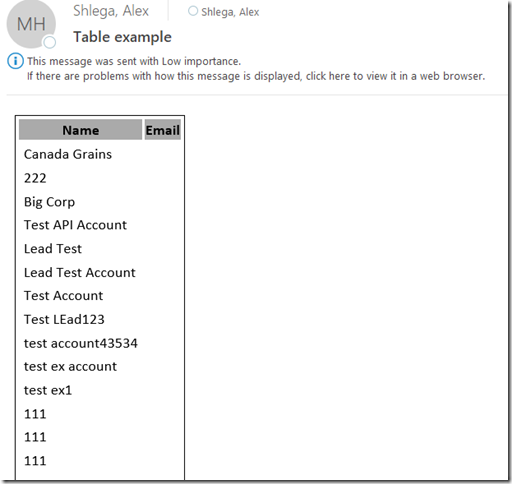
All that’s left is to test the result, so let’s add the output to an email:

image

And have fun with the results:

image

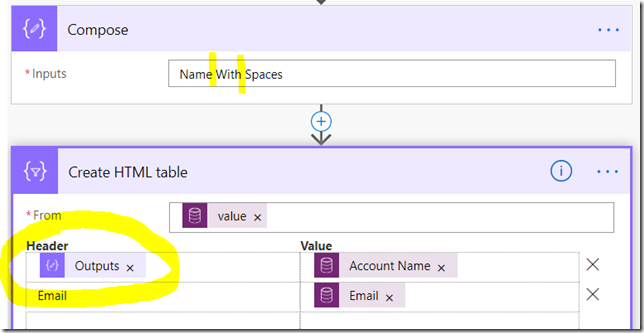
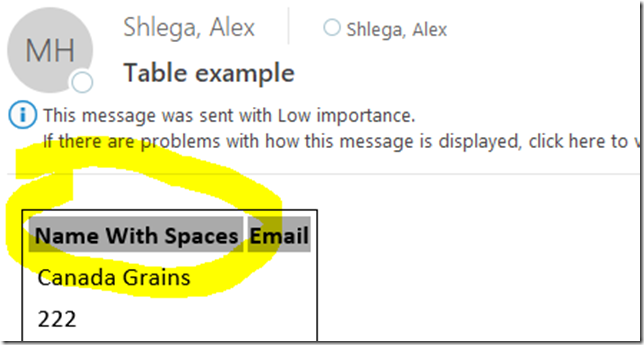
And one last note… normally, you are not allowed to add spaces to the header fields. But, of course, you can always use a Compose action to compose something with spaces, and, then, use that action’s output for the header fields:

image

There we go:

image

Early transition to the UCI – possibly a false alarm yet

$
0
0

We all know that by October 2020 classic web client will be retiring, and UCI interface will take over everywhere where the classic web client might still be reigning at the moment of writing this post.

This can be a very sensitive topic, though, and it can be quite confusing, too. As mentioned in this post, it seems Microsoft is now scheduling the transition for early 2020, and, quite frankly, that may scare the hell out of anybody in the community.

So, I just wanted to clarify something. From what I understand, this early transition is not the same as getting rid of the classic solution designer or settings area. There is a bunch of environments I work with which have already been transitioned:

image

This screenshot is coming directly from the runone portal (https://runone.powerappsportals.com/ ) where you can review the environments and schedule/postpone the updates.

I can still do all my administrative tasks and solution configuration in the classic interface in that transitioned environment:

image

What I can’t do – I can’t work with the actual applications in the classic interface in those environments anymore.

In other words, what this change will bring over is “UCI for the end users”, but not yet “UCI for the admins”. Mind you it’s not necessarily making this easy for the end users, but we have all been warned a while ago, and the clock is definitely ticking very loud now, but, at least, I don’t think we should be concerned about losing the ability to use classic solution designer or to create/update classic workflows with this early transition in 2020 (which might be in preparation for the eventual “full” transition later in the year)

FetchXml powers turned out to be limited, and I’ve just discovered it the hard way

$
0
0


image

That’s just how many linked entities you can have in FetchXml.
I guess I have never needed more than this. That’s until today, of course:

image

Actually, this is not how I discovered it. I was writing an SSRS report and the number of linked entities in my FetchXml query kept growing, so at some point the reports has stopped working:

image

That error message made me try my Fetch in the XrmToolBox, which lead to the error above, which, in turn, made me look at the documentation again… and there it is:

https://docs.microsoft.com/en-us/powerapps/developer/common-data-service/use-fetchxml-construct-query

image

It seems the limitation has been there forever, but it’s only been added to the docs recently:

image

So I’ll probably have to make the report work somehow else. Might have to start using subreports instead of bringing all the data through fetch…


Custom connector: where PowerAutomate makes peace with Logic Apps

$
0
0

Remember this screenshot?

Actually, other than Azure Functions and CDS custom actions, there is at least one other option in Power Platform which we can use to add custom code to our Power Automate Flows and/or to our Power Apps.

Those are custom connectors.  We can also use custom connectors with Logic Apps, so this is where all those Azure technologies are becoming equal in a way. Although, while Flows and Power Apps can only use REST API-s, Logic Apps can also use SOAP web services. Which gives Logic Apps a little edge, but, well, how often do we use SOAP these days?

Either way, the problem with custom connectors is that creating them is not quite as simple as creating an Azure Function or a CDS custom action.

Here is how the lifecycle of custom connectors looks like:

image

Source: https://docs.microsoft.com/en-us/connectors/custom-connectors/

The last two steps on this diagram are optional. As for the first three, the reason those first 3 steps can be quite challenging is that there are various options we have to create an API, to secure it, and to host it somewhere.

Still, what if I wanted to create a simple custom connector to implement the same regex matching that I used in the previous posts for Azure Functions and CDS Custom Actions?

I could create a Web API project in the Visual Studio. There is a tutorial here:

https://docs.microsoft.com/en-us/aspnet/core/tutorials/first-web-api?view=aspnetcore-3.1&tabs=visual-studio

In the remaining part of this post, I’ll show you how it worked out, and, if you wanted to get the source code for that regex Web API from github, here is a link:

https://github.com/ashlega/ItAintBoring.PowerPlatformWithCode

Essentially, it’s the same regex code I used for the Functions and/or for the CDS custom actions:

image

I can try this in Postman(hiding the actual link since, depending on where I leave it, it might not be protected with any kind of authentication. You can just publish that web api from github in your tenant to get your own link):

image

And the result comes back (although, compared to the other versions, it’s now in json format):

image

Let’s turn this into a custom connector?

There is a tutorial here: https://docs.microsoft.com/en-us/connectors/custom-connectors/define-blank

But, either way, let’s see how to do it for the regex connector above.

In the power apps maker portal, choose custom connectors area:

https://make.powerapps.com/

image

Creating a connector from scratch:

image

image


image

When importing from sample, make sure to specify full url. This feels strange, since I would assume with the base url specified before there would be no need to specify complete path to the api below, but it just has to be there. So, here we go (nothing goes to the headers btw):

image

With the response, there is no need to provide urls etc – just provide a sample response:

image

Once the response has been imported, for some reason nothing actually changes on the screen – there is no indication that a response has been added, but it’s there:

image

You can click on that “default” above, and you’ll see it:

image

Actually, the connector is almost ready at this point and we just need to create it:

image

And then it’s ready for testing:

image

When creating a new connection above, you will probably find yourself taken away from the “custom connector” screens. So, once the connection has been created, go back to the “custom connectors” areas, chose your connector, open it for “edit”, and choose the newly created connection:

image

Then we can finally test it:

image

And we can use this new connector in the Flow:

image

Apparently, it works just fine:

image

But what if I wanted to add authentication to my API? Since it’s hosted in Azure as an app service, I can just go there and enable authentication:

image

I can, then, get everything set up through the express option:

image

Save the changes, and it’s done!

Sorry, just joking – not really done yet.

The connector needs to be updated now, since, so far, it does not know that authentication is required now.

In order to update the connector, I need to configure the application first. The application will be there under “app registrations” in the Azure Portal – here is how it looks like in my case:

image

There is, also, a secret:

image

With all that in place, it’s time to update connector settings.

First, let’s make it https:

image

Here is how connector security settings look like:

image

Application ID (client ID) from the app registration page in Azure Portal goes to the Client ID field. Secret key goes to the Client secret field. Login URL and Tenant ID are just the way they are.

Resource URL is set to the same value as Client ID.

Then there is that last parameter which must be copied and added to the redirect urls for my app registration in Azure Portal:

image

Now it’s actually done. Once the connector has been updated and a new “authenticated” connection is created, I can retest the connector:

image

It works… so I just need to update my Flow above (it will require a new connection this time), and retest the flow.

It may seem as if it was quite a bit more involving than Azure Functions or CDS custom actions. But it’s probably just a matter of perception, since, come to think of it, it’s my first custom connector, and I had to figure out some of those things as I kept going.

More to follow on this topic, but enough for now. Have fun!

Here is a riddle: “I am a readonly record, but I am still updatable in the user interface. What am I?”

$
0
0

Have you ever noticed there is at least one entity in the Model-Driven apps (and in Dynamics before) which would sometimes claim a form is read-only, but which would still be somewhat updatable in the user interface?

Even more, this peculiar behavior may not be easily controlled through java scripts.

See, you can update “Regarding” field on the completed emails, even though the form will be telling you that the record is read-only:

image

What will happen as a result is that you’ll see “unsaved changes” notification in the status bar:

image

Even though you won’t see the usual “save” button there.

However, eventually “Autosave” will kick in and updated “regarding” will be saved. Or you could also use CTRL+S to save the changes right away.

That seems to be a bit of user-interface inconsistency, but there is a good reason for why “regarding” is not made read-only (even if the implementation feels more as a workaround). When an email comes in, and if it does not get linked to the right record, you may still want to change “regarding” on such an email even though it’s already been marked as “received” (or, possible, as “sent”).

One might argue that it’s no different from how other entities works, and we just need to re-activate them in such cases. However, it’s a little more complicated with emails since we can’t easily reactivate an email (I guess this is because, otherwise, it would turn into a mess really quickly if somebody tried to send an email that had already been sent etc)

PowerPlatform: beyond the custom code

$
0
0

As far as adding custom code to PowerApps/PowerAutomate goes, I’ve looked at three different options so far:


Those are all valid options, but there are things to consider which go beyond purely technical aspects. For example, even though some Office 365 licenses include Power Apps use rights, those licenses will not allow access to the custom connectors.

So, how do we compare those three options?

It might be worth looking at the following 7 aspects – there is probably more to compare, but that should be a good starting point:

image

Let’s look at each of those boxes one after another.

1. Data Security

For this one, I mostly wanted to look at it from the perspective of CDS security roles.

When setting up an Azure Function that would be connecting to CDS, we would likley utilize an account (be it a user account or an application account), and that account might be different from the account of the user who is running the Flow/utilizing the PowerApp. Which means there might be quite a few security issues there since those two accounts might have different levels of data access.

CDS Custom Actions, on the other hand, would be utilizing the user account specified in the Flow connection, and that would likely be the user account of the Flow creator. That would be a somewhat more consistent. Moreover, absolutely no effort would be required from the CDS custom action developer to achieve this.

As far as custom connectors go, it seems I don’t have enough experience there to be sure. On the one hand, we can set up authentication for the custom connectors. On the other hand, I am not sure if/how we can reuse those connections from within the custom connector code to open subsequent connections to CDS from code.

As far as data security goes, at least in relation to CSD, it seems CDS Custom Actions would have a bit of an edge.

2. Data Loss Prevention

Azure Functions, unless they are wrapped up into custom connectors, will work over the out of the box HTTP connector.

CDS Custom Actions will work over CDS connector.

From the DLP perspective, there is no way to separate one Azure Function from another or one CDS Custom Action from another.

Custom Connectors, on the other hand, can be added to the DLP individually:

https://docs.microsoft.com/en-us/business-applications-release-notes/october18/microsoft-flow/http-and-custom-connector-support-for-dlp-policies

We can wrap up different API-s into different custom connectors, and, depending on the needs, we can add those connectors to the DLP as required.

From this standpoint, Custom Connectors look better.

3. Code Hosting

Azure Functions are hosted in Azure. That kind of “hosting” is easy to set up, but it’s somewhat limited and is probably not meant to create really complex API-s

CDS Custom Actions are hosted in CDS. Which means you need CDS to start with. Which also means custom actions are tied to the CDS environment. Which allows for the DEV-TEST-UAT-PROD scenario, but, on the other hand, which might not be the best option when you need to host some kind of shared API. Also, just like with the Azure Functions, CDS custom actions are not really meant to serve as advanced API engine.

Custom Connectors are hosted… technically, it’s the API which is hosted. It can be hosted in Azure, or it can be hosted on some other servers. The advantage is that you can go as complex as you want with those API-s, but it’s also a disadvantage since you have to figure out deployment, lifecycle, etc.

The way I see it, there is no clear winner in this category. CDS custom actions work really well when your API is supposed to be tied to a specific CDS environment. Azure Functions work great in the non-CDS scenario where you don’t need complicated code. Yet with the custom connectors you can build something really advanced, but that comes with the additional deployment and configuration complexity.

4. CDS Solution Awareness

What if you wanted to move your custom code from one CDS environment to another? Of course the question itself assumes that such code would be environment-specific somehow. It might be because it is supposed to work with that particular CDS environment, or it might be because if has to mirror the same release process (Dev-Test-Prod).

Azure Functions have no idea of what CDS solutions are, so they are not competing in this category at all.

CDS Custom Actions live in CDS, they can be added to the solutions, so it’s their natural environment.

Custom Connectors can be added to the solutions, though I am wondering what it really means. You can add the connector, but you can’t add the API, so what exactly are you achieving by doing that?

Either way, in terms of CDS solution awareness and in terms of our ability to mimic CDS solution deployment process for custom code, CDS custom actions will definitely be ahead of the other two. They do take this one.

5. CDS Integration

This one is likely going to the CDS Custom Actions, too. Even if only because CDS is right there, in the name.

But, seriously, when it comes to CDS custom actions, we can write plugins and we don’t have to worry about authentication and/or about utilizing web api etc. All those SDK assemblies are there, so we can build code easily.

This is not the same for Azure Functions and Custom Connectors, even though we can always add references to the same SDK assemblies and set up the connections from code. But, then, those connections may have to account for different connection strings depending on whether we are working with Dev/Test/Prod, and how do we do that properly… that’s not a problem for the plugins at all – they just don’t need to worry about it.

6. Licensing

It’s better not to talk about licensing, but it’s also one of those topics which is just unavoidable.

First of all, whether it’s an HTTP connector (for Azure Functions), a Custom Connector, or a CDS connectors, those are all premium connectors. Which means you do need appropriate license to use them in PowerApps/PowerAutomate.

Other than that…

Azure Functions: there are tiers, but, essentially, it’s “pay per use”. Although, there is a caveat. If an Azure Function is not connecting to CDS, then that’s what it is. If it is connecting to CDS, then we also need a license and/or API usage add-on for CDS. Besides, since we will be using an HTTP connector

Custom Connectors: depending on where they are hosted, additional licenses/fees might be involved.

CDS Custom Actions: even if you are using them for something like “regex” validations, each custom action call is still considered a CDS API call, and there are limits on how many calls are allowed per license/add-on.

Is there a winner? I think Custom Connectors offer more flexibility, so will give it to them.

7. Other

Custom Connectors can be shared, and the can also be certified and made available to the users in other tenants. For the Azure Functions, best we can do is share the code. For the CDS Custom Actions, we can package them as solutions and share with other CDS customers.

Logic Apps do not support CDS (Current Environment) connector, so using CDS custom actions from Logic Apps might be more involved than using CDS Custom Actions from Power Automate Flows.

From the usability standpoint, Custom Connectors are, likely, the easiest to consume in the Flows/PowerApps. Azure Functions require json parsing etc. CDS Custom Actions – they seem to be somewhere in between.

Conclusion:

I don’t think there is a clear winner for all situations. I would not even say CDS Custom Actions work best when we are talking about CDS environments. Even more, I am not sure I have not missed something above that would turn everything on its head. But, like I said, this might be a good starting point.

Have fun!


Working with custom connectors – a few observations

$
0
0

For some reason, I got hooked up on the custom connectors for the time being. It’s a bit of a learning curve for somebody who has not been doing a lot of development outside of the plugins/scripts/occasional .NET  for a while, so, if nothing else, it’s a good exercise in re-building at least some of those development skills.

Interestingly, the learning here is not focused on the development only. Custom connectors are closely tied to PowerPlatform, and, besides, my Web API has to be hosted somewhere, so this involves building a Web API, but this also involves figuring out how to host it in Azure (in my case), and how to set up a connector in PowerPlatform.

Hence, in no particular order, here are some of the observations so far.

1. Creating a web API in the Visual Studio is very straightforward

image

Once you have a project, you may want to remove everything other than the Post method, and you may also want to update the route:

image

Then you just need to publish it somewhere, and, of course, publishing to Azure is easy:

image

You may want to look at the more detailed tutorial here, though:

https://docs.microsoft.com/en-us/aspnet/core/tutorials/first-web-api?view=aspnetcore-3.1&tabs=visual-studio

2. Creating a swagger file (or OpenAPI file) is more involved

That file is, really, just a description of your API. While creating a custom connector in PowerAutomate/PowerApps, you can feed that file to the custom connector “wizard”, it will parse it, and you won’t have to do a thing manually at that point.

But, of course, you may actually want to create that file AFTER you have an API. Or you may even want to generate it automatically.

This is where a couple of tools might help.

a) The post below provides instructions on how to generate swagger files for your web api projects

https://www.talkingdotnet.com/add-swagger-to-asp-net-core-2-0-web-api/

However, once the file was generated, I still could not use it to create a custom connector since some of the information was missing from the file

b) Swagger editor might help at that point

http://editor.swagger.io/

I added a few tags to my files (“host”, “basePath”, “schemes”, “consumes”, “produces”). Not sure all of them would be required, but pretty sure PowerPlatform expects at least the “host” information to be there (since that’s where I was getting an error).

3. Enabling authentication for your web api (in Azure)

This turned out to be a more complicated story for some reason, and I’m still trying to figure it out. Web API would be hosted as an app service, and it was not that complicated to enable authentication there. What has proven to be more challenging is setting it up so that users from other Azure tenants could use my web api.

Firsrt of all, that requires a custom domain. And, if there is a custom domain, it needs an SSL. And, if there is an SSL, I need a more expensive app service hosting plan. But, even once I had done all of that, I was still getting an error when trying to utilize my Web API with an account from another tenant, since, somehow, I was still required to add that user as a guest first. Anyway, that’s the bulk of it, and, it seems I’ll need to get back to the authentication part.

For now, there is no authentication on my web api.

4. It’s the second time when I’m observing errors in make.powerapps.com while flows.powerapps.com is working fine

It happened with the UI Flows before: https://www.itaintboring.com/power-platform/ui-flow-in-power-automate-former-microsoft-flow/

And it also happened this time when I was trying to update my custom connector. Turned out there is a related recent community thread, so, it seems, it’s just my luck that I’ve started working with custom connectors just about the same time when this problem was reported: https://powerusers.microsoft.com/t5/Building-Power-Apps-Formerly/Can-t-update-or-create-a-custom-connector/td-p/428162

Anyway, in my case switching to canada.flow.microsoft.com has helped in both situations.

5. While in the “test” mode, custom connectors don’t seem to recognize arrays

There is an array parameter in my connector. It works fine when using “raw body” option to adjust json:

image

However, once in the “regular” mode, there seem to be no way to turn that parameter into an array – it would only accept one element no matter what:

image

Still, when using that connector in the actual Flow, I can set up an array:

image

And I can pass that array through the action parameter:

image

Either way, so far web api source code is on github:

https://github.com/ashlega/ItAintBoring.PowerPlatformWithCode/tree/master/ItAintBoring.SimpleWebApi

There is a related swagger file you can use to create a custom connector in PowerPlatform:

https://github.com/ashlega/ItAintBoring.PowerPlatformWithCode/blob/master/ItAintBoring.SimpleWebApi/swagger.json

The API is hosted in Azure on a shared plan – you can try it, but don’t expect much in terms of uptime/reliability:

https://itaintboringsimplewebapi.azurewebsites.net/v1/addbusinessdays

https://itaintboringsimplewebapi.azurewebsites.net/v1/regex

Both methods will expect a post request.

Regex is, well, regex. More details here: https://www.itaintboring.com/dynamics-crm/custom-connector-where-powerautomate-finds-peace-with-logic-apps/

The other one (addbusinessdays) will take the starting date, an array of holidays (see screenshots above), and the number of business days to add to the starting date. It will, then, add those days to the starting date having accounted for Saturdays, Sundays, and all the holidays on the list.

“Default” property in the Canvas Apps controls – there is more to it than the name assumes

$
0
0

This comes straight from the Power Apps documentation:

Default – The initial value of a control before it is changed by the user

https://docs.microsoft.com/en-us/powerapps/maker/canvas-apps/controls/properties-core

Actually, I never bothered to read that definition until recently, and, it seems, there is some discrepancy there.

That definition seems to imply that “Default” will only affect your control’s initial value, but it’s not the case when “Default” is sourced from a variable. Instead, every time the variable is updated, the value you see displayed in the control will be updated as well, even if the user has already changed that value by typing something different into the control.

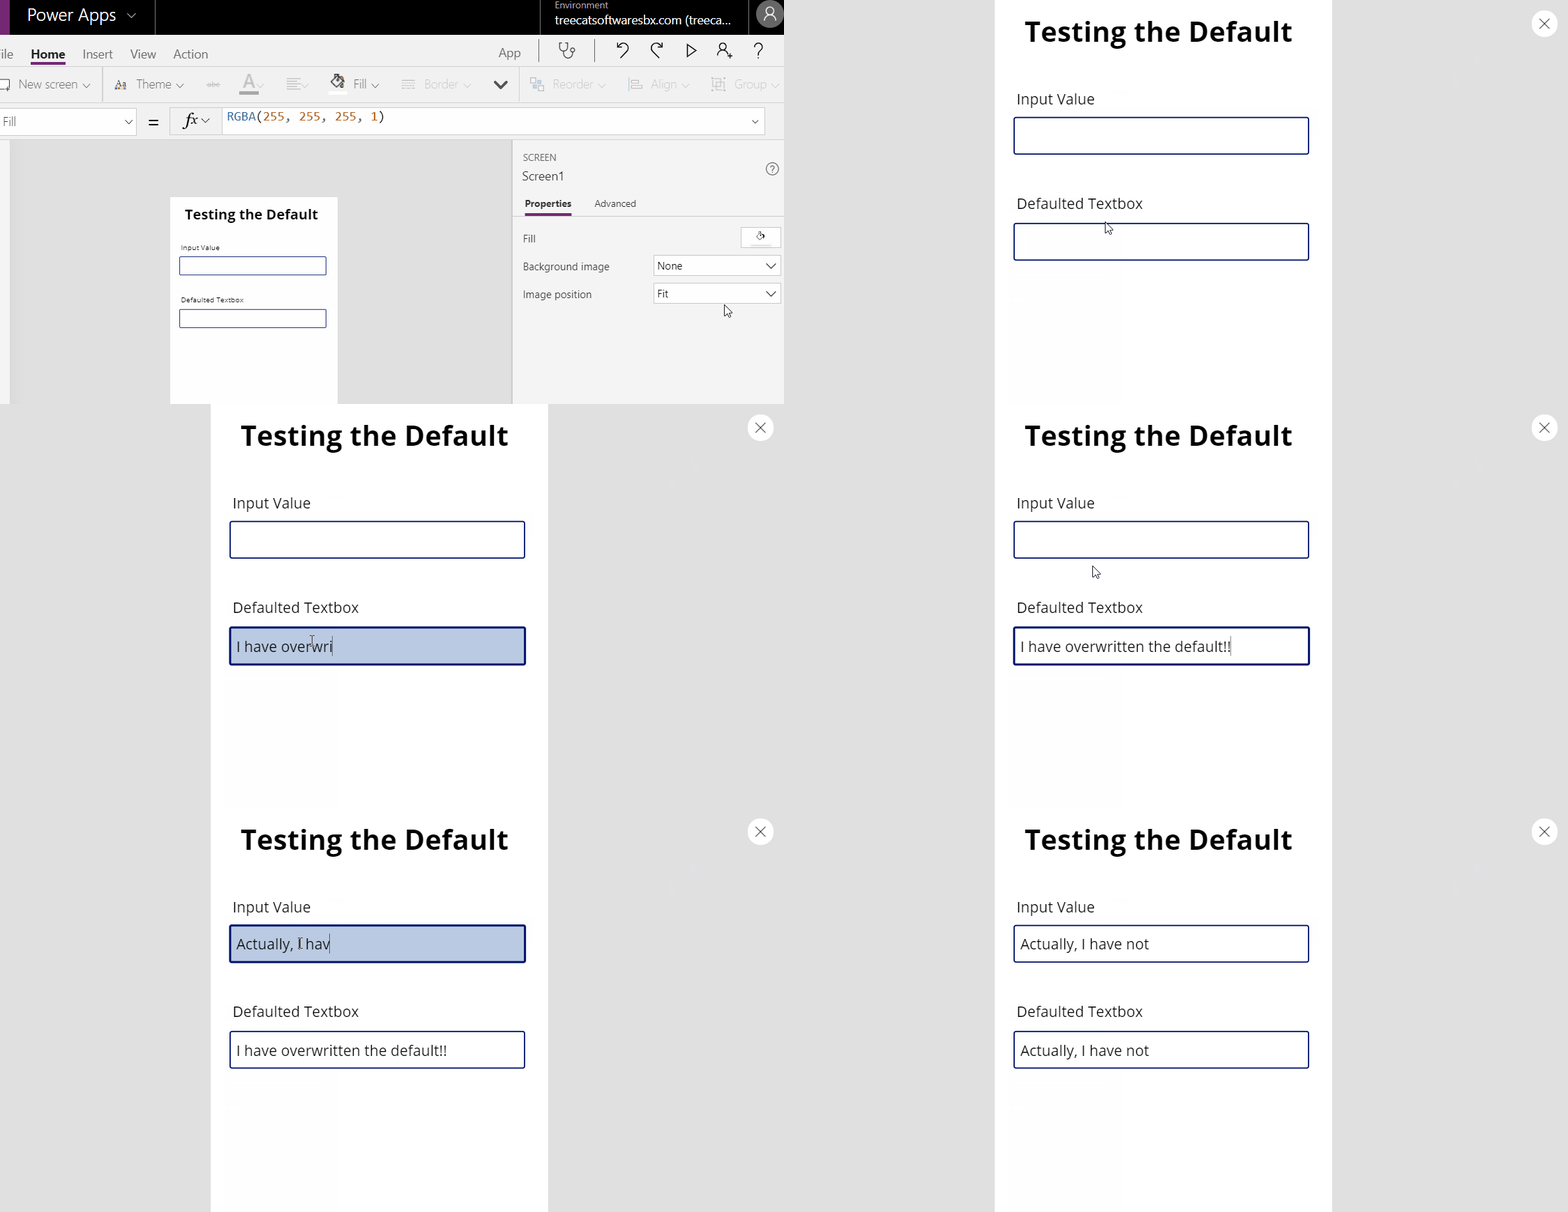
Here is an example:

canvas_default_prop

What’s happening there is:

1. I have a text box which will update a variable in the OnChange

image

2. And I have another text box which will source “Default” property from the global variable above

image

3. Every time the variable is updated through my first text box, my second textbox picks up that updated value. Even after I have typed something different into that text box

Either way, that is a very useful behavior. Otherwise, how would I even “reset” my controls if I wanted them to reflect those updated variable values? But it’s definitely more than just “the initial value”.

PS. A few hours after writing this blog post, and the proof has been found that’s a “by design” behavior:)

https://docs.microsoft.com/en-us/powerapps/maker/canvas-apps/functions/function-reset

“Input controls are also reset when their Default property changes”


Azure Architecture and Power Platform

$
0
0

I’ve been trying to catch up on the azure architecture lately using free learning material that Microsoft provides for the related az-300 exam:

https://docs.microsoft.com/en-us/learn/certifications/exams/az-300

There is a lot to catch up on, since it’s definitely not my primary area of expertise, but now that I’m through about a quarter of that course, I can’t help but start thinking about how that relates to the Power Platform/Dynamics.

Quite frankly, it seems that, even if the concepts discussed there are still applicable, technically Power Platform is very independent from Azure. It might be running on the Azure backbone, but, from the end-user and/or administrator standpoint, there is not a lot of control over how exactly it’s running there. Which is good and bad, as usual.

On the one hand, it’s up to Microsoft to ensure that Power Platform is running smoothly, so we, Power Platform users/admins, don’t need to worry about it.

On the other hand, Power Platform architecture essentially denies access to some of the Azure concepts. For example:

  • Power Platform environments are tied to the regions. If there is any fault-tolerance embedded there, it’s not exactly clear how it works
  • There is no load-balancing, health-probing, or traffic management. More exactly, they are not within our control. Although, I’m guessing traffic management might still be possible, but it would not make a lot of sense since we can’t do CDS database replication between regions. Besides, there would be licensing implications
  • With the SLA-s, it’s not clear what is really guaranteed


Actually, when it comes to the SLA-s, it’s very interesting in general. I used to think SLA is sort of an uptime guarantee. And this is how it is described in the architecture courses. But, come to think of it, it’s more of a “money-back” guarantee. For a lot of Microsoft products, you will find corresponding SLA-s in this document:

https://www.microsoftvolumelicensing.com/DocumentSearch.aspx?Mode=3&DocumentTypeId=37

As far as Power Apps go, here is what it looks like:

image

Strictly speaking, in terms of service availability there is just no guarantee. It’s simply common sense that Microsoft would want to hold on to the subscription payments rather than to reimburse its  clients for the service degradation. Although, that reimbursement would be limited either way.

In other words, there is an SLA, but, getting back to the architecture in general… let’s say we are building an application that is going to utilize CDS web api-s, and we want to guarantee 99.9% uptime for that app. We can keep adding load-balancers, availability sets, etc. But we can’t do better than the system we depend on, which is CDS in this case. Problem is, Power Platform subscription costs might not be that big of a component in the overall cost of our application downtime.

This has actually been my main “disagreement” with the whole ADX Studio architecture from the early days, and I am still not that convinced Power App Portals are much better in that sense. Although, I have to admit Power App portals are running in Azure, yet they are managed by Microsoft., and Microsoft likely has more tools and experience to maintain and operate them compared to the majority of individual clients who used to install ADX on-premise.

Either way, even though a bunch of things are out of our control in the Power Platform world, there is still quite a bit that’s on us:

  • Backups and disaster recovery. Technically, backups are supposed to be included into the disaster recovery plans… however, in case with Power Platform it’s not quite clear whether we can have any disaster recovery plan other than putting our trust in Microsoft and hoping there is a plan. There are database backups, though, so we can use those backups to restore our CDS databases if, somehow, the data gets broken there. On the other hand, Power Platform is not tied exclusively to CDS – there can be other data sources involved, so backups procedures for those other datasources can be quite different
  • Did you know you can use “Express Route” to connect your network to the Microsoft Cloud?  This is how you can get some extra security and lower latency, although, of course, it’s not a free service. Still, it might speed up(and secure) access to the Microsoft cloud in general and to the Power Platform in particular for your internal users
  • Data security in CDS. That’s never been particularly simple, but, with the introduction of canvas apps, excel online data editing, power BI, etc… it’s probably easier than ever to miss something in the security configuration and unintentionally expose data. Data security deserves a separate post, though

Well, this has not been a very coherent post – instead, it’s probably just a reflection on what I’ve been reading about lately. But there is one good topic to explore further, which is the security, and this is likely what I’ll get back to in one of the following posts.

OAuth, Implicit Flow, and Authorization Code Flow

$
0
0

If you ever tried registering applications in Azure, you have probably seen the term “implicit flow”. I’ve seen it a few times, and, finally, I’ve figured I need to get to the bottom of it. What I ended up with is the post below – it’s not meant to cover OAuth in details, but it is meant to provide a conceptual explanation and required references, even if only so I would know where to look for all this information when I need it again. If you find inaccuracies there, please drop me a note.

The purpose of OAuth is to provide a way for the users to authorize application access to various API-s. Once the authorization is provided, a token will be issued which the application will be able to utilize to call those API-s.

It all starts with registering a client (which is represented by a client id) on the authorization server. That client is normally set up to require access to certain API-s. However, required access is not granted automatically – it’s the user who has to authorize the client first.

So, you might ask, why can’t we keep utilizing user identity all the time? Why introducing those client id-s etc? Actually, it’s just a matter of reducing the “attack surface”. For example… As an Office 365 user, you might be able to access Common Data Service Web API, SharePoint API-s, Exchange API-s, and a whole lot of other services. However, when authorizing a client, you will only be authorizing access to certain API-s (so, an authorized client app might get access to the CDS API-s, while it won’t have access to the Exchange API-s).

Now, imagine there is a web page, and there is a JavaScript that needs to call certain API. When the page is loaded, it should not be able to just call that API – some kind of authentication and authorization has to happen first. Imagine there is an OAuth server, and there is a client registered there which can access required API-s. The idea is that, knowing the client ID, our imaginary web page needs to do a few things:

  • It needs to somehow ask the user to authenticate and authorize the usage of that client (which essentially means providing authorization to access those API-s)
  • Once this happens, it needs to somehow confirm to the API-s that it’s been authorized to use them


Let’s assume for a moment that the authentication and authorization has already happened. How does the second part work?
That is, actually, relatively straightforward (at least conceptually). On the client side, we just need to add authorization token to all API calls as a request header:


POST /api?param=123 HTTP/1.1
Host: apiserver.com
Authorization: Bearer AbCdEf123456

It will be up to the API to validate those tokens – for example, the API might just confirm token “validity” with the authorization server. Well, if you want to explore this topic a little more, have a look at this post:
https://dzone.com/articles/oauth2-tips-token-validation


But how does our imaginary web page gets that token to start with?

That’s what happens as part of the authorization grant, and this is where things get messy since there are different authorization grant flows. In other words, there are different ways our web page (or our application) can get a token from the authorization server.

You’ve probably spotted two of those authorization grant flows while looking at the Azure B2C configuration, or while trying to create app registrations in Azure portal:

  • Authorization code flow
  • Implicit flow


However, even though the authorization server might be able to support different authorization grant flows, not all of those flows might be supported on the client side.

There is a detailed explanation of how those flows work in the following post:

https://developer.okta.com/blog/2018/12/13/oauth-2-for-native-and-mobile-apps

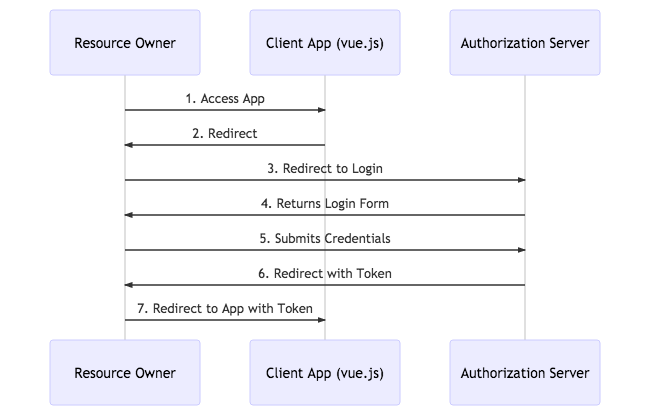
I’ll copy one of the images from the post above just to illustrate, quickly, what’s happening in the implicit flow:

Implicit Flow

There is a bunch of redirects in this flow. You will open the browser, it will load the page, and the script in that page will realize that it needs to get a token. So, the script will redirect your browser to the authorization server, and, as part of that redirect, it will also specify that it wants to use implicit flow by passing “token” for the “response_type” in the query string:

https://alexbilbie.com/guide-to-oauth-2-grants/

From there, the user will provide the authorization, the token will be issued, and it will be sent back to the client browser as a url fragment…

What’s a url fragment? That any part of the url following the ‘#’ character. URL fragments are special since browsers won’t add fragments to the requests – instead, fragments live on the client side and they are available to the javascript running on the browser side. If you are interested in how fragments behave, have a look at the post below:

https://blog.httpwatch.com/2011/03/01/6-things-you-should-know-about-fragment-urls/

That reduces the “exposure” of OAuth tokens on the network, so this flow becomes more secure. However, it is still less secure than the other one (authorization code flow), and, actually, it’s been deprecated:

https://oauth.net/2/grant-types/implicit/

Why was it introduced in the first place, though? This is because authorization code flow usually requires cross-domain calls, and, come to think of it, cross-domain calls from javascript were not really supported when OAuth was introduced.

Things have changed, though. JavaScript-based applications should not have a problem utilizing cross-domain calls today:

https://developer.mozilla.org/en-US/docs/Web/HTTP/CORS

Although, there is probably still a lot of apps which have not been migrated, so implicit flow may still be needed in many cases.

There is one important aspect of the authorization flows which I have not mentioned so far, and it’s the “redirect url-s”.

Imagine that our web page has redirected the browser to the authorization server, the user has provided required authorization, the token is ready… where should the authorization server “redirect” the browser now (since it’s all happening in the browser in this scenario)? This is what redirect url-s are for, and, if you are interested in a bit more details, have a look at the page below:

https://www.oauth.com/oauth2-servers/redirect-uris/

Hope this helps, though, as usual in such cases, somehow I have a feeling there is still more to it:)

Power App Portals and Azure AD B2C

$
0
0

The whole reason I started to look into the details of OAuth in the previous post is that I really wanted to see how to set up external identity providers for the portals.

There are some great blog posts out there which are describing the process in a step-by-step kind of way with all the necessary screenshots:

https://readyxrm.blog/2019/07/24/configure-azure-ad-b2c-for-powerapps-portals/

There is a documentation page as well which can walk you over pretty much the same steps:

https://docs.microsoft.com/en-us/powerapps/maker/portals/configure/azure-ad-b2c

What I was looking for is a bit better understanding of what’s happening behind the scene, though.

As a result, I think there are three items to discuss in this post:

  • OpenID Connect
  • Azure AD B2C
  • Setting up the portal to work with Azure AD B2C


But, again, if you have not looked at the OAuth, or if the term “implicit flow” still sounds too alien to you, have a look at the previous post and all the references there.

Because here is how it all works:

  • We can configure portals to use Azure AD B2C as an identity provider
  • Azure Active Directory B2C is a service from Microsoft that enables external customer sign-ins through local credentials and federation with various common social identity providers
  • Portals do support Open ID Connect, Azure AD B2C does support Open ID Connect… so there you have it: one can work with the other using Open ID Connect


What is Open ID Connect, though? It’s an extension of OAuth to start with, so we are still talking about all those client id-s and implicit/code flows. However, when utilizing Open ID Connect, we can get not only the authorization token, but, also, the so-called id_token. Which will actually represent user identity – there is a nice walkthrough in the post below if you are interested:

https://connect2id.com/learn/openid-connect

Azure AD B2C supports Open ID Connect: https://docs.microsoft.com/en-us/azure/active-directory-b2c/active-directory-b2c-reference-oidc

Portals support Open ID Connect and can be configured to work with Azure AD B2C: https://docs.microsoft.com/en-us/powerapps/maker/portals/configure/azure-ad-b2c

What’s interesting is that Azure AD B2C can also work as a “proxy” between the portal and external identity providers:

image

https://docs.microsoft.com/en-us/azure/active-directory-b2c/active-directory-b2c-overview

Even though those external identity providers have to be configured in your instance of Azure AD B2C, since, from the external identity provider standpoint, your users would have to authorize Azure AD B2C to access user identity information. So, for example, for the identity providers which are relying on OAuth, you’d have to go over the regular client registration steps to get client id & client secret so you could set up those providers in Azure AD B2C:

image

As I mentioned before, Azure AD B2C will work as a “proxy” in that sense. The portal will ask Azure AD B2C for the user identity, but Azure AD B2C will offer your users an option to authenticate through a configured external provider (and the portal does not need to even know about it).

Which may give you the benefit of single sign-on between the portal and other applications using Azure AD B2C(no matter if, ultimately, your users are using google/facebook/twitter/etc identity).

As a side note, what if you did not have Azure AD B2C and still wanted to use Google for portal authentication, for example? That would still be doable:

https://docs.microsoft.com/en-us/powerapps/maker/portals/configure/configure-oauth2-settings

With all the above, it should be easier now to answer some of the questions about all this set up process, such as:

Why do we need to register an app (OAuth client) in Azure AD B2C for the portal?

That’s simply because it’s OAuth, and we need a client id to make requests to the OAuth server

Why do we need to register an app (OAuth client) in Google if we wanted to add google identity provider to Azure AD B2C?

That’s because Azure AD B2C will be using OAuth to request authorization from the google OAuth servers for the usage of google profile API-s etc

Why would we choose Azure AD B2C over other external identity providers?

Essentially, this is because we’d be outsourcing identity management to a separate service that has a bunch of useful features available “out of the box”: https://docs.microsoft.com/en-us/azure/active-directory-b2c/technical-overview


As for setting up your portal to work with Azure AD B2C, I’ll just refer you to the same two pages I mentioned earlier in this post:

https://readyxrm.blog/2019/07/24/configure-azure-ad-b2c-for-powerapps-portals/

https://docs.microsoft.com/en-us/powerapps/maker/portals/configure/azure-ad-b2c

PS. There is a continuation to this post here – you will find additional details on how to set up the portals with Azure AD B2C, and, yet, how to enable additional external identity providers through Azure AD B2C: https://www.itaintboring.com/powerapps/power-app-portals-and-multiple-external-identities/

Have fun!

Viewing all 554 articles
Browse latest View live