Quantcast
Channel: It Ain't Boring
Viewing all 554 articles
Browse latest View live

Power App Portals, Azure AD B2C, and external identities

$
0
0

Before you read this post, let me suggest two earlier posts first, since they are all part of the same series:

Power App Portals have identity management functionality available out of the box. What it means is that the portals can use local identities, but they can also use external identities (azure, google, facebook, etc). All those identities can be linked to the same user profile in the portal (contact record in CDS):

image

Once a portal user has logged in using some kind of authentication, they can manage their other external authentications from the profile page:

image

For example. I just set up Azure AD B2C integration for my portal (have a look at the previous post for more details). However, I did not limit portal sign in options to the azureb2c policy only (through the LoginButtonAuthenticationType parameter), so “local account” and “Azure AD” are still there:

image

If I sign in through Azure AD, I’ll be able to connect my other external identities to my portal profile – in this case I only have azureb2c configured, so there are not a lot of options, but I could have configured google and facebook, for example, in which case they would be showing up on the list as well:

image

This is where the difference between using Azure AD B2C as an external identity provider and utilizing those other “individual” identity providers becomes clearer.

When Azure AD B2C is available, it’s likely the only identity provider the portal needs to know about, so it only makes sense to instruct the portal to use that identity provider all the time through the following site setting:

Authentication/Registration/LoginButtonAuthenticationType

image

When done that way, “sign in” link on the portal will bring the users directly to the Azure AD B2C sign in page:

image

So… there is no Azure AD or other options there? This is because I now need to go back to the Azure AD B2C and configure required identity providers as described in the docs:

https://docs.microsoft.com/en-us/azure/active-directory-b2c/tutorial-add-identity-providers

Note: it seems Azure AD application setup instructions provided there might not work as is, at least they did not work for me. When specifying the redirect url for my Azure AD application, I had to use the following format:

https://treecatsoftwareb2c.b2clogin.com/5cb9b89d-d5d2-4e31-….-e82a2cf12121/oauth2/authresp

That ID in the url is my Azure AD B2C tenant ID:

image

Otherwise, I kept getting an error when trying to authenticate through Azure AD since the redirect url specified for my application was different from the redirect url added to the request by Azure AD B2C when it was “redirecting” authentication to Azure AD (Uh… would be good if you are still following me, since I seem to be loosing it myself in all those redirects).

Anyway, once I’ve done that, Azure AD is now showing up as a “social account” sign in option on the Azure AD B2C sign in page:

image

If I use it to sign in, that brings me to the other screen:

image

Another note: I did not enable email claim on my B2C signin flow, so, at first, once I passed through the screen above, I got the following page displayed on the portal:

image

This is not how it should be, so, if you happen to forget to enable that claim as well, just go to you Azure AD B2C portal, find the signin policy you have set up for the portal, and add email claim there:

image

Once I’ve done that, though, the portal is complaining again:

image

But this is normal. The portal is not allowing a registration for an email that’s already there – remember that original portal account was using Azure ID external identity; however, right now I’m trying to register with an Azure AD B2C external identity, and it’s different. So, the portal is trying to create a new contact record in CDS with the same email address, and it can’t.

There is a portal setting that allows auto-association to a contact record based on email:

https://docs.microsoft.com/en-us/powerapps/maker/portals/configure/azure-ad-b2c#claims-mapping

If I wanted to enable that setting, I would need to add the following site setting to the portal my Azure AD B2C external provider (and set the value to true):

Authentication/OpenIdConnect/azureb2c/AllowContactMappingWithEmail

Finally, once that is done, I can now login to the portal through Azure AD B2C… but still using my Azure AD identity.

Since I did set up the portal (see above) to use Azure AD B2C exclusively, I don’t see my other external identities (or the local portal identity) on the profile page:

image

However, behind the scene the portal just created another external identity for my contact record:

image

It’s almost all good so far except for one remaining question (I know there are more questions, but this one is important). Having the portal integrated with Azure AD B2C, I would think there should be some easy way to link multiple external identities to the same user account. Basically, what if a portal user had different external identities(Azure AD, Google, Facebook, etc) and wanted to use either of them to login into the same portal account?

While identity management was done by the portal, it was possible to connect external identities from the user profile screen.

However, since I have just outsourced identity management to the Azure AD B2C, that kind of linkage would have to be done through Azure AD B2C now.

This seems to be what the github repository below is meant for, but I am certainly going to have to spend some more time on it:

https://github.com/Azure-Samples/active-directory-b2c-advanced-policies/tree/master/account-linking

And this will have to wait until the next post.


Compose action, dynamic content, and data conversions

$
0
0

Earlier today, a colleague of mine who tends to spend his days developing Power Automate Flows lately showed me something that seemed confusing at first. Now having dug into it a bit more I think it makes sense, but let’s see what you think.

Here is a Flow where I have an HTTP Trigger, a Compose action, Initialize Variable action, and “send an email” action:

image

When trying to add dynamics content to the email body, I see Compose action outputs, but I don’t see the variable. I also see “name” and “value” from the http request json payload.

What’s interesting about all this is that:

  • Presumably, email “body” is of “string” type
  • Compose action is of “any” type
  • “Name” and “Value” are of “string” type, too


As for the email “body”, I am not really sure how to verify the type there, but it’s a reasonable assumption.

I was not able to find  that statement about “Compose” action in the PowerAutomate documentation, but here is what Logic Apps documentation has to say:

https://docs.microsoft.com/en-us/azure/logic-apps/logic-apps-workflow-actions-triggers#compose-action

image

As for the Http request, here is the schema:

image

So, what if I changed the type of my variable to make it a “string”? I would not be able to use “body” from the Dynamic content to initialize it:

image

BUT. I would be able to use that variable for the email body:

image

Or I could just use “Compose”, since, the way I see it, it can take “any” type for input, and it produces “any” type for output. Which makes it compatible with any other type, and which is different from variables, since they are actually strongly-typed.

PS. Of course I might also use triggerBody() function to achieve the same result without using Compose, but what would I write about then?Smile

Power Platform dataflows

$
0
0

Have you tried Power Platform dataflows yet?

image

I would not be too surprised if you have not – I had not tried them until this weekend either. Might not have completely figured them out yet, but here is a quick rundown so far.

Basically, a data flow is a ETL process that takes data from the source, uses Power Query to transform it, and places this data in one of the two possible destinations:

image

Among those sources, there are some really generic ones – you can use Web API, OData, JSON, XML… They can be loaded from OneDrive, they can be loaded from a URL, etc:

image

For the Power Automate/Power Apps folks reading this – Data Flows are not using all the familiar connectors you may be used to when creating power automate Flows, for instance. As I understand it, Data Flows cannot be extended by throwing in yet another data source in the same way you would do it for Power Automate, for example. Although, since there are those generic “Web API/OData” sources, the extensibility is still there.

However, Data Flows did not start in Power Platform – they were first introduced in Power BI. There is a great post that explains why there were introduced there:

https://powerbi.microsoft.com/fr-fr/blog/introducing-power-bi-data-prep-wtih-dataflows/

Previously, ETL logic could only be included within datasets in Power BI … Power BI dataflows store data in Azure Data Lake Storage Gen2”

In other words, the problem Data Flows meant to solve in the Power BI world was about doing all that data transformation work outside of the Power BI dataset to make it much more reusable.

Power Platform dataflows seems to be doing exactly the same, although they can also store data in the Common Data Service. Actually, by default they will target Common Data Service. If you choose “Analytical entities only”, you’ll get data stored in Azure Data Lake Storage Gen2:

image

But what if you wanted to move data from CDS to Azure Data Lake Storage Gen2? Potentially (and I have no tried), you can probably choose “Analytical entities only” on the screenshot above, and, then, connect to CDS using Web API, then move that data to the data lake.

There is another option in the Power Platform which is called Export to Data Lake:

image

There is some initial setup, but, once it’s all done, you can enable CDS entities for export to data lake:

image

Important: don’t forget to enable Change Tracking on your CDS entity if you want it to show up on the list above.

So, with all the above in mind, here are two other facts / observations (in no particular order):

  • When setting up a data flow, you need to configure refresh frequency. For the data lake “target”, you can refresh target dataset up to 48 time per day. It seems there is no such limitation for CDS.
  • “Export to data lake” works somewhat differently from a regular data flow. It does create files for the records, but it also creates snapshots. The snapshots are not updated at once – they are updated with certain frequency (about 1 hour?)


Notice how, in the storage explorer,  I have snapshots dated Jan 11:

image

However, contacts files for 2018 has already been updated on Jan 12:

image

Have a look at the following post for a bit more details on this:

https://powerapps.microsoft.com/en-us/blog/exporting-cds-data-to-azure-data-lake-preview/

Compare those screenshots above to a regular Data Flow which has been configured with 1 minute refresh frequency (and, therefore, which has stopped to run because of the 48 runs per day limitation):

image

As you can see, there is a snapshot every minute, at least for as long as the data flow kept running.

Power Platform Dataflows vs … Taking a cruise to see Microsoft cloud ETL/ELT capabilities

$
0
0

Sometimes I think that Microsoft Cloud is not quite a cloud – it’s, actually, more like an ocean (which is, probably, similar to how things are with other “clouds” to be fair).

As an on-premise consultant, I did not use to appreciate the depth of Microsoft cloud at all. As a Power Platform consultant, I started to realize some of the extra capabilities offered by the Power Platform, such as:

  • Canvas Applications
  • Power Automate Flows
  • Different licensing options (can be good and bad)
  • Integration with Azure AD


Yet I was suffering quite often since, you know, there is “no way I can access the database”.

And, then, I tried the Dataflows recently. Which took me on a little different exploration path and made me realize that, as much as I’m enjoying swimming in the familiar lake, it seems there is so much more water out there. There is probably more than I can hope to cover, but I certainly would not mind going on a cruise and see some of it. So, this post is just that – a little cruise into the cloud ETL/ELT capabilities:

image

And, by the way, normally, you don’t really do deep diving on a cruise. You are out there to relax and see places. Here is the map – there will be a few stops, and, of course, you are welcome to join (it’s free!):

image

Stop #1: On-Premise ETL tools for Dynamics/Power Platform

If you have not worked with Dynamics on-premise, and I am assuming it’s about time for the pure-breed cloud consultants to start showing up, on-premise ETL tools might be a little unfamiliar. However, those are, actually, well-chartered waters. On-premise ETL tools have been around for a long time, and, right off the top of my head, I can mention at least a few which I touched in the past:

  • SSIS
  • Scribe(now Tibco – thank you Shidin Haridas for mentioning they were acquired)
  • Informatica


They all used to work with Dynamics CRM/Dynamics 365 just fine. Some of them turned into SAAS tools (Scribe online, for example), and some of them took a different route by merging into the new cloud tools (SSIS). Either way, in order to use those tools we had to deploy them on premise, we had to maintain them, we had to provide required infrastructure, etc. Although, on the positive side, the licensing was never about “pay per use” – those tools were, usually, licensed per the number of connections and/or agents.

We are still just near the shore, though.

Stop #2: PowerPlatform ETL capabilities

This is where we are going a little beyond the familiar waters – we can still use those on-premise ETL tools, but things are changing. Continuing the analogy, the cruise ship is now somewhere at sea.

Even if you’ve been working with the Power Platform for a while now, you might not be aware of the ETL capabilities embedded into the Power Platform. As of now, there are, actually, at least 3 options which are right there:


And, of course, we can often still use on-premise tools. After all, we are not that far from the shore. Though we are far enough for a bunch of things to have changed. For example, this is where an additional Power Platform licensing component kicks in since Power Apps licenses come with a certain number of allowed API calls.

Still, why would I call out those 3 options above? Technically, they are offering everything you need to create a ETL pipeline:

  • A schedule/a trigger/manual start
  • A selection of data sources
  • A selection of data destinations


Well, data lake export is special in that sense, since it’s hardwired for the CDS to Azure Data Lake export, but, when in the cloud, that’s an important route, it seems.

How do they compare to each other, though? And, also, how do they compare to the on-premise ETL tools (let’s consider SSIS for example):

image

The interesting part about Data Lake Export is that it does not seem to have any obvious advantages over any of the other tools EXCEPT that setting up CDS to Data Lake export looks extremely simple when done through “data lake export”.

Stop #3: Azure Data Factory

Getting back to the analogy of Azure being the ocean, it should not surprise you that, once in the ocean, we can probably still find the water somewhat familiar, and, depending on where we are, we might see familiar species. Still, the waters are certainly getting deeper, and there can be some interesting ocean-only life forms.

Hey, there is one just off the port side… Have you seen Azure Data Factory? That’s a real beast:

image

This one is strong enough to survive in the open waters – it does not care about Power Platform that much. It probably thinks Power Platform is not worth all the attention we are paying it, since here is what Azure Data Factory can offer:

image

  • It has data flows to start with
  • It can copy data
  • It has connectors
  • It has functions
  • It has loops
  • It is scalable
  • Pipeline designer looks somewhat similar to SSIS
  • It can actually run SSIS packages
  • It allows deployment of self-hosted(on-premise) integration runtime to work with on-premise data
  • It offers pipeline triggers
  • If has the ability to create reusable data flows
  • It has native support for CI CD (so, there is dev-test-prod)


And I think it has much more, but, well, it’s a little hard to see everything there is to it while on a cruise. Still, this screenshot might give you an idea of what it looks like:

image

In terms of data transformations, it seems there is a lot more one can do with the Data Factory than we can possibly do with the Dataflows/Data Lake Export/Power Automate Flows.

Although, of course, Data Factory does not really care about the Power Platform (I was trying to show it Power Platform solutions, and it just ignored them altogether. Poor thing is not aware of the solutions)

Finally, going back and relaxing in the sun…

image

It’s nice to be on a cruise, but it’s also great to be going home. And, as we are returning to the familiar Power Platform waters, let’s try putting all the above in perspective. The way I see it now, and I might be more than a little wrong, since, really, I did not have an opportunity to do a deep dive on this cruise, here is how it looks like:

  • SSIS will be becoming less and less relevant
  • Azure Data Factory will take over (probably has already done it)
  • Power Platform’s approach is almost funny in that sense. And, yet, it’s extremely useful. Following the familiar low code/no code philosophy, Power Platform has introduced its own tools. Which often look like simplified (and smaller) versions of their Azure counterparts, but which are meant to solve common Power Platform problems, and which are sometimes optimized for the Power Platform scenarios (environments, solutions, CDS data source, etc). The funny part there is that we, Power Platform consultants, are treated a little bit like kids who can’t be trusted with the real things. But, well, that approach does have some advantages:)


Word Templates and default printer

$
0
0

Have you ever used a Word Template in Power Apps?

Choose Word Template and select entity

If you have not, have a look at this documentation page. For the model-driven apps, it’s one of the easiest ways to quickly create standardized word documents for your entities.

Although, Word templates do come with some limitations – I won’t go into the details here since it’s not what this post is about. I use Word templates occasionally, and they work great where I don’t hit those limitations.

This was one of the projects where Word templates seemed to fit great. We had a few different document to print, there were not deep relationships to display, we could live with no conditional logic, etc. And, then, just about the time we were supposed to go live, one of the business folks was looking at it and posed a very interesting question:

“So, do I have to remember to switch the printer every time I use this?”

See, for some of the records, there would be more than one template, and they would have to be printed on different printers. One of the printers would be a regular printer, but the other one would be a plastic card printer. And, yes, if somebody did send a 10-pages long regular document to the card printer, that would be a waste of plastic cards. The opposite of that would be sending a card template to the regular printer, but that’s much less problematic.

Seems simple, right? Let’s just set the default printer and be done with it, or, at least, so I thought.

Unfortunately for us, Microsoft Word (2016 in our case) turned out to be more optimized that expectedSmile

If you have 2 printers, and if you set one of those as the default printer, you would probably expect the default printer to be selected by default?

image

The way it works, though, is:

  1. Imagine you’ve opened a document in Word
  2. Then you printed that document to a non-default printer
  3. Then you opened another document in a different Word window
  4. And you are trying to print that second document

The printer you’ll see selected by default is the same printer that you used for the first document:

image

Isn’t that awesome? You don’t need to choose, that’s the one you used before… except that we’d just waste a bunch of plastic cards in our scenario.

The problem seems to be related to the fact that there is only one winword process, no matter how many word documents you have open on the screen:

image

And, it seems, it’s that process that’s actually storing “current” printer selections for the user.

So, how can we work around this performance optimization in Microsoft Word?

We have to close all word windows, then the process is unloaded from memory, and the next time we open a document in Word and try sending it to the printer, Word will be using default printer again:

image

I wish there were a setting somewhere…

Well, there are articles suggesting to use macros in this scenario to choose the printer, but, since it’s a word template, and since there will be different users even on the same “terminal” machine, I am not sure how well this will work and if it will work at all. Might still need to try.

Reactivating a classic workflow that’s part of a managed solution

$
0
0

Managed solutions are recommended for production, and we’ve been using them lately without much troubles, but, occasionally, something does come up.

One of the solutions had a workflow which required reference data. So it should not have been included into that solution to start with, but, since it was, it could not be activated.

We’ve got the reference data deployed, and I was trying to activate the workflow… when I ran into the error below:

image

As it often happens, the error is not too helpful:

“Action could not be taken for few records before of status reason transition restrictions. If you contact support, please provide the technical details”.

Apparently it’s talking about the status reason transitions… that kind of throw me off at first, since I thought I just can’t reactivate “managed” workflows at all for some reason. That might be a bummer for sure.

Well, turned out there is still a way. As it’s been for a while, if you can’t do something from the managed solution, try doing it from the default solution. Worked like a charm in this case, too, and I got my workflow activated.

But, of course, I should not have had this problem to start with if I put all those workflows in the right solutions and did my deployment in the right order. Still… If there is a third-party solution in the system, it might be helpful to know that what’s been deactivated can still be reactivated. As long as it’s done from the default solution.

Power Platform Admin vs Dynamics 365 Admin

$
0
0

If you’ve been using Dynamics 365 Admin role to delegate Dynamics/Power Platform admin permissions to certain users, you might want to have a look at the Power Platform Admin role, too, since it may work better in some cases.

The main difference between those two roles is that you may need to add Dynamics 365 Admins users to the environment security group in order to let them access the environment, whereas you don’t need to do it for the Power Platform Admins:

https://docs.microsoft.com/en-us/power-platform/admin/use-service-admin-role-manage-tenant

image

Here is a quick illustration of how it works:

1. New user, no admin roles

No environments are showing up in the admin portal:

image

2. Same user, Power Platform Admin role

Six environments are showing up:

image

3. Same user, Dynamics 365 Admin role

Only five environments are showing up now since the 6th one has a security group assigned to it, and my user account is not included into that group:

image

Still, both roles are available and it may probably make sense to use Dynamics 365 Admin in those situations when you want to limit permissions a bit more. Although, the whole reason for this post is that we have found it a little confusing that such users must still be added to the environment security group, and, for us, it seems switching to Power Platform Admin might make this a little more straightforward.

Lookup filtering with connection roles

$
0
0

Here is what I wanted to set up today:

There is a custom SkillSet entity that has an “Advisor” field. That field is a lookup to the out-of-the-box contact entity. However, unlike with a regular lookup, I want that “Advisor” field to only display contacts which are connected to the current skillset through the “Expert” connection role.

In other words, imagine I have the skillset record below, and it has a couple of connected contacts (both in the “Expert” role):

image

I want only those two to show up in the lookup selector when I am choosing a contact for the “Advisor” field:

image

Even though there are, of course, other contacts in the system.


Actually, before I continue, let’s talk about connections and connection roles quickly. There is not a lot I can say in addition to what has already been written in the docs:

https://docs.microsoft.com/en-us/powerapps/maker/common-data-service/configure-connection-roles

Although, if you have not worked with the connections before, there is something to keep in mind

Connection roles can connect records of different types, but there is neither “source” nor “target” in the role definition

It’s not as if there were a source entity, a target entity, and a role. It’s just that there is a set of entities, and you can connect any entity from that set to any other entity in that set using your connection role:

image

Which may lead to some interesting effects – for example, I can have a SkillSet connected to a Contact as if that SkillSet were an expert, which does not really make sense:

image

But, of course, I can get a contact connected to a skillset in that role, and that makes much more sense:

image


That’s all great, but how do I filter the lookup now that I have an “Expert” role, and there are two contacts connected to the Power Platform skillset through that role?

That’s where we need to use addCustomView method

Why not to use addCustomFilter?

The first method (addCustomView) accepts complete fetchXml as one of the parameters, which means we can do pretty much anything there. For example, we can link other entities to define more advanced conditions.

The second method (addCustomFilter) accepts a filter to be applied to the existing view. We cannot use this method to define a filter on the linked entities.

In case with the connections, what we need is a view that starts with the contacts and that only displays those which are connected to the selected SkillSet record in the “Expert” role like this:

image

So… You will find a link to the github repo below, but here is the script:

function formOnLoad(executionContext)
{

	var context = executionContext.getFormContext();
	
	var viewId = "bc80640e-45b7-4c51-b745-7f3b648e62a1";
	var fetchXml = "<fetch version='1.0' output-format='xml-platform' mapping='logical' distinct='true'>"+
	  "<entity name='contact'>"+
		"<attribute name='fullname' />"+
		"<attribute name='telephone1' />"+
		"<attribute name='contactid' />"+
		"<order attribute='fullname' descending='false' />"+
		"<link-entity name='connection' from='record2id' to='contactid' link-type='inner' alias='ce'>"+
		  "<link-entity name='connectionrole' from='connectionroleid' to='record2roleid' link-type='inner' alias='cf'>"+
			"<filter type='and'>"+
			  "<condition attribute='name' operator='eq' value='Expert' />"+
			"</filter>"+
		  "</link-entity>"+
		  "<link-entity name='ita__skillset' from='ita__skillsetid' to='record1id' link-type='inner' alias='cg'>"+
			"<filter type='and'>"+
			  "<condition attribute='ita__name' operator='eq' value='" + context.getAttribute("ita__name").getValue() + "' />"+
			"</filter>"+
		  "</link-entity>"+
		"</link-entity>"+
	  "</entity>"+
	"</fetch>";
	
	var layoutXml = "<grid name='resultset' object='2' jump='fullname' select='1' preview='0' icon='1'>"+
	  "<row name='result' id='contactid'>"+
		"<cell name='fullname' width='300' />"+
	  "</row>"+
	"</grid>";
	
    context.getControl("ita__advisor").addCustomView(viewId, "contact", "Experts", fetchXml, layoutXml, true);
}


What’s happening in the script is:

  • It defines fetchXml (which I downloaded from the Advanced Find)
  • It dynamically populates skillset name in the fetchXml condition
  • Then it defines layout xml for the view. I used View Layout Replicator plugin in XrmToolBox to get the layout quickly:
  • image
  • Finally, the script calls “addCustomView” on the lookup control


And, of course, that script has been added to the “onLoad” of the form:

image

Now, I used connections above since that’s something that came up on the current project, but, of course, the same technique with custom views can be applied in other scenarios where you need to create a custom lookup view.

Either way, if you wanted to try it quickly, you will find unmanaged solution file in the git repo below:

https://github.com/ashlega/ItAintBoring.ConnectionRoleFilteredLookup

Have fun!


2020 Release Wave 1 – random picks

$
0
0

Looking at the 2020 Release Wave 1 features, it’s kind of hard to figure out which ones will be more useful. Somehow, all of those I’ve read through so far seem to have the potential to strike a chord with those working with Power Platform / Dynamics 365, so it’s going to be a very interesting wave.

Here are just a few examples:

Enabling printable pages in canvas apps

“Makers are able to configure a printable page in their canvas apps, taking the content on the screen and turning it into a printable format (PDF)”

I was talking about it to the client just the other week – they wanted to know if there is a way to print a Canvas App form. It’s still not exactly around the corner, since public preview of this feature is coming in July 2020, but for a lot of enterprise projects this is, actually, not too far away.

General availability for large files and images is coming in April 2020

Are you still not comfortable with Sharepoint integration for some reason and need a way to link large files directly to the records in CDS? There you go:

image

Forms displayed in modal dialogs

Do you want that command bar button to open a dialog before you deactivate a record? Or, possibly, before you close a case?

You will be able to open regular forms in the modal popup dialogs now. This kind of functionality is something we’ve been asking about for years:

“Users do not have to navigate away from a form to create or edit a related record. This greatly improves productivity by reducing clicks and eliminating the need to do unnecessary navigation back and forth across forms.”

image

Actually…

There is going to be a configurable case resolution page in Wave 1

“Choose between the non-customizable modal dialog experience (default setting) and the customizable form experience”

Will be it based on the modal dialog forms mentioned above? We’ll see soon, I guess.

“Save” button is back

It’s not hiding down there anymore – it’s back at the top (although, I think it’s down there as well.

Btw, technically, the description given in the release plan is not 100% correct: “Before this release, if the auto save option was turned on, both options were hidden and not available in the command bar”

See, in the releases that might now be long forgotten, “save” button was always visible at the top. I guess the good things are coming back sometimesSmile

License enforcement for Team Member licenses

Team member licenses have always been a problem because somewhat vague language around them could not stop people from trying to utilize those licenses. After all, the price could be really attractive.

Now that Power Apps have there own $10 license, and, so, Team Member license only makes sense for Dynamics 365, license enforcement will be coming in.

image

Why do I think it’s a good thing? Well, that’s because it brings certainty and leaves no room to the interpretation. The clients won’t be at risk of violating the license terms once those terms are, actually, enforced.

There is more….

Flow steps in business process flows, secrets management in the flows, etc etc

Have a look for yourself:

2020 Release Wave 1 for Power Platform

2020 Release Wave 1 for Dynamics 365

Is it a multiselect optionset? Nope… it’s an N:N lookup

$
0
0

If you ever wanted to have your own multiselect optionset which would be utilizing an N:N relationship behind the scene, here you go:

ntonmultiselect

It works and behaves similarly to the out-of-the-box multiselect optionset, but it’s not an option set. It’s a custom PCF control that’s relying on the N:N relationship to display those dropdown values and to store the selections.

Turned out it was not even that difficult to build this – all that was needed is to combine Select2 with PCF

The sources (and the solution file) are on github: https://github.com/ashlega/ITAintBoring.PCFControls 

This is the first version, so it might not be “final”, but, so far, here is how this control is supposed to be configured:

  • You can use it for any single line text control
  • There are a few properties to set:
  • image

Linked Entity Name: “another” side of the N:N

Linked Entity Name Attribute: usually, it would be “name” attribute of the linked entity

Linked Entity ID Attribute: and this is the “Id” attribute

Relationship Name: this is the name of the N:N relationship (from the N:N properties page)

Relationship Entity Name: this is the name of the N:N relationship entity name (from the N:N properties page)

Some of those properties could probably be retrieved through the metadata requests, but, for now, you’ll just need to set them manually when configuring the control.

N:N Lookup on the new record form? Let’s do it!

$
0
0

It was great to see how N:N lookup PCF control has sparked some interest, but there are still a few things that could(and probably should) be added.

For example, what if I wanted to make it work when creating a new record? Normally, a subgrid won’t event show up on the new record form. But, in the updated version of the N:N lookup, it’s actually possible now:

ntonmultiselectoncreate

So, where is the catch?

The problem there is that there is no way for the PCF control to associate anything to the record being created, since, of course, that record does not exist yet. But, I thought, a “post operation” plugin would certainly be able to do it:


image

If you wanted to try it, here is what you need:

NToNMultiSelect control has been updated, too

You can use the same approach with any entity, just keep in mind a few things.

NToNMultiSelect is supposed to be bound to a single line text control. I should probably change this to “multiline”, but, for now, that’s what it is. Since this control is passing JSON data through that field, the field should be long enough (2000 characters). Yes, there is still room for improvement.

Also, you will need to register a plugin step on each entity which is using this control:

image

It should be registered in the PostOperation, and it should be synchronous.

The plugin will go over all the attributes, and, if any of them includes data in the required format, it will parse the data, and it will create required record associations.

That’s it for today – have fun with the Power! (just testing a new slogan hereSmile )

TCS Tools v 1.0.23.0

$
0
0

It’s been a while since I’ve updated TCS Tools the last time – there are a few reasons for that, of course. First of all, the most popular component in that solution has always been “attribute setter” which essentially allowed to do advanced operations in the workflows using FetchXml:

  • Using FetchXml to query and update related child records (or to run a workflow on them)
  • Using FetchXml to query and update related parent record (or to run a workflow on that record)


with the Power Automate Flows taking over process automation from the classic workflows, most of that can now be done right in the Flows, though there are a couple of areas where TCS Tools might still be useful:

  • Real-time classic workflows (since there are no real-time Flows)
  • Dynamics On-premise


With the on-premise version, it’s getting really complicated these days. I know it does exist in different flavors (8.2 is, likely, the most popular). Unfortunately, I have no way of supporting on-premise anymore.

This only leaves real-time classic workflows in the online version as a “target” for TCS Tools at the moment.

With all that said, I just released a minor update which fixes an issue with the special characters not being encoded properly (for the details, have a look at the “invalid XML” comments here)

To download and deploy the update, just follow the same steps described in the original post:

https://www.itaintboring.com/tcs-tools/solution-summary/

Application Insights for Canvas Apps?

$
0
0

In the new blog post, Power Platform product team is featuring Application Insights integration for Canvas Apps:

https://powerapps.microsoft.com/en-us/blog/log-telemetry-for-your-apps-using-azure-application-insights/

It does look great, and it’s one of those eye-catching/cool features which won’t leave you indifferent for sure:

image

Although, I can’t get rid of the feeling that we are now observing how “Citizen Developers” world is getting on the collision course with the “Professional Developers” world.

See, every time I’m talking about Canvas Apps, I can’t help but mention that I don’t truly believe that real “citizen developers” are just lesser versions of the “professional developers”.

If that were the case, a professional developer would be able to just start coding with Canvas Apps right away. Which they can, to an extent, but there is an always a learning curve for the professional developers there. On the other hand, “Citizen Developers”, unless they have development background, may have to face an even steeper learning curve, and not just because they have to learn to write functions, understand events, etc. It’s also because a lot of traditional development concepts are starting to trickle into the Canvas Applications world.

ALM is, likely, one area where both worlds are not that different. Since it’s all about application development, whether it’s lo-code or not, the question of ALM comes up naturally, and, out of a sudden, Citizen Developers and Professional Developers have to start speaking the same language.

As is in the case of Application Insights integration. I don’t have to go far for the example:

image

“Microsoft Azure Resource”, “SDK”,  “telemetry”, “instrumentation key” – this is all written in a very pro developer-friendly language, and, apparently, this is something “Citizen Developers” may need to learn as well.

Besides, using Application Insights to document user journeys seems to make sense only when we are talking about relatively complex canvas applications which will live through a number of versions/iterations, and that all but guarantees a “citizen developer” must have some advanced knowledge of the development concepts to maintain such applications.

Well… this was mostly off-topic so far to be fair.

Getting back to the Application Insights, we just had a project went live with a couple of “supporting” canvas applications, and I am already thinking of adding Application Insights instrumentation to those apps, so I could show application usage patters to the project stakeholders. That would certainly be a screen they might want to spend some time talking about.

So, yes, I’m pretty sure we just got a very useful feature. If anything is missing there, it’s probably having a similar feature for the model-driven appsSmile

A CDS security model which supports data sharing, but which is not using business units or access teams

$
0
0

I’ve been trying to figure out how to set up CDS security for the very specific requirements, and it has proven to be a little more complicated than I originally envisioned (even though I had never thought it would be simple).

To start with, there are, essentially, only two security mechanisms in CDS:

  • Security roles
  • Record sharing

Yes, there are, also, teams. However, teams are still relying on the security roles/record sharing – they are just adding an extra layer of ownership/sharing.

There is hierarchy security, too. But it’s only applicable when there is a hierarchy relationship between at least some users in the system, and it’s not the case in my scenario.

And there is Field Security, of course, but I am not at that level of granularity yet.

There is one additional aspect of CDS security which might be helpful, and that’s the ability of CDS to propagate some of the security-related operations through the relationships:

image

However, if you try using that, you’ll quickly find out that there can be only one cascading/parental relationships per entity:

image

“The related entity has already been configured with a cascading or parental relationship”

Which makes sense – if an entity had two or more “parent” entities (which would have  cascading/parental relationships with this entity), the system would not, really, know, which parent record to use when cascading “share”/”assign” operations through such relationships. The first parent record could be assign to one user, and the second one could be assigned to the another user. There would be no way for the system to decide which user to assign the child record to.

Hence, there is that limitation above. Besides, “cascading” only happens when an operation occurs on the parent record. So, for instance, if a new child record is added, it won’t be automatically shared/assigned through such a relationship.

On the other hand, there is “Reparent” behavior which happens when a child record’s parent is set. In which case the owner of the parent record gets access to the child record.

With all that in mind, the scenario I have been trying to model (from the security standpoint) is this:

  • There is a single CDS environment
  • There are functional business teams – each team corresponds to a model-driven app in the environment
  • Within each application, there is a hierarchy of records (at the top, there is a case. Then there are direct and indirect child entities)
  • There are some shared entities
  • Functional team members are supposed to have full access to all corresponding application features/entities
  • The same user can be a member of more than one functional team

This “business security” model does not map well to the business units, since a user in CDS can be a member of only one business unit, and, as mentioned above, in my case I need the ability to have the same user added to multiple “functional teams”.

One way to do it would be to micromanage record access by sharing every record with the teams/users as required. That can become messy, though. I would need a plugin to automate sharing, I would need to define, somehow, which teams/users to share each record with, etc. Besides, “sharing” is supposed to be an exception rather than a norm because of the potential performance issues.

Either way, since I can’t user multiple business units, let’s assume there is a single BU. This means there are only two access levels I can work with in the security roles:

  • User
  • Business Unit


image

“Parent-Child” and “Organization” would not make any difference when there is only one business unit.

I can’t set up the security role with the “Business Unit” access, since every user in that BU will have access to all data. Which is not how it should be.

But, if I configure that security role to allow access to the “user-owned” records, then there is a problem: once a record is assigned to a user, other users won’t be able to see that record.

It’s almost like there is no solution to this model, but, with one additional assumption, it may still work

  • Let’s create an owner team per “functional team”
  • Let’s create a security role which gives access to the “user-owned” records and grant that role to each team
  • Let’s keep cases (which are at the top of the entity hierarchy) assigned to the teams
  • And let’s add users to the teams (the same user might be added to more than one team)


Would it work? Yes, but only if there is a relationship path from the case entity to every other entity through the relationships with cascaded “Reparent” behavior.

That’s how “regarding” relationship is set up for notes and activities out of the box (those are all parental relationships), so I just need to ensure the same kind of relationship exists for everything else:

image

All users which are members of those teams above will get access to the cases which are assigned to the teams. And, as such, they will also have access to the “child” records of those cases.

If a new child record is created under the case (or under an existing case’s child record), that record will still be accessible to the team members because of “reparent” behavior.

So, as long as cases are correctly routed to the right teams… this model should work, it seems?

What’s unusual about it is that not a single security role will have “business-unit” (or deeper) access level, there will be no access teams, and, yet, CDS data will still be secured.

And, finally, what if I wanted to assign cases to the individual users? That would break this whole “reparent” part  (since team member won’t have access to the case anymore). However, what if there were a special entity which would be a case’s parent, and what if, for each case, the system would create a parent record and assign it to the team? Then, out of a sudden, “reparent” would kick in, and all team members would get access to the cases AND to the child records of those cases. Even if those cases were assigned to the the individual users. Of course this would mean I’d have to reconfigure existing parental relationship (which is between cases and “Customers”). But, in this scenario, it seems to be fine.

PS. As for the “reparent”, you will find some additional details below. However, even though  that page is talking about “read access” rights, it’s more than that (write access is also inherited, for example):

https://docs.microsoft.com/en-us/dynamics365/customerengagement/on-premises/developer/entity-relationship-behavior#BKMK_ReparentAction

PCF Controls solution dependencies

$
0
0

I have definitely managed to mess up my PCF controls solution a few weeks ago, since I put some test entities into that solution, and, then, I missed to include a few dependencies. Definitely my apologies for that to everyone who tried to deploy that solution while I was happily spending time on vacation, but, hopefully, this post will help.

First of all, there are two different solutions now. In the main solution, I have those PCF controls and a plugin to support N:N.

Then, in a separate solution, I have all the test entities and forms to set up a quick demo.

Those two solutions should be imported in exactly this order, since, of course, you won’t be able to install “demo” solution having not installed the PCF solution first:

This is a good lesson learned, though. I guess it does make sense to always create a separate solution for the PCF controls?

If you are an ISV, and you are using those controls in your own solutions, you would probably want to be able to update the PCF controls without having to update anything else.

If you are developing PCF controls internally, it’s, essentially, the same idea, since you may want to reuse those controls in various environments internally.

Although… here is what looks a little unusual here. I can’t recall any other solution component that would be so independent from anything else. In the past, we used to put workflows into separate solutions to ensure we can bring in required reference data first. We might use separate solutions for a set of base entities since we’d be building other solutions on top of that core entity model. We might use dedicated solutions for the plugins, since plugins might make our solution files really big.

Still, those were all specific reasons – sometimes, they would be applicable, and, sometimes, they would not be. As for the PCF, when all the entity names, relationship names, and other configuration settings are passed through the component parameters, it seems we have a solution component that will be completely independent from anything else most of the times.  Instead, other components in the system will become dependent on the PCF components as time goes, so it probably make sense to always put PCF into a separate solution just because of that.


Working with the grid onLoad event

$
0
0

Sometimes, I get a feeling that, as far as Dynamics/Model-Driven javascript event handlers are concerned, everything has already been said and done. However, I was recently asked a question which, as it later turned out, did not really have the kind of a simple answer I thought it would have (meaning, “just google it” did not work).

How do you refresh a form once a grid on the form has been updated?

For example, imagine there is a subgrid on the form, and, every time a new record is added to the subgrid, there is a real-time process that updates the “counter” field. By default, unless there are further customizations, I will have to hit “refresh” button to see updated value of my counter field. Otherwise, I will keep seeing 0:

image

Which is not correct, since, if I clicked “Refresh” there, I would see “2”:

image

Apparently, some customization is in order, and, it seems, what we need is an event that will trigger on update of the subgrid. If there were such an event, I could just refresh the form to update the data.

This seems to be a no-brainer. For the form refresh, there is formContext.data.refresh method:

https://docs.microsoft.com/en-us/powerapps/developer/model-driven-apps/clientapi/reference/formcontext-data/refresh

For the sugrid, there is addOnLoad method for adding event handlers:

https://docs.microsoft.com/en-us/powerapps/developer/model-driven-apps/clientapi/reference/grids/gridcontrol/addonload

So, it seems, I just need to use addOnLoad to add a listener function, and, from that function, I need to refresh the form.

Except that, as it turned out, there are a few caveats:

  • When you open a record in your app, form onLoad will fire first. This is a good place to call addOnLoad for the grid
  • Gird’s onLoad event will follow shortly. But only if there is some data in the grid. Otherwise, it won’t happen for an empty grid
  • Every time a linked record is added to the grid or removed from it, grid’s onLoad event will fire. Even one the last record has been removed from the grid and the grid is empty after that
  • Once formContext.data.refresh is called, form data, including all grids on the form, will be refreshed. Form onLoad won’t fire, but onLoad event for the grid will fire at that time (Although, see note above about empty grids). This may lead to an infinite recursion if another formContext.data.refresh is called at that time


Strangely, I could not find a simple solution for that recursion problem above. At some point, I figured I could just add a variable and use it as a switch. So, once in the grid’s “onload” event, I would check if it’s set to true, and, if yes, would reset it and do nothing. Otherwise, I would set it to true, and, then, would call formContext.data.refresh

This was supposed to take care of the recursion, since I would be calling “refresh” every second time, and, therefore, the recursion wouldn’t be happening. And this was all working great until I realized that, when the form opens up initially, there is no way of telling if grid’s onload will happen or not (since that depends on whether there are any linked records – see the list above). Which means I can’t be sure which is the “first” time and which is the “second” when it comes to the grid events.

Eventually, I got a solution, but this now involves an API call to check modifiedon date. Along the way, it turned out that “modifiedon” date that we can get from the attributes on the form does not include seconds. You can try it yourself – I was quite surprised.

On the other hand, if we use Xrm.WebApi.retrieveRecord, we can get modifiedon date with the seconds included there.

What I got in the end is javascript code below.

  • gridName should be updated with the name of your grid control
  • onFormLoad should be added as an onLoad event handler for the form
  • onFormSave should be added as an onSave event handler for the form


Basically, this script will call refresh whenever modifiedon date changes after a grid control has been reloaded. Keeping in mind that I’d need to compare seconds as well, I am using Xrm.WebApi.retrieveRecord to initialize lastModifiedOn variable in the form onLoad.

And, then, I’m just using the same API call to verify if modifiedon has changed (and, then, to call “refresh”) in the grid onLoad event.

Finally, I need onFormSave to reset lastModifiedOn whenever some other data on the form is saved. Otherwise, once the form comes back after “save”, all grids will be reloaded, and, since modifiedon will be updated by then, an additional refresh will follow right away. Which is not ideal, of course.


var formContext = null;
var lastModifiedOn = null;
var gridName = "Details";

function onFormLoad(executionContext)
{
  formContext = executionContext.getFormContext();
  //Can't use
  //lastModifiedOn = formContext.getAttribute("modifiedon").getValue();
  //Since that value does not include "Seconds"
  //Also, this needs to be done for "updates" only
  if(formContext.ui.getFormType() == 2){
    Xrm.WebApi.retrieveRecord(formContext.data.entity.getEntityName(), formContext.data.entity.getId(), "?$select=modifiedon").then(onRetrieveModifiedOn);
  }
}

function onFormSave()
{
	//Not to refresh on save
	lastModifiedOn = null;
}

function onSubgridLoad(executionContext)
{
   Xrm.WebApi.retrieveRecord(formContext.data.entity.getEntityName(), formContext.data.entity.getId(), "?$select=modifiedon").then(onRetrieveModifiedOn);
}

function onRetrieveModifiedOn(result)
{
	if(lastModifiedOn != result.modifiedon)
	{
		debugger;
		var doRefresh = false;
		if(lastModifiedOn == null){
			formContext.getControl(gridName).addOnLoad(onSubgridLoad);
		}
		else{
			doRefresh = true;
		}
		lastModifiedOn = result.modifiedon;
		if(doRefresh) formContext.data.refresh();
	}
}


Have fun with the Power!

User licensing in D365 instance

$
0
0

When thinking about user licensing in D365 instances, you may be thinking of D365 applications. However, from the licensing standpoint D365 instance is nothing but an “advanced” CDS instance with a bunch of first-party apps deployed there, so it is still possible to use Power Apps “per app” and “per user” plans in those instances.

Which is exactly what the diagram below tells us, and that’s coming straight from the D365 licensing guide:

image

However, that diagram is looking at the licensing in a sort of exclusive manner, and, also, it’s doing it more from the custom entities standpoint. Also, it’s not mentioning Power Automate licensing in any way.

Still, it’s a great starting point, but I was wondering if there might be a case where a Team Member license would need to be combined with the Power App and/or Power Automate licenses. And/or whether it’s actually possible to replace a Team Member license with a Power App license.

This might be especially relevant now when team member license enforcement is almost there:

https://docs.microsoft.com/en-us/dynamics365-release-plan/2020wave1/dynamics365-sales/license-enforcement-users-new-team-member-licenses

Hence, here is my take on it.

In both cases, we just need to see which use rights are covered by each of those license types, and here is how it goes:

Team Members:

  • Read-only access to the restricted entities
  • Dedicated first-party applications only (no custom apps, though can still extend those first-party)
  • Power Automate use rights within D365 app context
  • 15 custom entities per covered app module
  • Access to the employee self-service portal (ability to create cases)

Power Apps plans:

  • Unlimited custom entities
  • Custom applications (limited # in case with “per app” plan)
  • Read-only access to the restricted entities
  • Custom applications only (no first-party apps)
  • Power Automate use rights within app context
  • Unlimited custom entities
  • “Per app” plan is linked to the environment

Power Automate plans:

  • Power Automate use rights for the general-purpose Flows (per user or per flow)

For the most part, it’s clear how to mix and match license assignments for the same user account. Except for the two questions I mentioned above.

Would we ever need to combine Team Member license with a Power App license?

The only scenario I see clearly is when there is a user who needs access to the employee self-service portal, yet that same user needs to go beyond Team Member license limitations (15 custom entities per module, read-only accounts, etc). Team Member license will give access to the self-service portal, and everything else will come with the Power App license.

Can we replace a Team Member license with a Power App license?

This is really the same question, just asked differently. We might not be able to use first-party apps; however, a model-driven app is nothing but a set of application components and an associated site map. We can always create a custom app which will include required components, and we can customize a site map. That will still be within the use rights of the Power App license.

There is a caveat here, though. In terms of pricing, Team Member license is comparable with the “Power App Per App” plan. However, while a Team Member license can be used in multiple D365 instances, a “Power App Per App” plan is linked to a single environment. From that standpoint, the answer to the question above depends, of course.

Other than that, a Power App license seems to be more powerful than a Team Member license – after all, Power App users will be getting access to all those additional non-restricted entities, including the “account” entity. Yet Power App users will be able to utilize two custom apps, and that may include a model-driven app and a canvas app (assuming “per app” plan).

Finally, what about the Power Automate?

The most important thing to remember is that you can only use generic Flows with the dedicated Power Automate plans. Any use rights provided by Power App/Dynamics licenses will only cover your users for the app-specific scenarios. This is a vague language, but, just to give you an example… a Team Member license would give you access to the dedicated Dynamics apps, and those apps have only one data sources (CDS). If you wanted your Team Member users to start using Flows which are connecting to SQL, you’d need to throw in Power Automate licenses into this mix.

PS. As usual with licensing, everything I wrote above is based on my interpretation of the licensing guides. You can use it as a starting point, but do your own research as well.

When that stubborn Default property does not work for a Canvas App input control, there is still a way

$
0
0

It was a strange day today – I kept finding new stuff (as in “new for me”) in Canvas Apps. Apparently it had something to do with the fact that a Canvas App I was working on is being used in production now, so it’s getting much more real-life testing than it used to.

A couple of months ago, I wrote a blog post about the “default property”: https://www.itaintboring.com/powerapps/default-property-in-the-canvas-apps-controls-there-is-more-to-it-than-the-name-assumes/

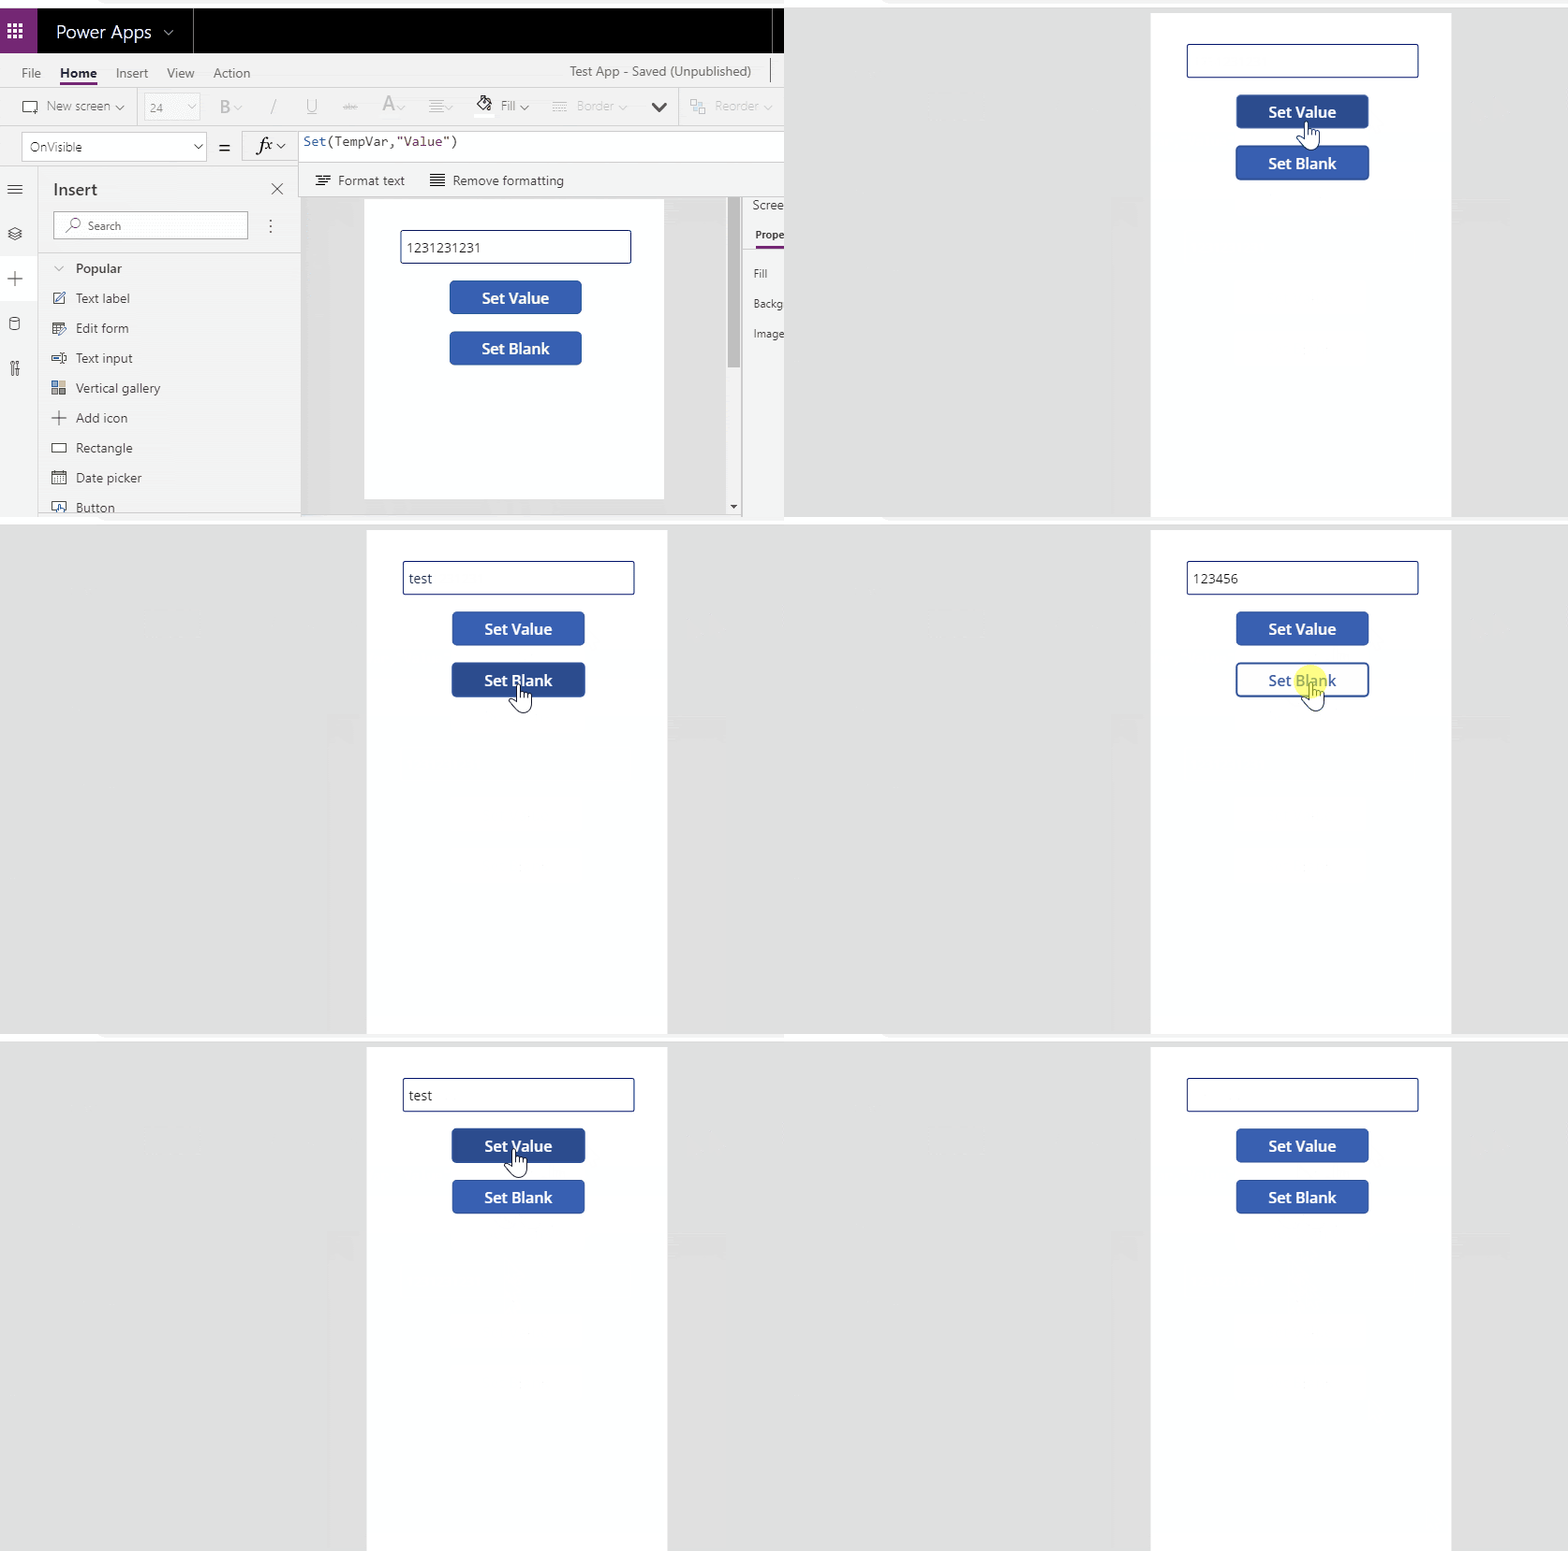
Just to reiterate. When using a variable for the “Default” property of the input control, we can normally expect that, once the variable has been updated, those changes will also be reflected  in the input control through its “Default” property.

This works, but, as it turned out, there is one edge case when it does not.

In the following scenario, it seems my Canvas App stops recognizing changes in the underling variable:

  • I set my variable to a new value
  • As expected, that value gets displayed in the text box input control
  • I type in a value into the text box
  • And, then, I use Set operator to update my variable once again using the same value as before


It does not work – my text box control is still displaying the same value I entered manually. Why? Because I actually have to update the variable, and, of course, it’s not happening if I am using the same value again and again.

Here is a quick demonstration – notice how I keep pushing “Set Blank” toward the end of the recording, and nothing is happening – this is exactly because my variable had already been set to Blank, so setting it to Blank again does not change anything. However, once I click “Set Value”, it all starts working again:

default_property

Why did it suddenly hit me today? That’s because my Canvas Application is, essentially, a multi screen wizard application, and, as the user keeps going  through the screens, they can go back to the start screen any time. At which point I may need to reset all input controls, and, since I am using variables, I need to reset those variables.

Because of how this wizard-like application is working, some of the variables would not be updated till the very last screen has been reached. So, if the user decides to start over somewhere in the middle… Those variables will still be “Blank”, and, so, resetting them to “Blank” won’t do much because of what I wrote above.

Dead end? Have to redesign the whole app? That might well be the case, but it’s for when I get some spare time. As it turned out, there is a workaround – I’m just afraid I’ll have to add a note every time I write something like this:

image

Yep… When using a variable for the Default property of your input control, you might want to change the value of that variable twice whenever you want to make a change. First, change it to a dummy value. Then, change it to the actual value. That all but guarantees that the change will get reflected in the input control.

Canvas Apps: Sync processing vs Async processing

$
0
0

I used to think Canvas Apps are synchronous, since, after all, there are no callback functions, which means implementing a real async execution pattern would be  a problem. As it turned out, there are at least a couple of situations where Canvas Apps are starting to behave in a very asynchronous way.

There is a “Select” function: https://docs.microsoft.com/en-us/powerapps/maker/canvas-apps/functions/function-select

And there is a “Concurrent” function: https://docs.microsoft.com/en-us/powerapps/maker/canvas-apps/functions/function-concurrent

Looking at the documentation for those two, you will get a hint of how Canvas Apps functions are, normally, evaluated:

image

image

Those two excerpts, bundled with the mere existence of the “chain” operator (“;”) are telling me that, normally, all functions in a chain are executed sequentially.

Except, of course, for those two above. Actually, “Concurrent” is also executed sequentially – it’s just that all those other functions within “Concurrent” won’t wait for each other.

“Select” turned out to be quite a different story, though.

I was having a problem with my app. As it often happens, I added a hidden button, so I could use that button to call the same “code” over and over again from different places. That seems to be a common workaround whenever we need to define our own “function” in Canvas Apps.

It usually works seamlessly – all I need to do is call Select(<ButtonName>) wherever we need to run that encapsulated code (while the user is on the same application screen).

However, the fact that “Select” only queues the target “OnSelect” for processing and does not execute it immediately makes all the difference in some situations.

Why did it bite me this time?

In my application I have a number of checkboxes per screen. Different users can open the same screen at the same time and start updating those checkboxes. I wanted to make sure that any change one user makes are presented to the other user at the earliest opportunity.

So, I figured, I’d do it this way:

  1. When the user changes something, I’d call “Select” for a hidden button
  2. In the “OnSelect” of that button, I’d re-read all values from the input controls, and I’ll use “Patch” to push changes to the CDS
  3. Then I’d re-read all data from CDS to capture any changes made by other users
  4. And, then, updated data would be displayed in the interface


Why does it matter that Select calls are not executing “OnSelect” immediately? Because what I ended up with is this:

image

I wanted to go with the least amount of efforts, so I figured I would go easy on the “OnChange” events, and I would just call “Select” there. In the Select, I would read values from the UI controls, I would patch the datasource, then I would reload data, and, then, I would update the UI with reloaded data.

Problem is, because of the queued nature of those “OnSelect” events, it may turn out that the data OnSelect would be using to update the UI would not really reflect the  most recent changes made by the user, so some of those changes might be lost in the end.

Well, if you run into this issue, the only workaround I could think of is to put an overlay control (I used a label) on top of all other elements on my screen so that it would be hidden most of the times, but it would be displayed once OnSelected has started to prevent any user input:

image

We can easily manipulate the visibility of such control using a variable:

image

So, I just need to set that variable to true at the start of OnSelect, and, then, reset it to “false” once there is no more processing in the OnSelect.

Transparent effect can be achieved by using that last (“alpha”) parameter of the RGBA color – it indicates the opacity (in the range from 0 to 1, where 0 stands for “transparent”):

image

Adding FetchXml filtering to the N:N lookup

$
0
0

I was looking into adding FetchXml parameter to the N:N lookup PCF component earlier today, and something interesting came up.

But first things first. I needed a way to define a filter for the list of records my control will be showing in the dropdown list. Imagine the following scenario, for instance:

  • There is a long list of tags
  • However, for every N:N lookup I want to be able to choose from a subset of tags rather than from the whole list


“No problem – let’s just use FetchXml”. Or, at least, so I thought.

It seems we should be able to create multiline properties for our PCF controls – if you look at the manifest schema reference, you’ll see “Multiple” and “SingleLine.Text” types there:

https://docs.microsoft.com/en-us/powerapps/developer/component-framework/manifest-schema-reference/type

I tried both, but, somehow, for either of them I could only use a certain number of characters into the property value(not sure how many exactly, but it was not even 200) . On the screenshot below, it’s been cut off at around 160th character:

image

Well, maybe it just does not work, or, maybe, I don’t know how to use it.

In either case, I figured if it’s limited that way then I need something else, so, in the end, here is how it worked out:

  • Instead of accepting FetchXml as a parameter, N:N lookup will be accepting a web resource name
  • FetchXml will have to be stored in that web resource


Here is an example of the control property:

image

Here is an example of the web resource:

image

And you will see below how the values are getting filtered (only those having “1” in the name are displayed in one of the controls) when there is FetchXml filter:

filteredoptions

If you know of a better way to create multiline parameters, please drop me a note – would be much appreciated. In either case, those changes are in the github repo now, so feel free to try it out!

Viewing all 554 articles
Browse latest View live