Quantcast
Channel: It Ain't Boring
Viewing all 554 articles
Browse latest View live

Making a PCF control readonly

$
0
0

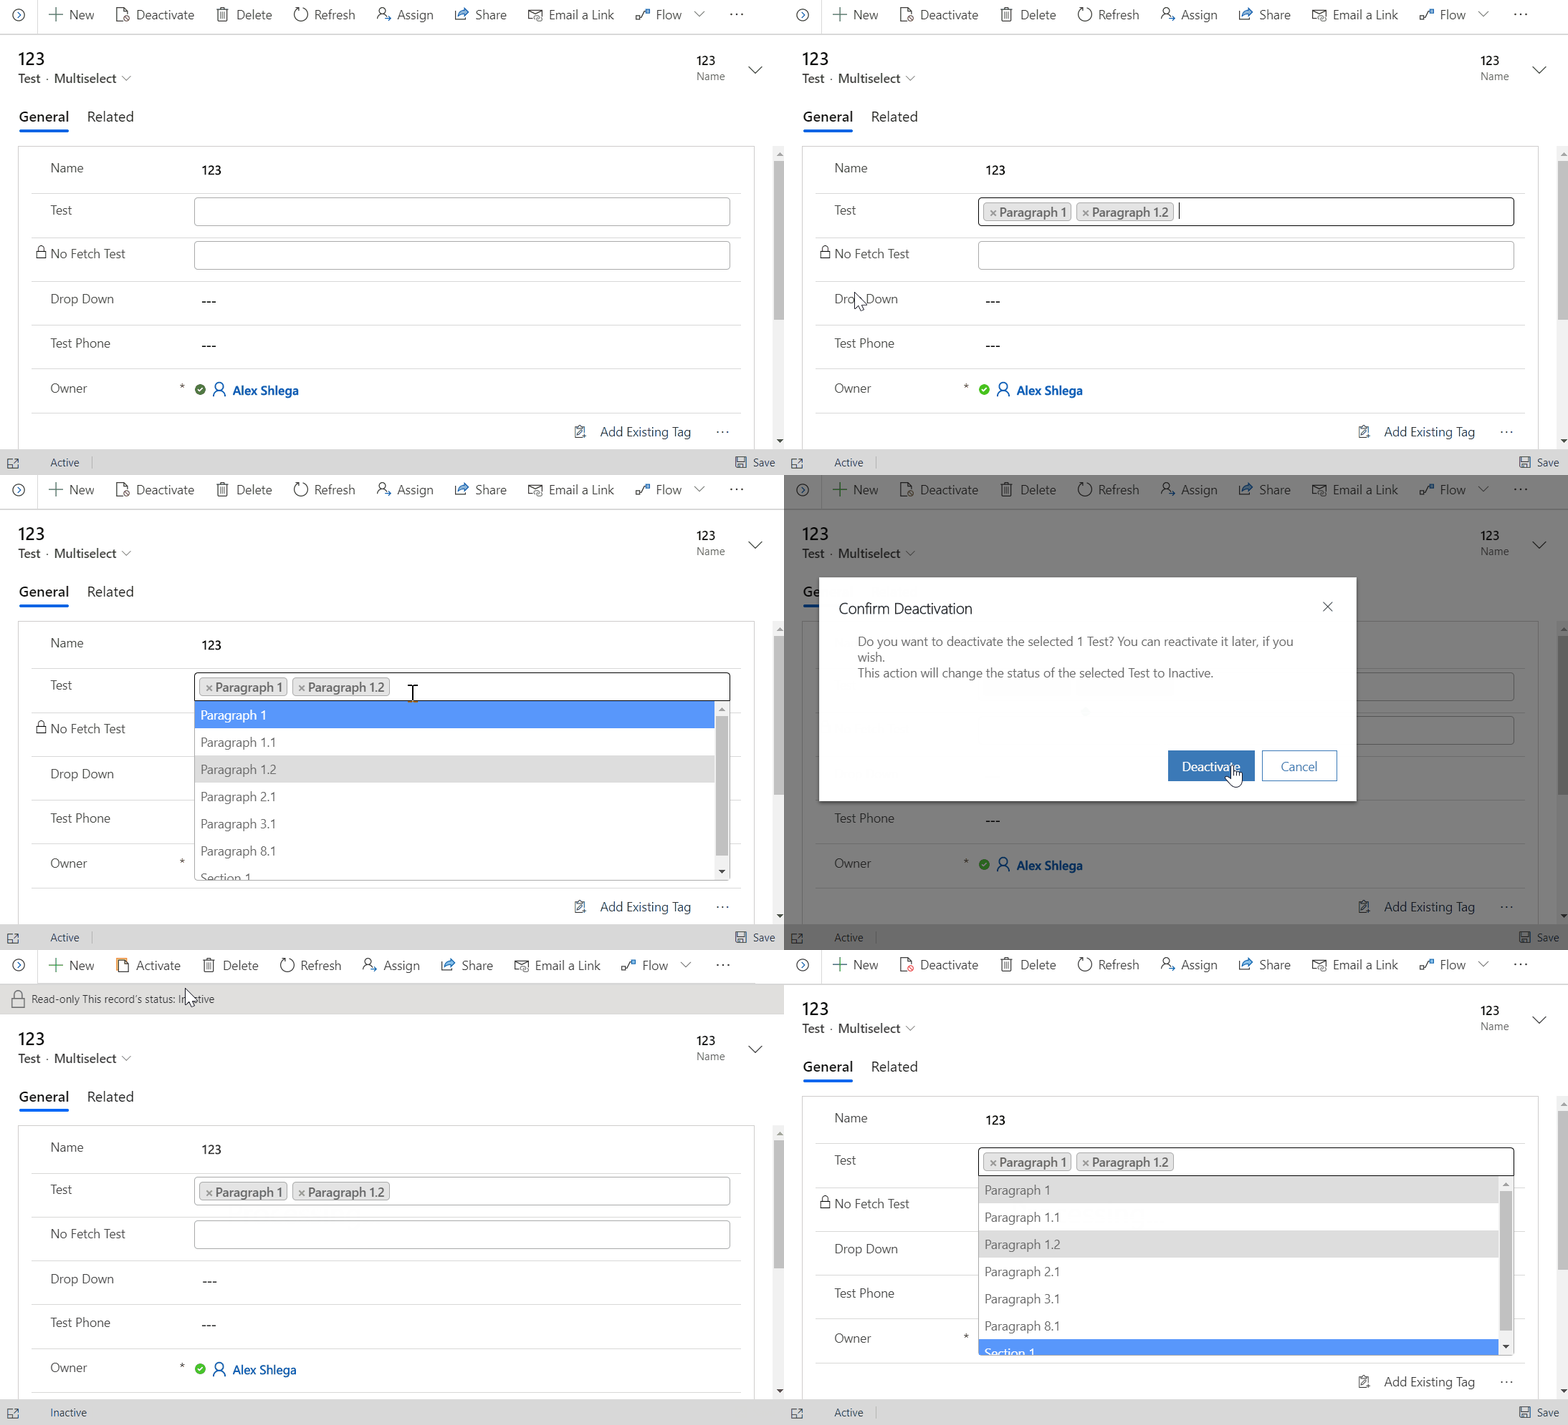
Up until now, none of my PCF controls were meant to be readonly. But, of course, it would only make sense to prevent updates for inactive records and/or when some of those controls are set to be readonly in the form designer:

readonlypcf

Dynamics Ninja has already described the basics in his earlier post: https://dynamicsninja.blog/2019/11/25/is-your-pcf-control-read-only/

Just to reiterate, though, we can use the property below to decide whether our PCF control should be readonly or not:

context.mode.isControlDisabled

However, depending on how that PCF control is implemented, making it readonly might end up being a bit more involved exercise.

For both N:N treeview and N:N dropdown controls in my PCF controls solution, I ended up using the following approach (and, it seems, it may work for other controls, too):

  • There would be a transparent overlay div element
  • That div element would only become visible once isControlDisabled has been set to true

From the HTML/CSS standpoint, for this to work I would actually need 3 elements:

  • A container div (which could be the container element provided by the PCF framework)
  • An overlay div added as a very first child element to the container above
  • Main PCF component element

For those 3, I’d be using the following CSS styles:


.pcf_container_element
{
	 position:relative;
	 width:100%;
	 height:100%;
	 overflow:none
}

.pcf_overlay_element
{
	 width:100%; 
	 height:100%;
	 border:0px;
	 background-color:transparent;
	 z-index:10;
	 position:absolute; 
	 top:0;
	 left:0
}

.pcf_main_element
{
	position:relative; 
	top:0; 
	left:0
}

With these settings, my overlay element would be placed just on top of the main element, so there would be no way to click/change anything in the control. And, yet, since my overlay element would have transparent background, it would no be visible to the user. Which means this would all result in a read-only PCF component presented to the user.

You can take a closer look at the code in the github repository, but here is the summary:

setReadonly function will change visibility of the overlay element depending on what’s stored in the isControlDisabled property

public setReadonly(): void
{
(<HTMLElement>this.container.firstElementChild).style.display = this.contextObj.mode.isControlDisabled == false ? "none" : "block";
}
</HTMLElement>

In the “init” method of the PCF
control, all those elements will be created with correct styles


	container.classList.add("pcf_container_element");
		
	this.overlayDiv = document.createElement("div");
	this.overlayDiv.classList.add("pcf_overlay_element");
	container.appendChild(this.overlayDiv);
		
	this.mainContainer = document.createElement("select");
	this.mainContainer.id = this._ctrlId;
        ..
	this.mainContainer.classList.add("pcf_main_element");

Those 3 css styles will be added to the PCF control through an additional css resource file

image

Finally, setReadonly function should be called from somewhere

It should definitely be called from the updateView; however(and maybe that’s something I need to look into a bit more), I found that for my N:N treeview control updateView does not get called on the initial load, for example. Therefore, I’m also calling it once the treeview has been initialized.

That seems to be all there is to it. And, of course, those css styles above can be tweaked a little more. For example, you might want to add background color to the overlay element. In that case it might make sense to use rgba colors to make the background transparent.

Power Apps Component Framework (PCF) – is it complicated? Or is it not?

$
0
0

Ever since Power Apps Component Framework went into the GA, there probably was not a day when a new PCF component would not be released by somebody in the Power Platform community.

There is just no way to ignore the fact that PCF has turned into a very popular addition to the Power Platform developer toolset.

And it’s not like it’s just a toy for developers to play with – in these few months I personally saw a few situations where PCF components were developed on the actual projects because they do provide the best level of re-usability and/or configurability when it comes to the UI components in Power Apps.

However, there is something very unique about PCF component development which makes it difficult to clearly answer the question of whether it’s complicated or not.

What is PCF to start with? From my perspective, it’s, basically, plumbing. PCF itself is not a component – it’s an agreement on how PCF components should be developed. There are command-line tools, there are a few standard event handlers, there are a few standard data types, there are some out of the box javascript functions and objects to facilitate execution of standard operations, there is a manifest definition file, and there is a bunch of sample components which anyone can use to start developing their own components quickly.

That may seem like a lot, but it’s, really, not.

Any plugin developer will tell you that the number of things one needs to learn to efficiently develop plugins is, likely, even greater.

Still, I’ve done PCF development, and I’ve done plugin development. If you ask me, PCF component development is way more complicated. Although, if you ask a seasoned front-end developer, they’ll probably say PCF is the most simple thing they had to learn lately.

Here is how I see PCF development:

image

The more experience you have with the frameworks/tools/technologies in the orange circle, the easier it will be for you to develop PCF components. Since, really, PCF component development is not so much about knowing the PCF framework – it’s still about creating a user interface widget with javascript/typescript, and PCF is nothing but a plumbing which connects that widget to the underlying model-driven/canvas screen.

In the same way, plugin development looks like this:

image

In general, it may take longer to figure out “plugin development framework”, but, once you’ve learned it, you can rely on your C#/.NET development experience to start creating useful plugins.

In other words, if you are thinking about developing a PCF component, you may want to do a mental exercise. Imagine that you need to develop a typescript/javascript application that will do what you think your PCF component should do. With PCF taken out of that equation, at least temporarily, do you think you’ll be able to do it? If the answer is “piece of cake”, you are in a really good shape. Just be prepared to spend a day or two working through the documentation, and you’ll be good to go.

If, however, the answer is “no idea – I thought PCF would take care of it”, that’s where you’ll quickly find out that PCF is not a magic bullet, and you may still need to learn front-end development first.

And that’s when you decide if PCF is complicated or not…

A PCF-based regex validation for a regular out-of-the-box control

$
0
0

You know how we can put more than one control for the same attribute on the model-driven form? So I was thinking… would it work if I added the same attribute twice, but if I used default control for the first occurrence of that attribute on the form, and, then, if I used a custom PCF control for the second occurrence? Not only that, though. What it I could hide that second control, and, instead, use it for validations only?

This was based on the idea that whenever the attribute value changes(no matter how or through which control), the framework would call updateView method for my PCF control, and that’s where I could do the validations.

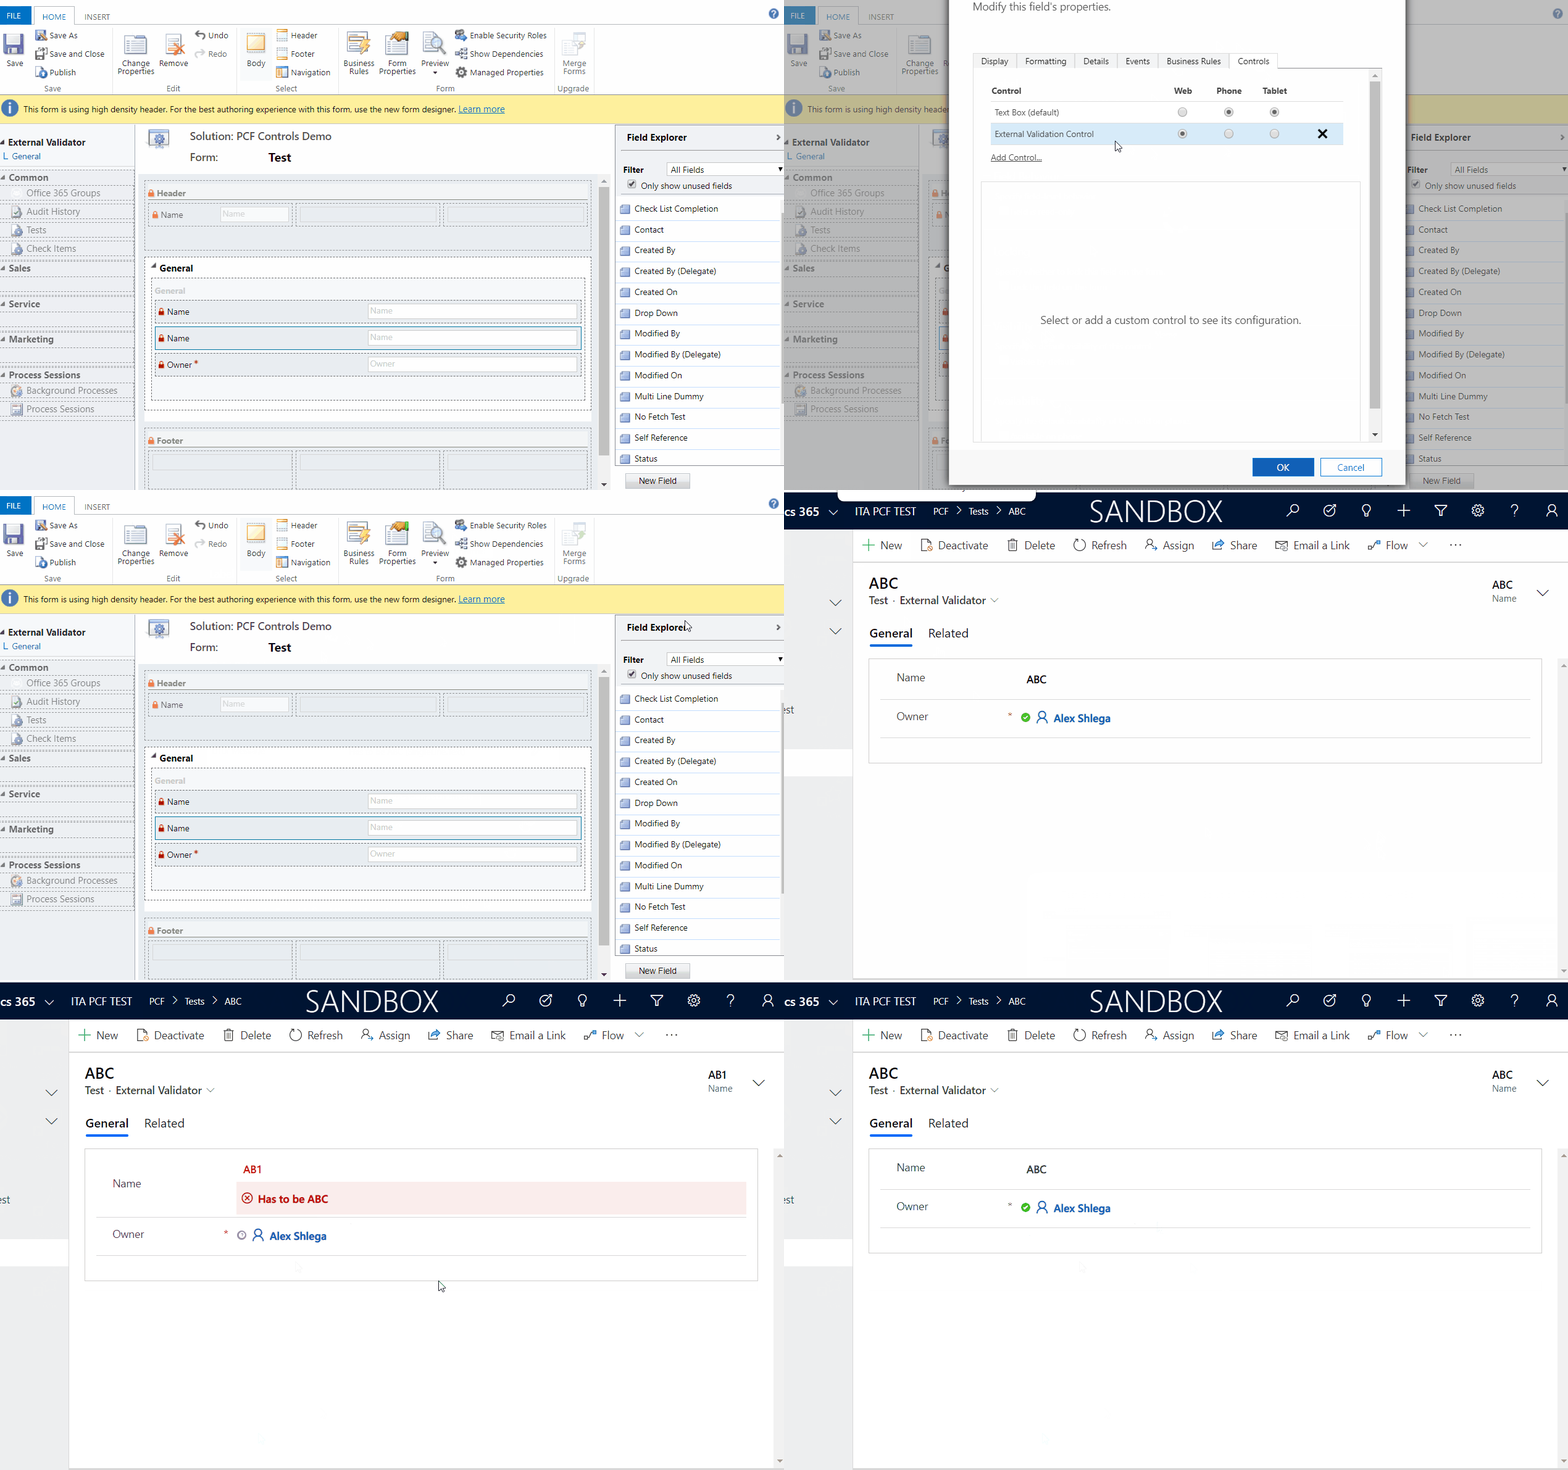
Here is how it worked out – keep in mind there are no web resources attached, and all I had to do to add that extra validation to the default “name” field is to configure a custom control for the second occurrence of that attribute on the form:

externalvalidator

That approach is, actually, pushing the boundaries of what’s “supported” because:

  • I need that second control to be hidden
  • However, if I hide it by default, my PCF control code would not run (guess that’s how the framework is)
  • So, I can’t hide it in the form properties, and I need to hide the HTML element containing my control. That part is not, technically, supported, but, well, consider this an experiment


With that said, what exactly are the steps for setting up an extra validation using this experimental PCF control?

1. For an field on the form, add the same field one more time

image

2. For the second occurrence of the field, configure custom control

image

3. Save, publish, and see how it works

A word of caution: since this control has to hide itself, it’s looking at a certain CSS class, and, as of right now, this may not always work (seems to depend on the form resolution etc). I may have to play around with this “hiding part” a little more to make it more reliable.

Or, if you want to try it yourself, just get this solution from github and see how it works out:

https://github.com/ashlega/ITAintBoring.PCFControls

PCF components and setVisible / setDisabled

$
0
0

Every input control in model-driven apps has a couple of methods that I use quite often when creating web resources to customize form behavior. Those are:


Actually, I can’t recall a single projects where I would not need to use one, or, probably, both of those.

So, we have PCF now, and there are more and more custom controls. So how are those controls going to respond to a web resource calling one of those methods for them?

Actually, they respond pretty well, but there are a few things to keep in mind.

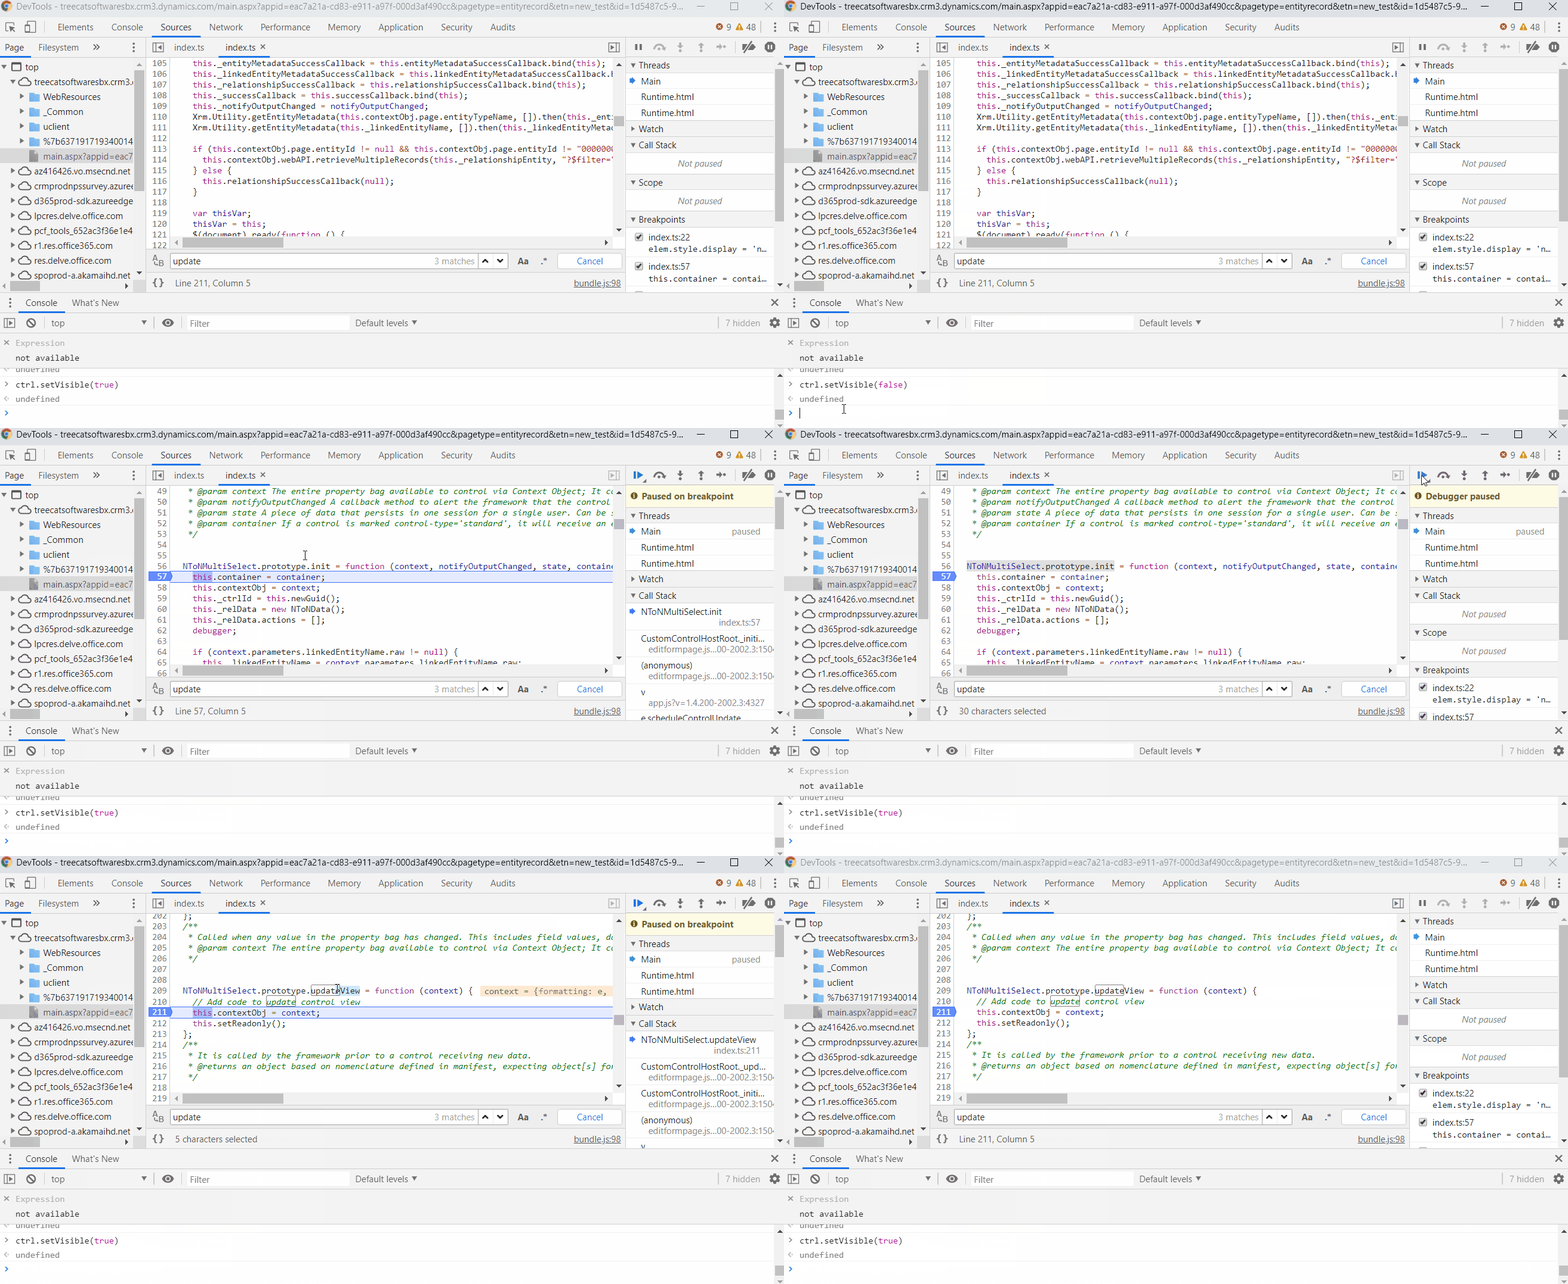
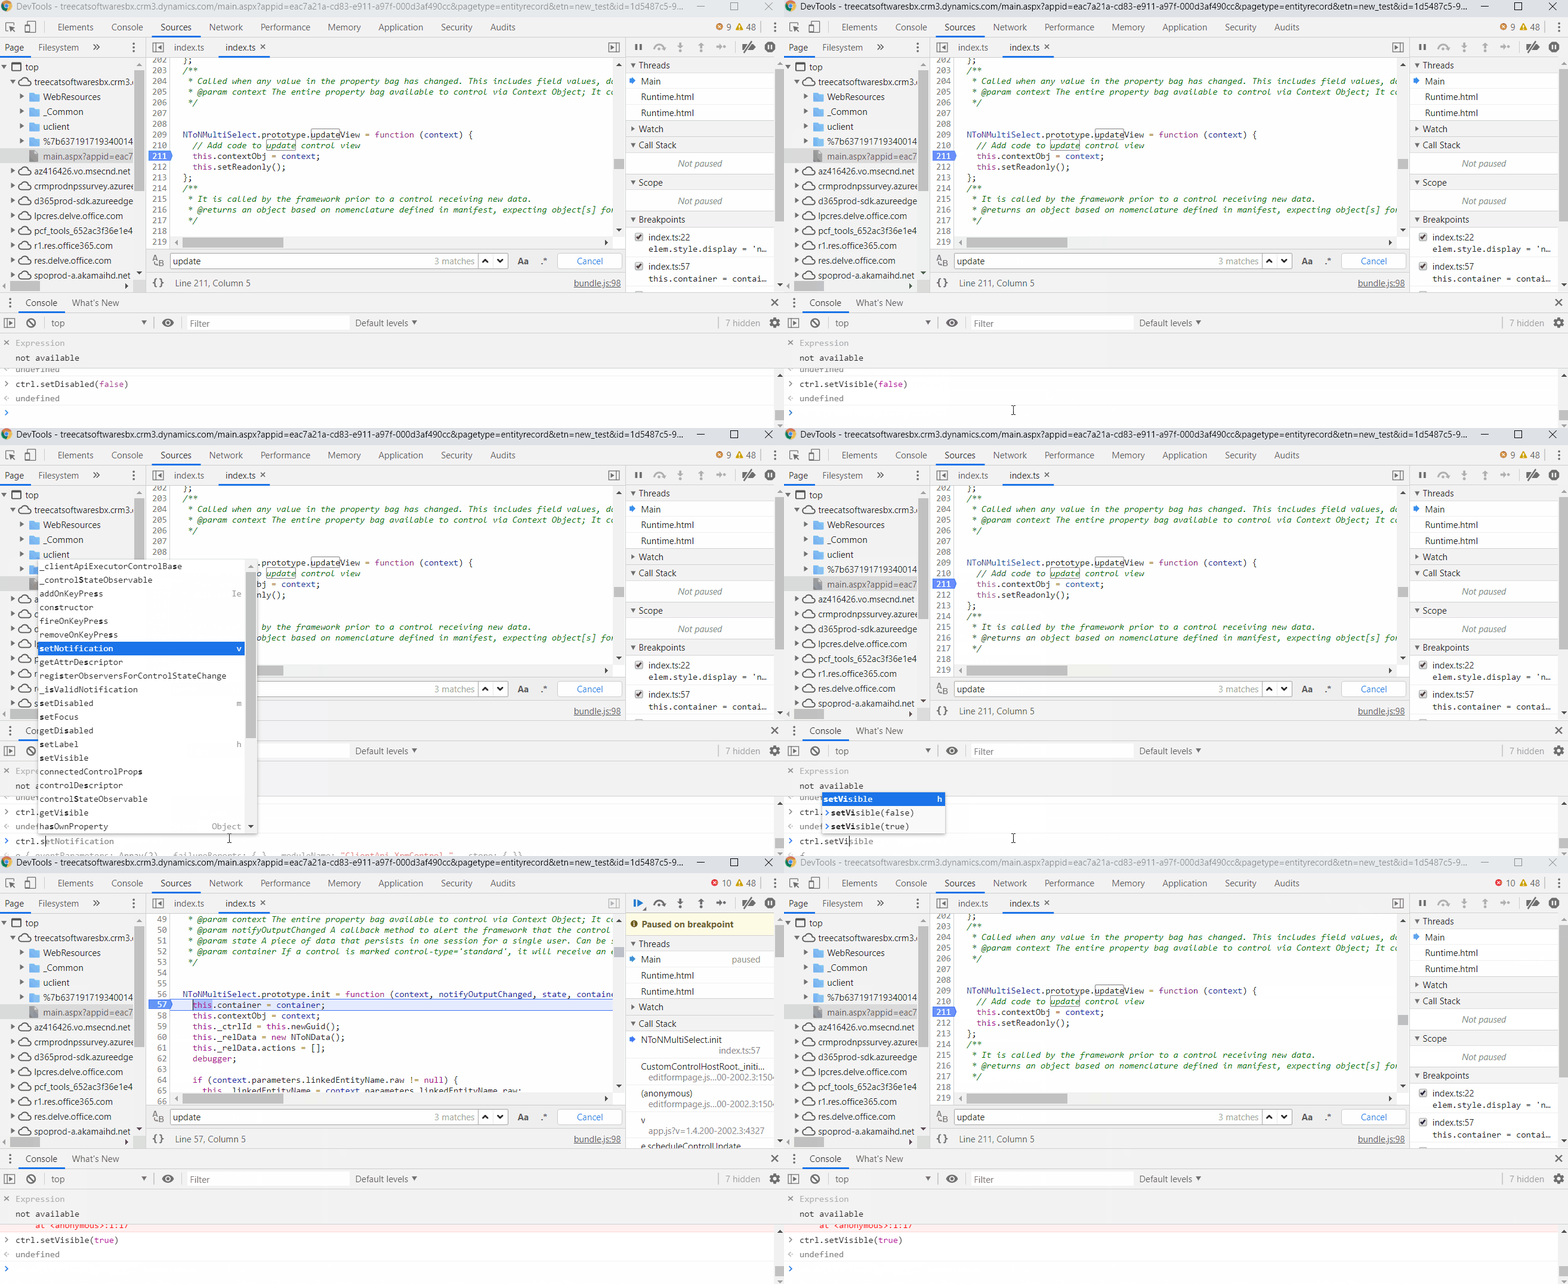
Init method will be called every time your custom PCF control becomes visible. It will be followed by  a call to updateView. This is similar to what will happen on load of the form. Below, I have Chrome dev tools open, and you’ll see how calling “setVisible(true)” causes my PCF control to go through both “init” and “updateView” methods:

setvisible

Actually, there is more to it:

  • Calling setVisible with “false” argument to hide the control does not kick off “init”/”updateview”
  • Calling setVisible with “true” argument to show and already visible control does not kick off “init”/”updateview” either (apparently, there is some optimization)


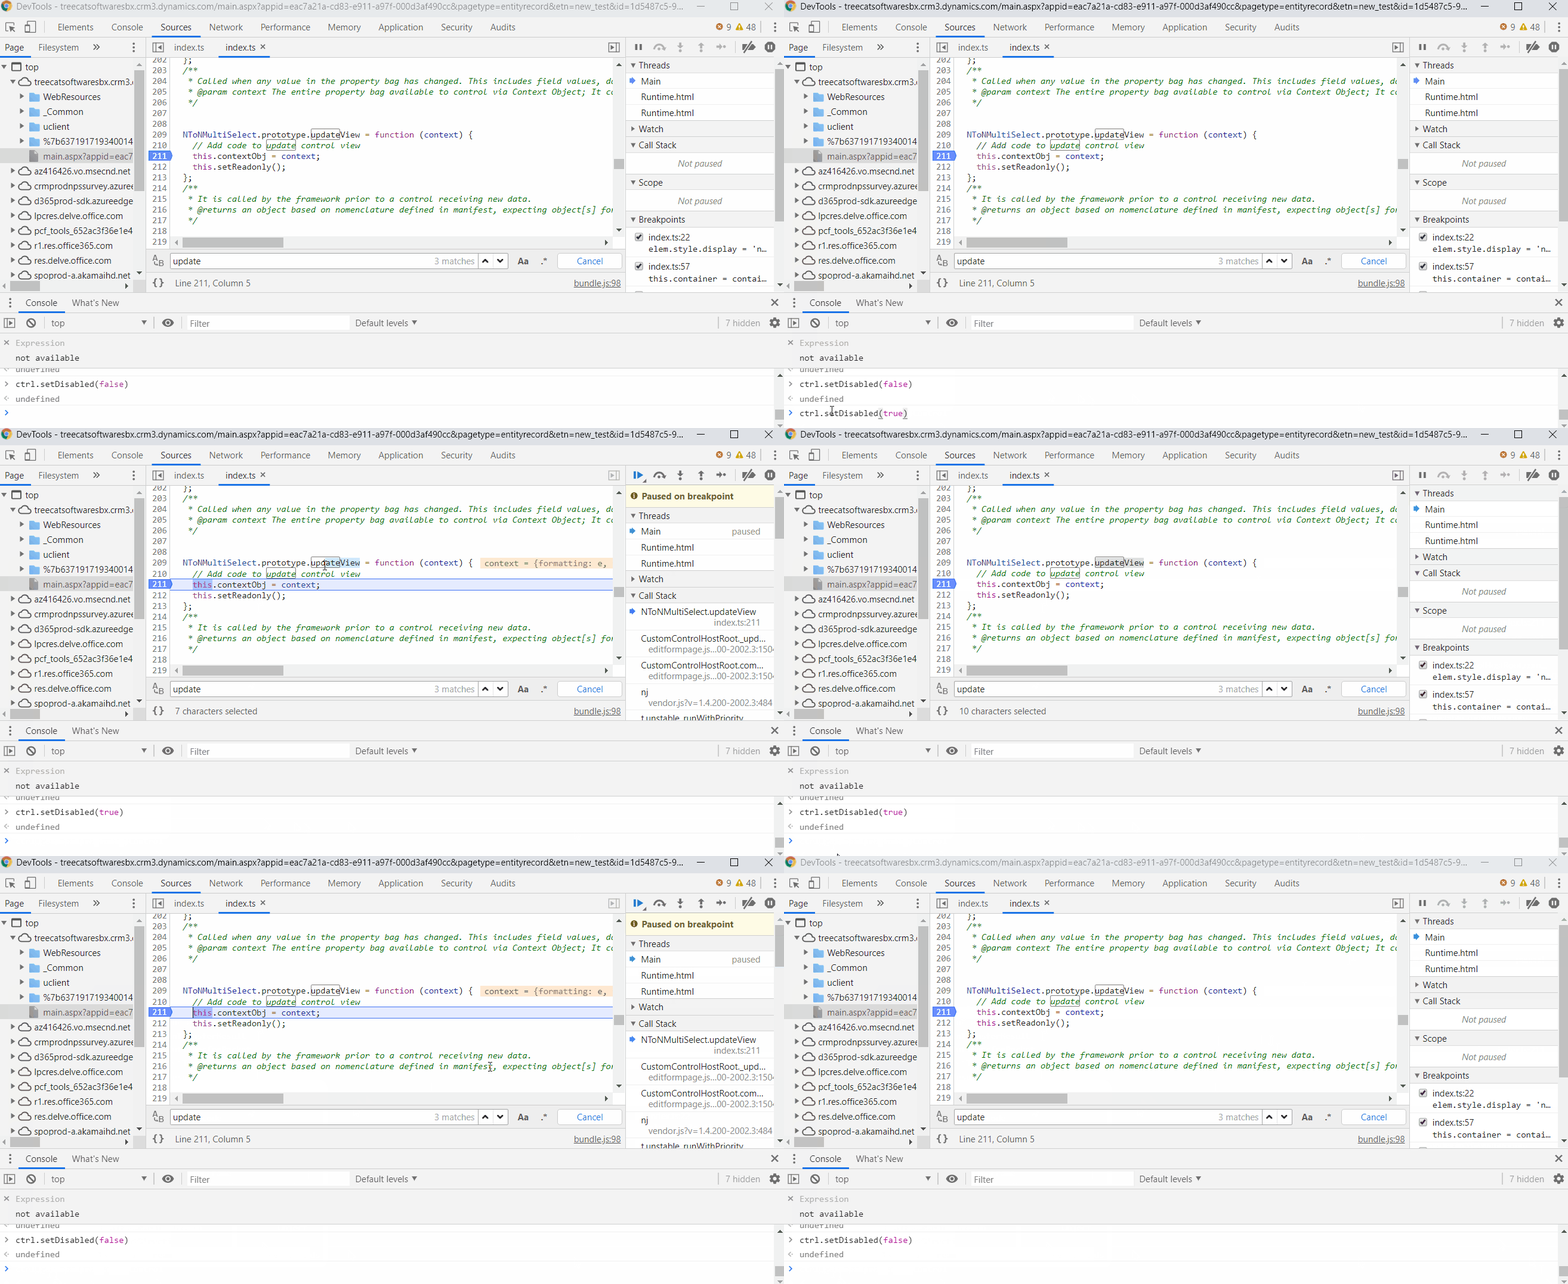
As far as “setDisabled” goes, whether it’s called with “true” or “false” as an argument, it always results in a call to updateView:

setdisabled

However, what if I hide my control first? In that case, my custom PCF control stops responding to just about anything. For example, calling “setDisabled(true)” goes absolutely unnoticed until the control is visible again:

setdisabledwhenhidden

And here is a diagram that may help:

image


Verifying application type in the PCF component

$
0
0

You probably know that PowerApps Component Framework is now in the public preview for CanvasApps. So, what do we do when there is something new? Of course, we start poking around to see what happens.

One thought that kept bothering me is that I tend to use more than I am probably supposed to in my components. For example, my N:N Lookup control is using Xrm object, and, technically, it should not. But, on the other hand, since it’s always going to run in the context of the model-driven form, and Xrm is supposed to be there, there should be no harm. Right?

Well, kind of. Turned out I can, as well, just add that component to a canvas app. Inevitably, it will fail, so here is how it will look like:

image

That’s not so nice, after all.

Ideally, I should be able to somehow identify the target of my component – should it work with model-driven/canvas/or both types of applications? Unless I’m missing something, and I’m guessing that kind of setting should be part of the manifest definition file, here is an idea you might vote for if you think it makes sense:

https://powerusers.microsoft.com/t5/Power-Apps-Ideas/Add-target-application-type-canvas-model-driven-both-to-the-PCF/idi-p/493354#M29919

In the meantime, I was looking for a way to add some code to the component so it would display more user-friendly message. Which, in itself, should not be a problem. Figuring out current application type turned out to be a little tricky, though, since some of the properties I would expect to become unavailable in the Canvas Apps are, actually, still there. It seems specific values of those properties don’t necessarily make sense, but the fact that they are there makes it impossible to compare some of those properties to “null” if I wanted to do different things depending on the outcome of that comparison.

For instance, this screenshot is for a Canvas App, but notice entityTypeName there:

image

Having said that, I just settled on the most simple thing to do that kind of comparison (which I alluded to above):

if(typeof Xrm == 'undefined'){
   this.errorElement = document.createElement("div");
   this.errorElement.innerHTML = "<h2>This control only works on model-driven forms!</h2>";
   container.appendChild(this.errorElement);
   this._isValidState = false;
}
else
{
    //Proceed as usual
}


Of course, in order to do that I also have to declare Xrm variable in my typescript to be able to build my component without errors:

image

It’s time for a quick test? Here you go:

image

As usual, the source code/solution are available from github:

https://github.com/ashlega/ITAintBoring.PCFControls

Power Automate Flow – creating an email with attachment in CDS

$
0
0

  The way I feel about Power Automate Flow is a perfect example of the love-hate relationships. Yes, I can do much more than I used to be able to do in the classic workflows. However, every now and then I run into something that seems simple, but that ends up being an exercise in google searching, forums browsing, intuition-based Flow development, and, of course, in the intense self-control.

  The subject of today’s exercise was the following question posted in the community forums:

https://powerusers.microsoft.com/t5/Building-Flows/How-to-use-flow-to-send-CRM-email-with-attachments/m-p/494318#M61306

  Well, this seems simple, and it is sort of simple once it’s been done, but it took me a while to figure out how to do it.

  Here is how the Flow looks like:

image

There are a few things to consider:

  • I can create an email record using “Common Data Service (Current Environment)” connector
  • Once an email record has been created, I need an HTTP (Azure Ad) connector to add an attachment
  • And, finally, I need an HTTP (Azure Ad) connector to send the email created earlier

Why do I need those Http with Azure Ad connectors?

image

This is because I could not figure out how to add email attachments/send emails directly through the CDS connector (and there were a few helpful links in the community forums which came up when I was looking for a solution. For example, this one has really helped: https://community.dynamics.com/365/f/dynamics-365-general-forum/360013/creating-activitymimeattachment-email-attachment-record-through-microsoft-flow).

With those connectors, however, you have to use a connection which is using correct base url. For example, in my case here is how “Send the email” step looks like – notice the request url:

image

In order for this to work, you’d have to create a connection so that base resource url and azure ad resource url would match the request url above:

image

image

Also, do keep in mind that all references are supposed to be in the following form:

/entityset(guid)

image

With all that said, let’s just see how each step in my workflow is implemented:

1. Loading the file from Sharepoint

image

2. Creating an email (using “create record” action of the “Common Data Service(Current Environment)” connector)

I’ve hardcoded contact guid there, but you might, as well, get it from CDS using “List Record” action, for example

image

3. Converting email message id into “any” type – that’s a Compose action

image

This is so I could use it in the next step

4. Creating an email attachment (Http with Azure AD)

“Outputs” is from Get Email ID above

That base64 function is an expression: base64(outputs(‘Get_file_content’)?[‘body’])

I’ve also hardcoded file name & mimetype

image

5. Finally, sending an email (Http with Azure AD)

image

That’s it. Done. I think in the end I love Flows! Since, of course, I would not even be able to load that file from Sharepoint using a classic workflow, so I’d have to write some code, and it would take me quite a bit longer to figure out Sharepoint authentication etc.

A Canvas App as a Kiosk App?

$
0
0

I was looking for a point of sale software solution the other day, and it occurred to me that, in theory, I could probably write something up using a Canvas App. Of course I would need to solve a few problems, such as:

  • Which device do I run it on
  • How do I stop users from using other system functions
  • How would licensing work


And there might be a few more, but those are the main ones.

Here is what I ended up with:

How does it work?

Basically, there is a windows application that’s hosing my canvas app. It’s using Chromium engine, so it seems to be fully capable of running Canvas Apps. Although, if it sounds as if I had to create a new “Edge” browser for this purpose, that’s a bit of an overstatement. Sure, I had to write a few lines of code in C#, but here is what I used:

https://github.com/cefsharp/CefSharp

That’s a nice open-source library that allows us to embed Chromium in .NET apps.

The rest is all about running that .NET app in a full-screen mode, so that the task bar is hidden and the app stays on top of all other windows. Besides, that app can’t be closed using “Alt+F4”, for instance. Whoever is trying to close it will need to provide a key phrase.

Of course this all means that, should I start using this app, I’d need to run it on a Windows 10 laptop/tablet.

And what about the licensing? This application still requires a login, so, in the scenario where an agent would login in the morning, that agent would have to be licensed of course. Then the client might come in, sign a document, submit it through the app. And another client might come in to do the same. And then another one… this scenario would not be so different from when the agent would just hand over this tablet/laptop to each client manually for signatures, and that would be absolutely fine licensing-wise.

Either way, if this is something you’d like to explore a little more, here is a github repo you might use as a starting point:

https://github.com/ashlega/ItAintBoring.KioskApp

By the way, you’ll also find that PI Catcher canvas app there:

https://github.com/ashlega/ItAintBoring.KioskApp/tree/master/CanvasAppSolution

Have fun, and have a great upcoming Pi day!

Canvas App: Incompatible variable types

$
0
0

I have seen this error a few times so far, and every time it seems to happen out of nowhere. My application used to work – I even recorded a video of how it was working the night before to share it with the client. Lucky me, since, when I opened it the next morning to do a demo, all my formulas were showing errors similar to the one below:

image

“Incompatible type. We can’t evaluate your formula because the context variable types are incompatible with the types of values in other places in your app.”

Looking at the list of variables, I noticed that CurrentContact is of the “Error” type:

image

Not that it was very useful, but, to make it somewhat worse, I also found a different screen where the error was a little more precise:

image

If you’ve seen it before, maybe you can leave me a note since I’d be really interested to know what’s happening there. At the moment, I only have a workaround which seems to help, but what bothers me is that it does require quite a bit of application refactoring. Basically, I have to rename the variable everywhere. Will this problem happen again later when my app is bigger and it takes longer to do the renaming?

In the example above, I started to change variable name, and I’ve noticed quickly that the error was gone. So, I tried renaming it back to the original, and it was still all good. However, I remember the same issue happened to me before, and I actually had to change the name of my variable on a few screens before the error was gone.

Anyway, so far so good. If you run into it, you may try the “renaming trick”. But, if you have a better solution, please let me know.


Canvas Apps and CDS: Which attributes are added to the query?

$
0
0

Before you start reading, here is a disclaimer right way: this post is not an extension to the power apps documentation. It is just my attempt to figure out how Lookup and Filter functions work in Canvas Apps when those functions are applied to the CDS data source. I am hoping the information below is accurate, but use it at your own risk.

Was it scary enough?

Let’s continue to the fun part, then.

Here is a question: when you have a Filter function in your canvas apps against “Contacts” entity, which attributes will each of the returned records have?

Luckily, Canvas Apps are still web apps, so I can fire up chrome dev tools and do some network tracing.

But, first, let’s talk about the setup.

I have a simple Canvas App that’s using a Gallery control to display contact names and email addresses. There is a text box where I can enter a keyword, and that keyword will be used to filter records in the Gallery:

image

image

Now, I’m using “Select” button to set “SelectedContact” variable:

image

In turn, I’m using that variable to display selected contact phone number:

image

Based on the setup above, I have “Contacts” datasource in my app:

image

However, if you look at the above screenshots, I am not specifying the query attributes anywhere. There is no FetchXml, there is no Column Set (for those of you familiar with the SDK), there is no “select” parameter (Web API?), etc. So how does the framework know that it needs to query Phone Number attribute, for example?

Quite frankly, I don’t knowSmile But I can guess.

When looking at the query that the app sends to the Web API endpoint once the search keyword is updated, I see this:

image

Apparently, this includes all the fields I’m using on that screen. Let’s try something , though. Let’s replace ‘Home Phone’ with ‘Middle Name’ in the label’s text formula:

image

If I just “play” the app right away, there will be no text displayed in the label:

image

However, if I change the search text so a new request is sent to the server, and, then, click “select” button for exactly the same contact, here is what I’ll get:

image

What happened? From the dev tools trace, it’s clear that ‘Middle Name’ attribute was added to the query:

image

Although, ‘Home Phone’ (telephone2) is still there as well.

Hm… Let’s close the browser, completely. Then let’s open it again and re-run the app. Here is how the trace looks like this time:

image

There is middlename, but there is no telephone2.

I think at this point it’s clear what the framework is doing. It’s looking at all the attributes you might be using in different places, and it’s adding them to the query. Those attributes stick to the session, so, if you stop using some of them, they will still be added to the query until there is another session, at which time the framework will update the list of attributes.

However, there seem to be some optimization there, and it might be unexpected. What if I used Filter in a different place to populate a different collection?

image

Since my app is not using other attributes through that collection, only contactid and ‘Full Name’ attributes get added to the query:

image

Now what if I take it one step further?

image

Technically, I seem to be doing the same what I was doing before. I am setting “SelectedContact” from the collection, so I would expect ‘Middle Name’ to show up in the label text. Instead, that label does not show anything now:

image

Hm…

How about I collapse that formula into a single line?

image

Now I’m getting somewhere, it seems:

image

Except that… My label is absolutely empty now:

image

I need to go there, update the “Text” property of that label, and, then, the text shows up:

image

Fortunately, this only happens once when following the steps above.

Still, the fact that I have to collapse my formula into a one liner means that the framework has limited ability to infer the attributes it needs to add to the query.

It seems that, as soon as the attribute is utilized “directly”, everything works. But, once there is an extra variable between the query and the place where that attribute is utilized, this mechanism stops working. For example, it stops working once “OnSelect” formula is modified this way:

image

Which is obvious from the dev tools – there is no “middle name” attribute there:

image

Does this provide a definitive answer? Not really, but, quite frankly, I’ve been struggling with this behavior in my application recently, and, so I figured it would make sense to dig into it and see what’s happening. Not sure if it helps at the moment, but… knowledge is power, tooSmile

Canvas Apps: What is a “scope” and, what does it have to do with Filter/Lookup functions?

$
0
0

In the previous post, I was looking at which attributes are added to the CDS query by the Filter/Lookup functions. Might not end up with a definitive answer there, but, to summarize, chances are you’ll get the attributes included IF those attributes are utilized in the other formulas.

Now, it turned out there is a caveat to the statement above.

Somehow, this is also tied to the record scope. In the example below, I have a label that’s displaying a text from the variable. That variable is set from within a button “OnSelect” in the gallery or from within another button “OnSelect” outside the gallery. Both “OnSelect”-s are using exactly the same formula:

Set(SelectedContact, LookUp(‘Contacts’, txtSearch.Text in ‘Full Name’ ));

and here is how label’s text is set:

“Selected Contact: ” & If(IsBlank(SelectedContact), “Blank”, SelectedContact.’Middle Name’)

As you can see below, the result of those clicks is quite different (just watch the label):scopes

Actually, when using that “in-gallery” button, apparently I’m not getting anything at all (not only the attribute, but even the record itself is not retrieved).

Why?

Again, I don’t have a complete explanation, but this is definitely related to the scopes. Because, you see, once the formula for that in-gallery button is updated to use disambiguation operator (“@”), I am starting to get the record (without the attribute yet).

Here is the updated formula:

Set(SelectedContact, LookUp([@’Contacts’], txtSearch.Text in ‘Full Name’ ));

Here is how it looks like now – notice that SelectedContact is not blank anymore, even though there is still no attribute value:

scopes1

Now, if I add that attribute to the formula (just about anywhere), I’ll finally start seeing it retrieved from the datasource. Here is another version of that formula (for the in-gallery button) – this may be the most important part of this post, btw:

image

And here is another recording:

scopes2

Finally, both buttons are working the same way.

So, what was the problem with the first version of my formula? Apparently, since I am using the gallery to display contacts, and since I am using a Lookup function to work with the same datasource, somehow those two are getting into a naming conflict. A disambiguation operator allows me to use global scope for the data source name:

image

https://docs.microsoft.com/en-us/powerapps/maker/canvas-apps/functions/operators#disambiguation-operator

However, even with that, and probably since it’s happening in a different scope, that in-gallery Lookup call does not know which attributes should be added to the request, and I have to mention all those attributes in the same scope.

And, of course, it’s just me reflecting on the ad-hoc workaround, so, even though it seems to make sense, I am not sure I’ve covered everything. What’s more important, I am still not sure of the exact “method” the framework is using to identify the attributes which will be added to the CDS query (but, at least, it seems I know, now, how to force it to add those attributes if some of them are missing).


When “required” field validation is not client-side only anymore

$
0
0

When working with the model-driven applications, we can make a field required, but, normally, that would not make any difference for server-side processing. That field will be required on the form:

image

But I would have no problem at all using “empty” value for that field through the API/SSIS/etc. Or, as in the case below, by importing those changes back to CDS through Excel Online:

image

Here is the end result – the field is empty now:

image

So, what if the field were not required through the configuration, but there were a business rule that would make it required?

As you can see below, I’ve updated field configuration to make that field optional:

image

Now let’s add an entity-scoped business rule:

image

That rule would make the field required when there is some value in the “Name” attribute.

Would it be required all the time now? This is where things are getting interesting.

It is definitely required on the form now, so I just put some text value into the field:

image

I can open Excel Online and make a change, though. Instead of “Updated value” which is there at this point:

image

I’ll put empty value in the field:

image

It’s not a problem, it seems. Actually, it’s what I would expect since it’s what I always used to think – “required” fields are only validated on the client:

image

Now what if I open Excel Online again and modify the “Name” of that record?

image

There will be an import error this time:

image

And the error would tell me that my test attribute is, actually, required:

image

Even though I have not even touched it this time around.

To summarize. This kind of business rule will kick in because it will be triggered by an update of the field used in the business rule condition. From there, “Entity”-scoped rule will enforce required level on the server side, no matter if the fields affected by the rule are modified or not as part of the operation. In other words, somewhat unexpectedly this kind of rule will enforce server-side validation… but only if it gets triggered.

Updated filtering in Model-Driven Apps/Dynamics

$
0
0

Social distancing has definitely took a toll on my blogging – it’s been a while since the last post. Although, I’ve actually learned quite a few things outside of PowerPlatform in the last month, so I could probably start blogging about a few other things now:

  • How to teach math fractions
  • How to build wooden tank models from the stuff we have in the garage
  • How to set up a volcano model in your kitchen safely
  • How to bake bagels…


However, Power Platform  has, finally, caught up with me when a co-worker showed me how filtering in model-driven apps works differently now. I think I like it. Although, the reason it came up in the first place is that the users were complaining. Well, at least it’s not on us that this change has happenedSmile But what exactly is different now?

image

Basically, there are 3 changes.

1. Column sorting

There is a drop down there which combines “sort” and “filter” options. It’s not enough to click on the column header now to get the grid sorted – we need to open the drop down and choose a sorting option.

Note: you can still hold “Shift” button to sort on more than one column

2. Filter by

When using the Filter by, you can choose a filter:

image

Which, for a lookup field, will give you a lookup popup:

image

And, for an optionset, will allow you to check off multiple options:

image

3. And this all brings us to the “Advanced Filter”

Which sounds strangely familiar, but it’s not the same as “Advanced Find”.

image

The query builder interface there, even though it seems to be very similar to what it looks like in the advanced find, is somewhat different. And, unlike the advanced find, it actually does pick up on all those individual column filters which I have set up in the “current session”

image

Which, in general, seems to be working quite well. Although, would not it be great if I could also save that query as a personal view? It seems I can’t, yet.

This is all part of the release wave 1, and, if we were paying more attention, we could have given the client a bit of an advance warning. It does not seem to be that disruptive, though, except for the sorting which now requires two clicks instead of one.

And the only other thing I have not mentioned yet is that, once using “Advanced Filter”, you’ll see those additional indicators that an advanced filter has been applied:

image

For some reason, those indicators won’t be showing up when using a column filter, so just keep that in mind when troubleshooting with the usersSmile

Are there hidden solutions in Power Apps?

$
0
0

I was troubleshooting missing dependencies earlier today, and, after some digging, uncovered a hidden solution in the environment. I could see that solution when looking at the layers:

image

And I certainly could not see it in the list of solutions neither in the old interface, nor in the new one.

Well, there is always a way to bypass smart filtering and just look at the whole list of solutions using web api, so, of course, the solution is there:

image

It’s just marked as “not visible” (“isvisible”: false on the screenshot above)… Huh? Anyway, that’s, likely, the reason why this solution is not showing up in the portal where it should be displayed right after the highlighted solution below:

image

Turned out we can still see those hidden solutions (with the proper application of URL-s), even though this is where power apps portal won’t work since it’ll keep displaying spinning progress indicator:

https://make.powerapps.com/environments/<your env id>/solutions/<solution id you can get from web api>#

image

However, there is still classic solution designer which comes in handy in such cases:

https://instance_url/tools/solution/edit.aspx?id={solution id you can get from web api}&utm_source=MakerPortal#

image

And, yes, that’s where the dependencies were missing somehow. That’s another story, though.

Quick Find – when did it get fixed?

$
0
0

I have certainly missed some news. Apparently, quick find in the unified interface now works as it has always been expected to work (but never did):

  • It’s now using selected view columns
  • And it’s now applying selected view filters

If I were reading release wave 1 plan more carefully, I would have noticed the following there:

What does it mean in practical terms? In the classic interface (and that’s how it used to be in the unified interface until recently), quick find would switch view columns/filters, so, if I started with “My Active Contacts”:

image

I would get a different view as a result once I’ve provided a search phrase:

image

This has always been confusing and needed explanations when presenting to the users.

In the unified interface, it works as it should now.

If I start with “My Active Contacts” view:

image

It’s also going to be the view used to display / filter the results once I’ve provided a search phrase:

image

Using SQL Management Studio with CDS

$
0
0

Just got to play with the latest cool feature, which is using SQL Management Studio to connect to CDS environments. You’ll find the documentation here:

https://docs.microsoft.com/en-us/powerapps/developer/common-data-service/cds-sql-query

If you have not seen what it looks like, here is an example:

image

To set it up, you just need SSMS v18.4, and don’t forget to configure your environment to enable TDS endpoint. Which you can do with the help of this solution, for example:

https://github.com/seanmcne/OrgDbOrgSettings/releases

Just need to update the setting below before you try connecting SSMS to the environment;

image

And then it just works. From my very quick testing so far, here are some observations – they are not making this feature less exciting, but this is just something to keep in mind:

  • RetrieveMultiple plugins are not working when you are querying data in SSMS. There are lot of solutions which would be using those plugins for localization/security, and, it seems, SSMS is just bypassing them, so that’s something to keep in mind
  • Looking at the speed of those queries, it seems they are running directly against the database (no fetchxml involved)
  • This is not the same as having access to the on-prem database – there are no views, for example
  • If you have lots of data, I’d suggest using TOP X in your SELECT queries. Or it may take quite a bit of time to get the results
  • All data is read-only (which you can see on the first screenshot above, next to the database name). In either case, UPDATE statements etc are not supported. Which is understandable since they would have to go through the API

Canvas App Code Reuse Tool for XrmToolBox has just been listed in the repository

$
0
0


The Canvas App Code Reuse tool has just been listed, so it should be much easier to install it now:

image

Just a quick summary:

  • You can use this tool to do implement repeatable code in your canvas apps
  • Essentially, you’ll do a bit of mark up to identify places in your canvas app where the code should show up, and the tool will do all required markup replacements for you


Since I already have a separate page for this tool, just have a look there for more details:

https://www.itaintboring.com/canvasappcodereuse/

Advanced Find: the relationship you are adding already exists in the query

$
0
0

I was looking at this post by CRM Ninja, and it hit me that, even though that post had a different purpose, it had an interesting workaround for the “one relationship only” problem which happens when trying to add the same relationship more than once to the query. For example, on the screenshot below, I just tried adding Tasks one more time:

image

Why would I wanted to do it? What I wanted to find all contacts where there are both “Important” and “Not important” tasks? Such as this one below:

image

If I used “or” condition on the linked task, that would give me contacts with both or one of those tasks. But I need “both”.

If I used “and”, it would not work, apparently, since none of the tasks can be important and not important at the same time.

However, I can do it this way to get the contacts I want:

image

Basically, the first condition would limit my contacts to those which have “Important” tasks. But, from there, I’d go back to the contacts(and that would be the same contact, since it’s just going back through the same relationship)… then again to the tasks… to make sure there are, also, “not important” tasks.

It may feel somewhat convoluted with this kind of looping through the relationships, but it does the trick.

Thank you CRM NinjaSmile


We can now do column comparison with Fetch/Web API!

$
0
0

Wow, we’ve been asking about it for a (long) while:

image

https://powerapps.microsoft.com/en-us/blog/announcing-column-comparison-through-fetchxml-sdk-and-odata/

Do you want to do column comparison with Fetch? You can do it now – it’s only supported for a few conditions so far:

  • Equal
  • NotEqual
  • GreaterThan
  • GreaterEqual
  • LessThan
  • LessEqual


And it’s not, yet, supported in the UI query building tools (Advanced Find). And it can only be done within the entity, but… with all those limitations, which will hopefully go away over time, I can still do this, for example:

Find all accounts where primary contact’s email address is identical to the the account’s email address

Did not I just say it only works within the same entity? Yeah, but… It’s problem solving 101 – lets reduce this more complicated problem to the problems we can solve.

1. No multiple entities allowed? Let’s create a calculated field and populate it from the primary contact

image

2. Can’t use the UI to build that query yet? XrmToolBox to the rescue

image

And here we go:

image

And if you wanted to utilize this in the system views, you might just use View Designer tool in XrmToolBox to update a system view:

https://www.xrmtoolbox.com/plugins/Cinteros.XrmToolBox.ViewDesigner/

Using application monitor to troubleshoot Model-Driven apps

$
0
0

You may have heard that we can now use Monitor with model-driven applications. It can provide some very useful context about the client-side behavior of your apps, but there is one option which may be particularly useful when troubleshooting end-user issues.

It seems this process is supposed to be done through the “Invite” button below:

image but there are a few things which did not work for me when I tried doing it that way, so here is a workaround for now.

Using your own account, open Monitor page for your app from the maker portal:

image

Once the monitor shows up, click “Play Model-Driven App”

image

Copy the url so you can send it to the user

On the screen below, do not choose “join” right away – first, copy the url from the browser address bar:

image

Then send that url to the user and click Join

Once the user receives the url, they can open that url in the browser, join the session, and you will see all their session details in your original monitor session:

image

How/why is this helpful?

Well, you can spare your users from having to send you the log files to start with, and, besides, you may be able to see not just the error itself in the monitor session, but, also, a lot of contextual client-side information about the error itself, and, also, about the client-side events which happened before or after the error and which might have lead to the error.

When would onSave form event occur in model-driven apps?

$
0
0

We can use three different functions to save a form:

  • formContext.data.entity.save
  • formContext.data.save
  • formContext.data.refresh(true…)


Off the top of your head, do you know which one will result in the “onSave” form event and when?

Those details might not be quite obvious when looking at the documentation for each of the functions separately, but there is a documentation for the onSave event which gives us the answer:

https://docs.microsoft.com/en-us/powerapps/developer/model-driven-apps/clientapi/reference/events/form-onsave

image

Notice the difference between formContext.data.entity.save and the other two. Whether onSave will be called or not depends on whether there is unsaved data for those, but it does not matter for the formContext.data.entity.save. It’s one of those strange cases where onSave will actually be called even if there is no changed data to be saved. Which makes it an equivalent of the “save” button (see the first bullet item).

Why would it matter? I am actually having a hard time coming up with the scenarioSmile Except, possibly, if you have some custom logic in the onSave that is supposed to kick in whenever the user clicks “save” button (counting save button clicks? Well…), and that logic might not kick in when formContext.data.save or formContext.data.refresh is used.

Viewing all 554 articles
Browse latest View live